To start a food blog, choose a specific cuisine or cooking style, pick a name, register a domain, get WordPress hosting, build the site with an AI WordPress builder or by hand, set up a recipe-friendly structure, then publish well-tested recipes with clear photos on a steady schedule. The setup can be finished in an afternoon. What separates a food blog that grows from one that stalls is whether every recipe actually works when a stranger cooks it in their own kitchen.
This guide is written for food blogging for beginners. It covers how to start a food blog step by step with real screenshots of the setup, a first-year cost breakdown in rupees, food blog ideas for India, building the whole site automatically with an AI WordPress website builder, recipe schema so your pages can show up as rich results, and the photography, legal and monetization details most guides rush past.
What Is a Food Blog?
A food blog is a website built around recipes, cooking techniques and food stories, usually organised around a cuisine, a cooking style or a specific kind of reader. The strongest food blogs are not just photo albums of meals. Every recipe is tested enough times that a reader who has never cooked that dish before can follow it and get the result shown in the photo.
Why Start a Food Blog in 2026?
- Recipe searches never stop: people search for dinner ideas, festival sweets and healthy meals every single day, and a well-tested recipe keeps earning visits for years.
- Video is not a replacement: short cooking clips drive discovery, but viewers still come back to a written page for exact quantities and timings.
- Regional Indian food is under-covered: many popular food sites lean heavily on a handful of cuisines, leaving entire regional kitchens with few detailed, reliable guides.
- Several income streams: display ads, affiliate links for kitchen tools, sponsored recipes and digital cookbooks.
- A portfolio for real opportunities: brands, kitchen appliance companies and publications look for creators with a working, well-photographed website.
How Much Does It Cost to Start a Food Blog in India?
A self-hosted WordPress food blog costs less than a single grocery run for a photoshoot. Here is a realistic first-year budget:
| Item | Cost | Notes |
|---|---|---|
| Food blog domain (.com or .in) | ₹0 in year one | Bundled free with the hosting plans below |
| WordPress hosting | From ₹119/mo | 3-year term with a free domain; ₹59/mo plan without one |
| AI website builder | Included | 5 AI site generations on the DaProfessional and DaElite plans |
| SSL certificate | Free | Included with hosting |
| Recipe card plugin | Free to start | Premium versions add nutrition calculators and video support |
| Camera and props | ₹0 to start | A phone camera and a window for natural light are enough at first |
How to Start a Food Blog in 2026: Step-by-Step
Step 1: Choose Your Niche From These Food Blog Ideas
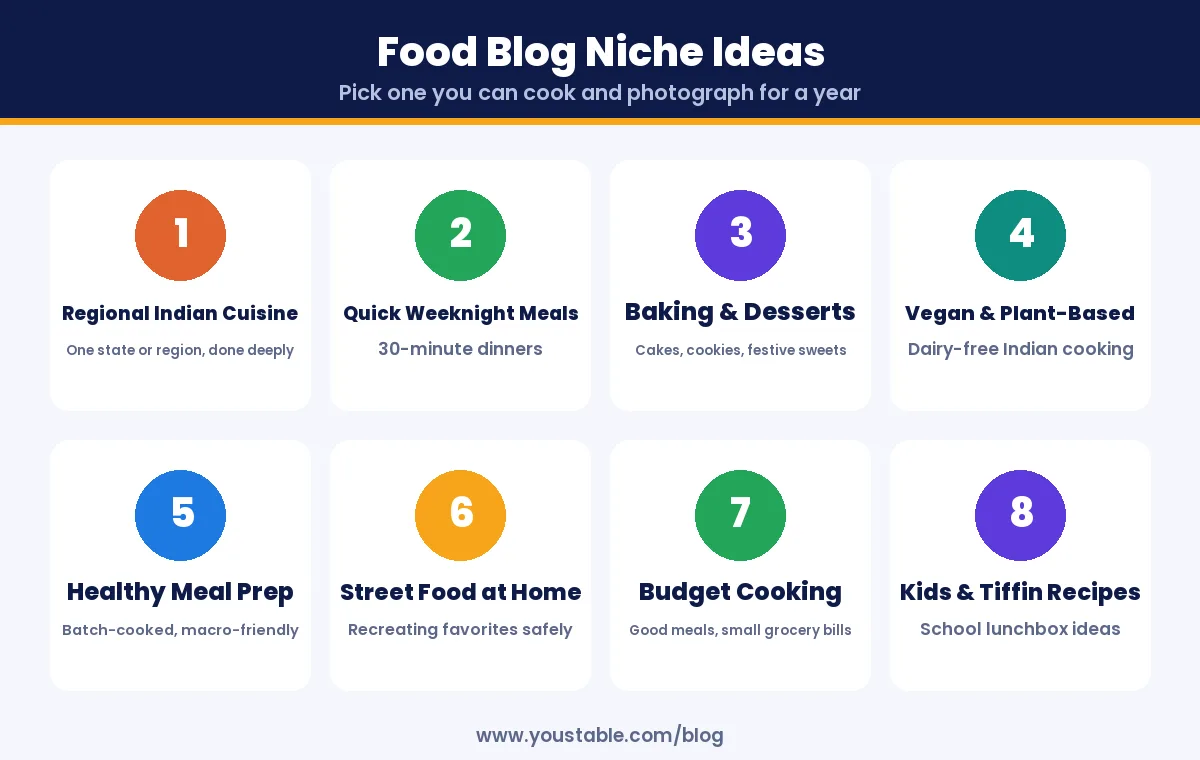
Anyone researching how to start a food blog eventually hits this fork: go broad or go deep. A food blog that tries to cover every cuisine competes with publications that have entire teams. A narrow niche lets a single person build real authority. Before you commit, ask whether you can name thirty dishes within that niche without reaching for a search engine.
| Food Blog Niche | Example Post Idea |
|---|---|
| Regional Indian cuisine | A home-style Konkani fish curry, step by step |
| Quick weeknight meals | Five 20-minute dinners for a busy workweek |
| Baking and desserts | Eggless chocolate cake for a small kitchen |
| Vegan and plant-based | Dairy-free paneer substitute, tested three ways |
| Healthy meal prep | A week of high-protein vegetarian lunchboxes |
| Street food at home | Pani puri water, four regional variations |
| Budget cooking | A full week of meals under a fixed grocery budget |
| Kids and tiffin recipes | Ten lunchbox ideas kids actually finish |
Pro tip
Cook from your own niche for two weeks before you register a domain. If you run out of new ideas within those two weeks, the niche is too narrow to sustain weekly posting. If new ideas keep appearing faster than you can cook them, you have found the right one.
Step 2: Pick a Memorable Food Blog Name
- Keep it easy to say out loud: food blogs get recommended verbally far more than most other niches.
- Avoid locking in one dish: a name built around a single recipe becomes awkward once your content grows.
- Check it is not already a restaurant or packaged food brand in your city, which causes confusion and search overlap.
- Secure matching handles on the platforms where food content performs best, since photos and short videos will travel there first.
In this guide we use the example name spicewithsanya, which keeps the door open for any dish while still sounding personal.
Step 3: Get a Domain Name and WordPress Hosting
A food blog lives or dies on its photos, and photos are heavy. Two things decide whether your site stays usable as it grows: your domain, which is the address readers remember, and hosting, which has to serve full-size images quickly without slowing the page down. Look for WordPress hosting with NVMe storage, built-in caching and a free SSL certificate.
3.1 Search for your food blog domain name
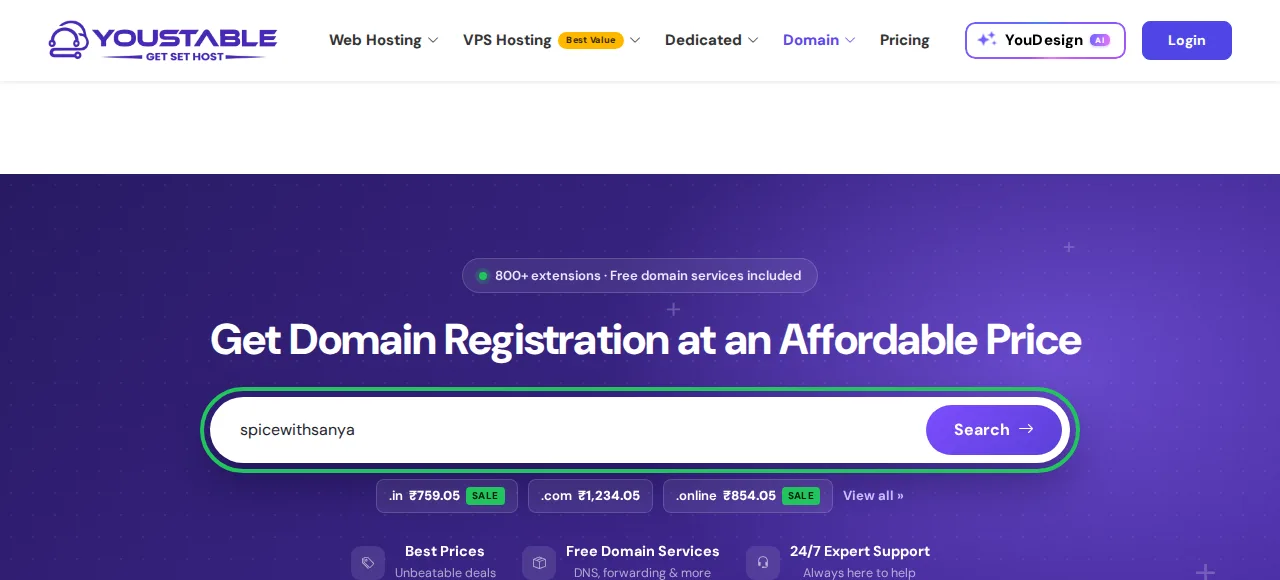
Open a domain registration page, type your chosen name and click Search.
3.2 Confirm the domain is available
A green confirmation like this one means the name is free to claim. A .com travels well internationally, while a .in tells Indian readers immediately that the recipes are made for their kitchen.

You could register this domain by itself, but it is usually cheaper to claim it as part of a hosting plan, which the next step covers.
3.3 Choose a WordPress hosting plan
Compare the WordPress hosting plans. For a food blog that will carry hundreds of photos over time, the middle plan is a practical starting point: it bundles a free domain, room for up to 25 websites and 5 AI site generations, which the next step uses to build the site automatically.
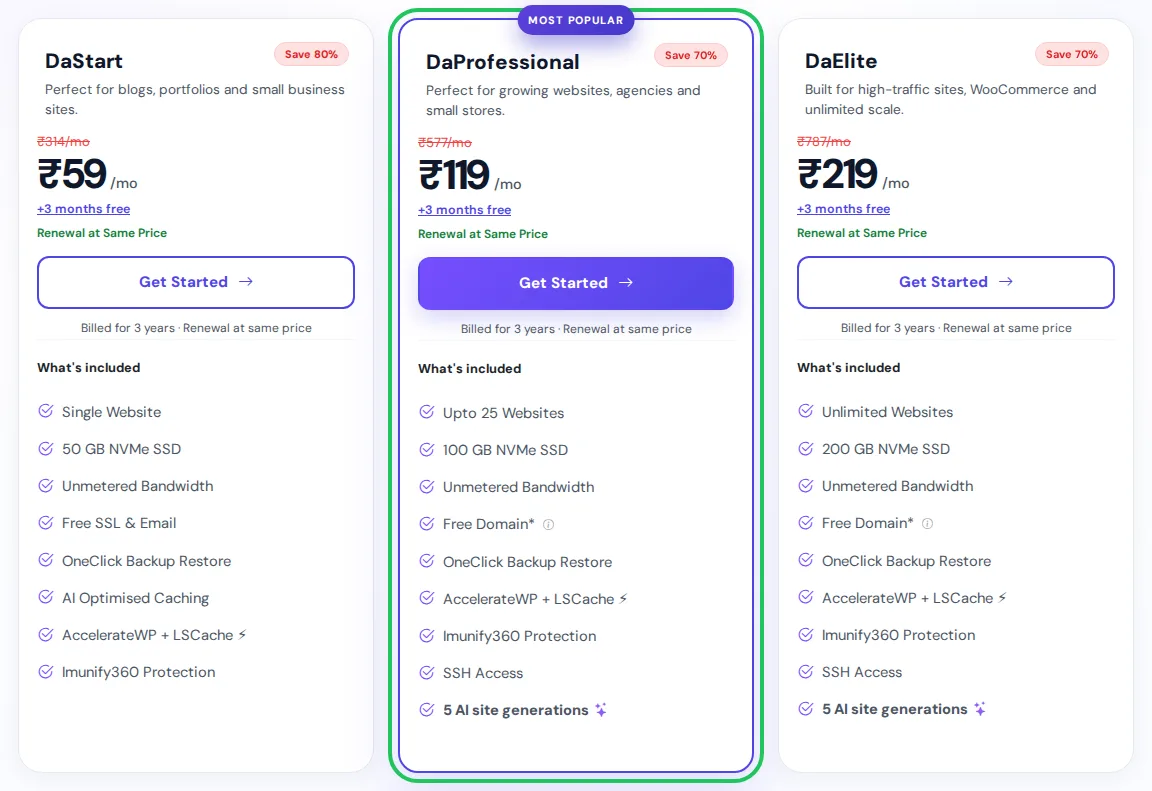
| Plan | Best For | Key Features | Price (3-year term) |
|---|---|---|---|
| DaStart | One food blog, domain already owned | 1 website, 50 GB NVMe, free SSL | ₹59/mo |
| DaProfessional | New food bloggers | Up to 25 websites, 100 GB NVMe, free domain, 5 AI site generations | ₹119/mo |
| DaElite | Photo and video-heavy food sites | Unlimited websites, 200 GB NVMe, free domain, 5 AI site generations | ₹219/mo |
3.4 Register your free domain with the plan
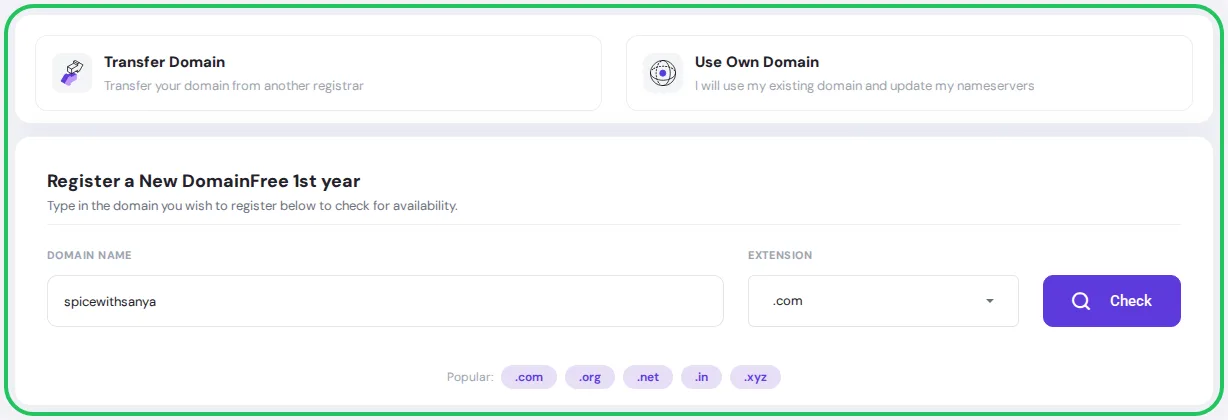
After picking a plan, choose Register a New Domain, type your blog name, select the extension and click Check. Choose Use Own Domain instead if you already hold one.
3.5 Choose your billing cycle
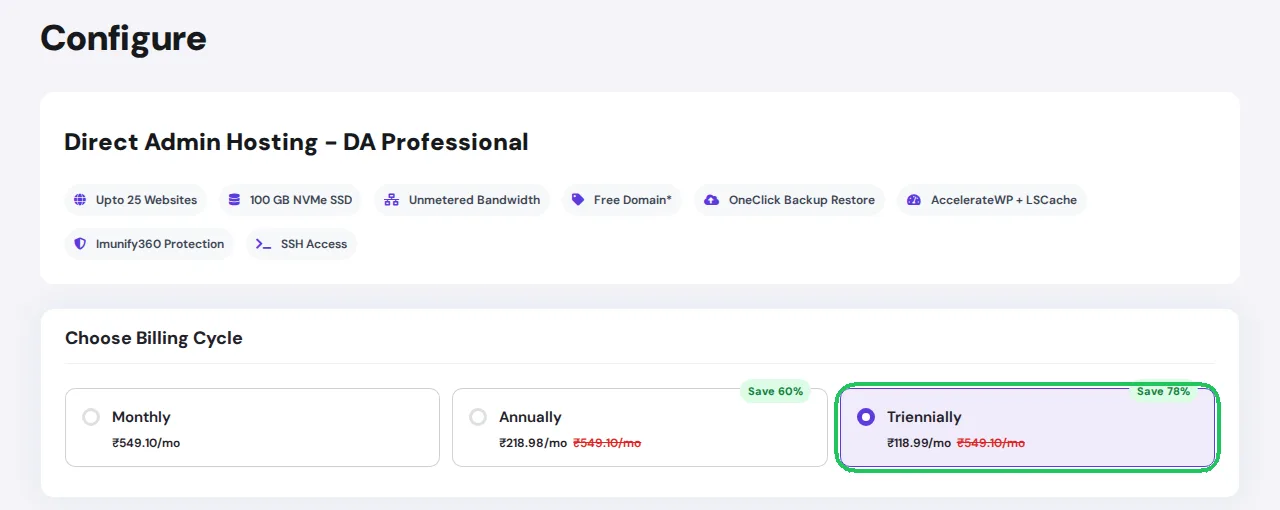
A longer billing cycle drops the monthly rate considerably. During our test checkout, the DaProfessional plan on a 3-year term showed ₹118.99 a month, which came to ₹4,283.55 for the full term before tax, and ₹5,054.59 once 18% GST was added.
3.6 Review your order and complete checkout
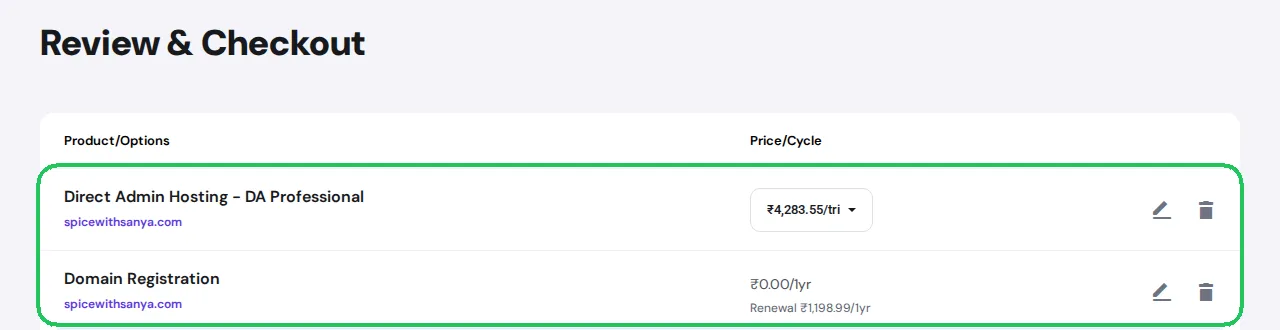
The review screen lists your hosting plan next to the domain, with the domain line showing ₹0.00 for the first year because the free-domain offer has already been applied. Confirm the spelling, continue to payment, create your account and pay. Hosting is usually active within minutes.
Pro tip
Pick the extension before you fall in love with a specific word. If spicewithsanya.com is gone but spicewithsanya.in is free, the .in version usually serves an Indian food blog just as well, and you keep the exact name instead of adding numbers or hyphens to fit a taken .com.
Step 4: Build Your Food Blog Automatically or Manually
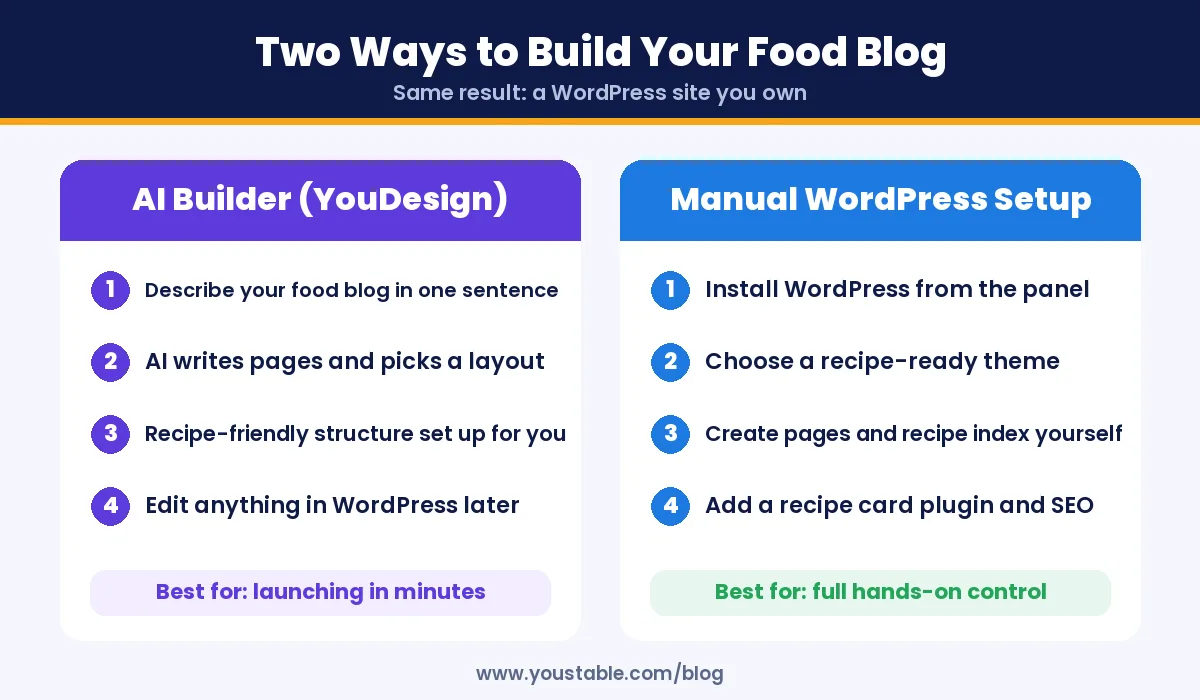
This is the step where how to start a food blog turns from a plan into a real site. With hosting active, pick the path that fits your time. Both end in a normal WordPress site, so the real decision is whether you would rather describe your blog once or build each page yourself.
Option A: Let YouDesign Build Your Recipe Site
YouDesign can put together the first version of your food blog while you focus on recipe testing. Describe your blog in plain language, and it writes starter copy, lays out the pages and sets up basic SEO, handing you a real WordPress site rather than a page builder you cannot move away from later.
- Describe your food blog: type a clear sentence in the Describe the website you need box, up to 2,000 characters.
- Click Build this site: the AI generates layout, pages and starter content.
- Replace sample recipes with your own: swap in your tested dishes, photos and voice.
- Publish: your recipe index and categories are live, ready for the first real recipe.
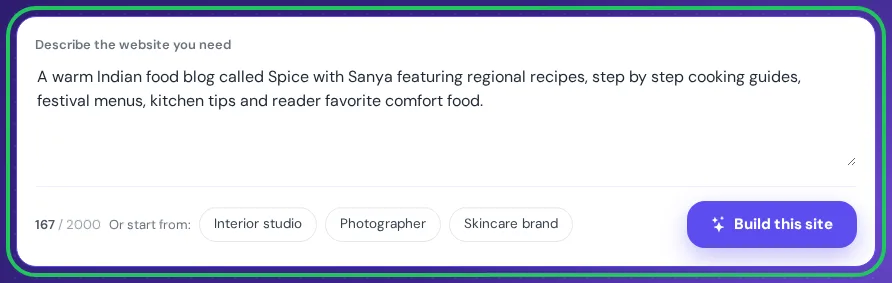
The prompt used above, ready to adapt to your own cuisine:
A warm Indian food blog called Spice with Sanya featuring regional recipes, step by step cooking guides, festival menus, kitchen tips and reader favorite comfort food.Pro tip
Name your cuisine and your signature content format in the prompt, such as five-ingredient Bengali recipes with a fifteen-minute cook time rather than just a food blog. The more specific the prompt, the closer the generated recipe index and categories land to what you will actually publish, which saves a restructuring job later.
Treat the AI draft as scaffolding, not a finished voice. Rewrite any recipe instructions yourself and test them in your own kitchen before publishing, since accuracy matters more here than almost any other niche. For more detail on the builder itself, see how to build a WordPress website using an AI website builder.
Option B: Install WordPress manually
Prefer to choose every theme and plugin yourself? Open the one-click installer in your hosting control panel, select WordPress and point it at your domain. Name the site, create a login that is not admin, choose a strong password and enter your email, then run the install. Our guide on how to install WordPress in DirectAdmin walks through each screen.
Step 5: Set Up a Recipe-Friendly Site Structure
- Permalinks: set them to Post name so URLs read like spicewithsanya.com/dal-tadka-recipe.
- Recipe Index page: one page that lists every recipe, filterable by course, cuisine or diet.
- Categories by course and cuisine, such as Breakfast, Main Course, Desserts and Regional, rather than one long undivided list.
- About page: who is cooking, your background with the cuisine and why readers should trust the recipes.
- Privacy policy and contact page, required if you plan to run ads or collect emails.
Step 6: Install a Recipe Card Plugin and Essential Plugins
| Purpose | What It Does for a Food Blog |
|---|---|
| Recipe card plugin | Structured ingredients, steps, timing and built-in recipe schema |
| SEO plugin | Titles, meta descriptions, sitemaps and FAQ schema |
| Caching plugin | Keeps image-heavy recipe pages fast |
| Image optimisation | Compresses photos without losing detail |
| Email signup form | Builds a list for new recipe alerts |
| Security plugin | Login protection and malware scanning |
A recipe card plugin does the heaviest lifting here, since it formats ingredients and steps for readers while generating the structured data search engines need. See our list of top WordPress security plugins for the protection layer.
Step 7: Get Your Recipe Schema Right
Recipe schema is the structured data that lets a recipe page qualify for rich results, the listings with a photo, star rating and cook time that stand out in search. A recipe card plugin generates most of this automatically, but you still control the content that fills it in.
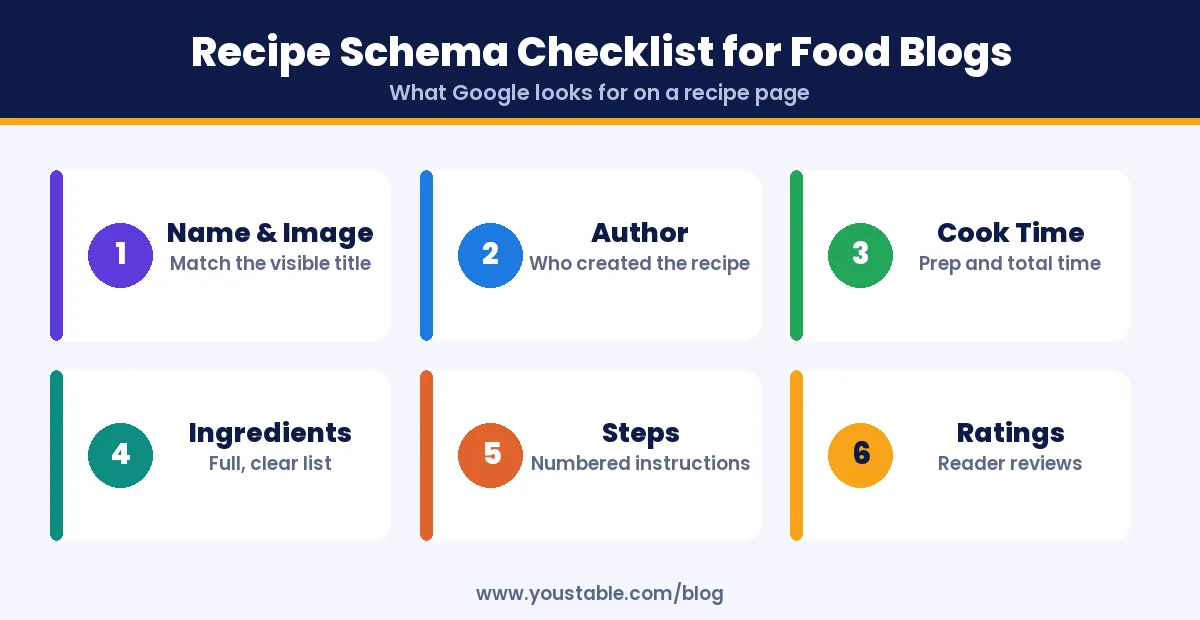
- Recipe name and image: keep both matched to the page’s visible title and hero photo.
- Author: credit whoever actually tested and wrote the recipe.
- Prep time and cook time: measure these honestly rather than rounding down to look quick.
- Full ingredient list with exact quantities, not approximate ones.
- Numbered steps written in the order you actually cooked them.
- Ratings and reviews once readers start leaving them, which build long-term trust for the page.
Pro tip
Valid schema makes a page eligible for a rich result, not guaranteed one. Google still decides whether to show it. Your best lever is the same one that was true before structured data existed: a genuinely clear, accurate recipe that readers finish cooking and come back to.
Step 8: Shoot Photos That Make People Want to Cook
- Use natural light near a window instead of a kitchen’s overhead bulb, which casts a flat, yellow tone.
- Shoot at an angle readers can read ingredients from, usually straight down or at 45 degrees, depending on the dish.
- Keep the background simple so the dish stays the focus, not the props around it.
- Capture one process shot that shows a key step, which helps uncertain cooks trust the recipe.
- Compress before uploading: convert photos to WebP and resize to the width your theme displays, so pages still load fast.
Step 9: Write Recipes People Can Actually Follow
A recipe post earns trust through precision, not length. Give every post the same dependable shape:
- A short intro that says what makes this version worth making.
- Exact ingredients and quantities, with common substitutions noted.
- Numbered steps that match what you actually did, including timing cues.
- Storage and reheating notes, since many readers cook in batches.
- Allergen and dietary notes, such as nuts, dairy or gluten, stated plainly near the top.
Pro tip
Cook every recipe a second time, weeks after the first test, using only your own published instructions and no memory of how you originally made it. Gaps readers would hit, a missing resting time, an unclear pan size, usually surface the moment you try to follow your own page cold.
Step 10: Follow a Seasonal Food Content Calendar
Timing is an underused lever in how to start a food blog that actually grows. Food searches in India follow festivals and seasons closely. Publish three to five weeks ahead so your recipes are indexed before readers start searching.
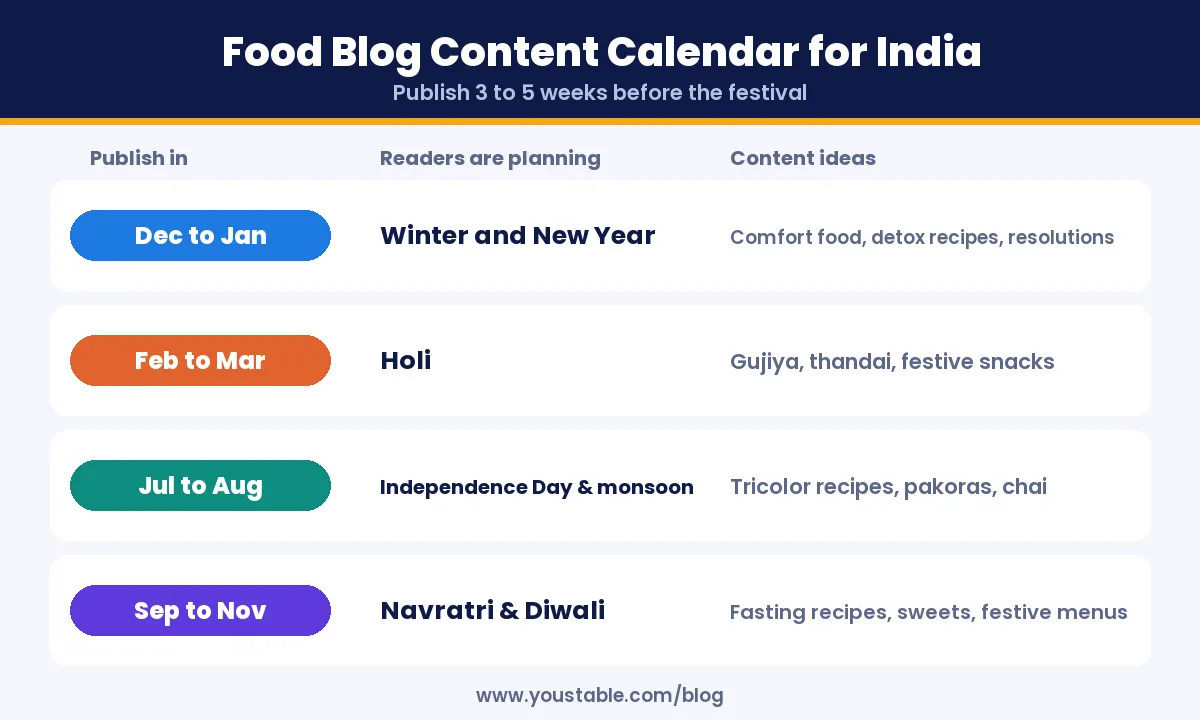
| Publish In | Occasion | Content Ideas |
|---|---|---|
| December to January | Winter and New Year | Comfort food, detox recipes, resolution-friendly meals |
| February to March | Holi | Gujiya, thandai, festive snacks |
| July to August | Independence Day and monsoon | Tricolor recipes, pakoras, chai pairings |
| September to November | Navratri and Diwali | Fasting-friendly recipes, sweets, festive menus |
Step 11: Promote Your Food Blog
- Short recipe videos: show one striking step in a reel and send viewers to the full written recipe for exact measurements.
- Visual search platforms: tall, well-lit recipe pins drive steady long-term traffic.
- Email list from day one: offer a small recipe collection in exchange for an email address.
- Local food groups and communities: share genuinely useful recipes rather than only self-promotion.
- Track performance: connect Google Search Console to see which recipes already bring visitors and refresh those first.
Step 12: Make Money From a Food Blog
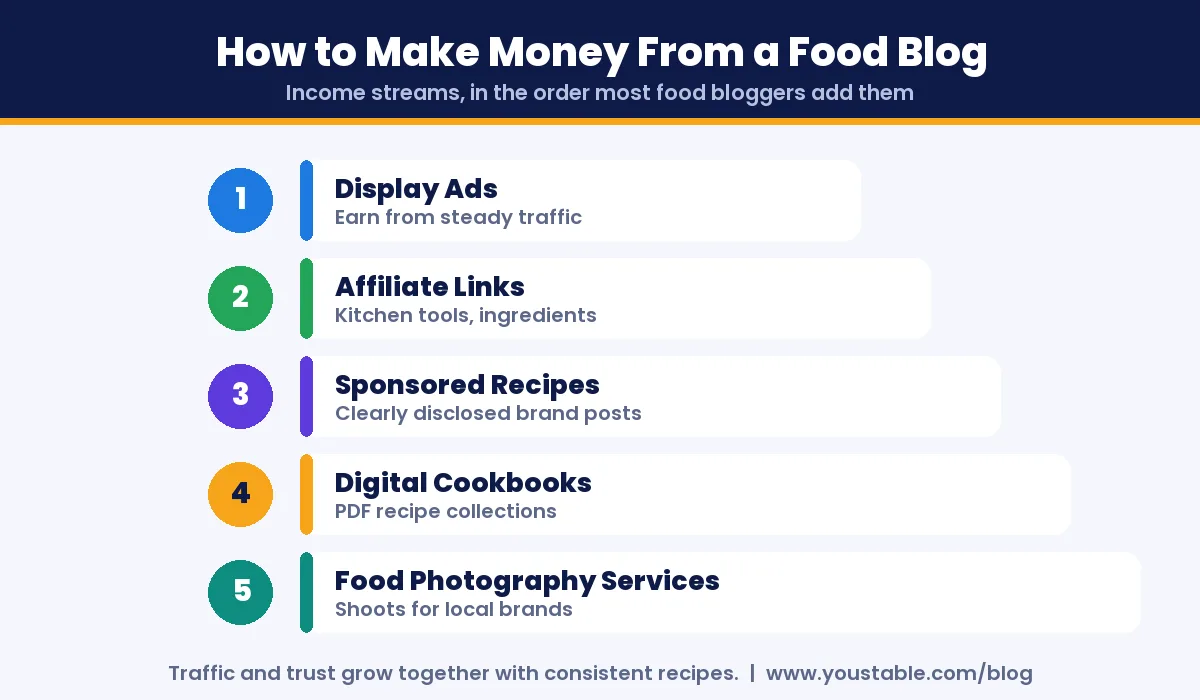
- Display ads: networks place ads around your recipes once visitor numbers climb.
- Affiliate links: kitchen tools, specific ingredients and cookbooks you genuinely use.
- Sponsored recipes: a brand pays to feature its product in a recipe, always clearly disclosed.
- Digital cookbooks: a themed PDF collection of your best-tested recipes.
- Food photography services: local restaurants and brands often need the same photo skills you build for your own blog.
Disclose every sponsored post and affiliate relationship clearly, in line with the Advertising Standards Council of India‘s influencer advertising guidelines. For affiliate-heavy plans, see how to create an affiliate marketing website.
Pro tip
Your highest-traffic recipe is usually also your best advertising space, not your newest post. Once a recipe is bringing steady search visits, that page is where an affiliate link to the exact pan or spice you used will actually get clicked, because the reader is already mid-recipe and looking for it.
Step 13: Keep Your Food Blog Fast, Secure and Backed Up
- Watch page speed: years of recipe photos add up, so recheck speed periodically and follow our checklist to fix a slow WordPress site.
- Automatic backups with at least one copy kept off the server. Our guide covers how to back up your website safely in detail.
- A unique admin password with two-factor authentication turned on.
- Regular updates for WordPress, your theme and every plugin.
Common Mistakes When You Start a Food Blog
- Publishing untested recipes: a dish that fails for one reader can cost you their trust permanently.
- Skipping exact measurements: approximate quantities frustrate anyone cooking the recipe for the first time.
- Uploading huge, unedited photos that slow down every recipe page.
- Covering every cuisine at once instead of building depth in one.
- Leaving out allergen information that some readers genuinely need.
- Posting rarely: recipe search rewards consistency more than occasional, long gaps.
Curious about other niches? Our guides on how to start a travel blog and how to start a fitness blog follow the same real-screenshot approach.
FAQs
How do I start a food blog with no experience?
Choose one cuisine or cooking style you already cook well, register a domain, get WordPress hosting, build the site with an AI WordPress builder or a one-click WordPress install, then publish recipes you have personally tested at least twice before sharing them.
How much does it cost to start a food blog in India?
A self-hosted food blog starts from about ₹119 per month on a 3-year WordPress hosting term, which includes a free domain for the first year. WordPress itself and a basic recipe plugin are free, so photography time is usually the bigger cost.
What is recipe schema and do I need it?
Recipe schema is structured data that tells search engines the name, author, cook time, ingredients and steps of a recipe, which can make the page eligible for rich results with a photo and rating shown in search. Most recipe card plugins add it automatically once you fill in the recipe fields.
Can I build a food blog automatically with AI?
Yes. An AI WordPress website builder such as YouDesign can generate the layout, pages and starter content for a food blog from a one-sentence description. You should still test and rewrite every recipe yourself before publishing, since accuracy is what readers depend on.
What are good food blog ideas for beginners in India?
Strong starting niches include one regional Indian cuisine done in depth, quick weeknight meals, baking and desserts, vegan Indian cooking, budget meal plans and kids tiffin recipes. A narrow niche is easier to rank and easier to keep writing about.
How do food bloggers make money?
Food bloggers typically earn through display ads once traffic grows, affiliate links for kitchen tools and ingredients, sponsored recipes with brands, digital cookbooks and, for some, food photography services for local businesses.
How often should I post new recipes?
One to two well-tested recipes a week is realistic for most beginners. Consistency and accuracy matter more than volume, since a single recipe that fails for readers can undo the trust built by several good ones.
Conclusion
Now you know how to start a food blog step by step: pick a niche you can cook from for years, choose a flexible name, set up your domain and WordPress hosting, build the site automatically with an AI builder or by hand, structure it around recipes from the start, and get your schema, photos and seasonal timing right. The setup is an afternoon’s work; what readers remember is whether your recipe worked the first time they tried it.
The hardest recipe to publish is the first one. Get your domain and hosting sorted today, write up the dish you make best, and let the next one follow once readers start asking for it.