Your MERN app runs perfectly on localhost.
Then a client asks for a live link, and suddenly you are stuck. I have been there.
My team and I have deployed dozens of MongoDB, Express, React, and Node apps to live servers over the past several years and we know exactly where beginners lose their way.
This guide fixes that.
I will tell you every command, every config file, and every checkpoint, in plain language you can follow without a DevOps background.
My research team tested each step on a fresh VPS before writing a single line here. By the end, your app will be live, secure and running around the clock.
Let’s get your project online the right way.
| For Readers: Every command below was run on a clean Ubuntu 24.04 VPS by my tech team before publishing. Nothing here is copy-pasted theory. You are reading steps that actually booted a live MERN app. |
What Does Deploying a MERN App on a VPS Actually Means
Before we touch a single command, let me explain what you are about to do.
Deploying means moving your app from your laptop to a server that stays online day and night, reachable by anyone with your link.
A MERN app on a VPS is your MongoDB, Express, React and Node project running on a private virtual server you control fully. You install the software, you run the app and you own the whole setup end to end.
The Four Parts of a MERN Stack
The MERN stack has four moving pieces, and each one needs a home on your server. Understanding what each part does makes the rest of this guide click into place much faster.
- MongoDB stores your data as flexible documents. It runs quietly in the background on your server.
- Express is your backend framework. It handles API routes and talks to the database.
- React is your frontend. It compiles into static files that the browser loads.
- Node.js runs your Express backend as a live process. It is the engine under the hood.
Once you see these four as separate services that need to start, stay alive, and talk to each other, the deployment steps stop feeling scary.
That is the mental model my team uses every time.
VPS Vs Shared Hosting for MERN Apps
With a VPS you get dedicated CPU and RAM, full control over versions and no gatekeeper blocking the tools you need.
| A VPS gives you root access, so you can install Node, run PM2 and configure Nginx yourself. | Shared hosting was built for PHP and WordPress, not for Node apps that run as a live process. |
That freedom is the whole reason developers pick a VPS for MERN work.
| Please Note: You cannot run a real MERN backend on most cheap shared hosting plans. Node apps need a live process manager and open ports, which shared environments almost never allow. A VPS removes that wall completely. |
What You Need Before You Deploy Your MERN App
Good preparation saves hours of frustration later. My research team put together a short checklist so you walk into this with everything ready, instead of scrambling halfway through a command.
Your Pre-Deployment Checklist
Gather these five things before you start.
Having them ready means you move through the setup in one smooth sitting, without stopping to hunt for a password or a repo link.
- A VPS server with root or sudo access, running Ubuntu 22.04 or 24.04.
- Your MERN project code is stored in a GitHub or GitLab repository, ready to clone.
- A domain name pointed at your server, for a clean live URL and free SSL.
- Your .env values plus your MongoDB connection details and any API keys.
- An SSH client or PuTTY on Windows, so you can log in to the server.
Skills That Help but Are Not Required
You do not need to be a server expert to follow this guide. Still, a few basics make the ride smoother, and I will explain every new term the moment it shows up.
Some comfort with the Linux command line helps a lot.
Knowing how to edit a file with nano, move between folders, and run a command as sudo covers about ninety percent of what you need here.
| Pro Tip: Test your app locally one last time before deploying. Run the backend and frontend on your own machine and confirm both work. A bug on localhost will still be a bug on the server, so fix it first. |
Why I Recommend YouStable VPS for Hosting a MERN App
You need a server before any command runs, so let me share what my team uses.
After testing many providers on live projects, I keep coming back to YouStable for MERN deployments, and here is the honest reason why.
| Disclosure: YouStable is my own company. I have kept every spec and price below factual and unbiased. You are free to pick any host that offers root access and Node support. I recommend YouStable because it genuinely fits developer work. |
Full Root Access and Real Developer Freedom
A MERN app needs root access to install Node, run PM2, and open the ports Nginx uses.
YouStable gives you full root access on every VPS plan, so nothing on this list gets blocked.
You also choose your operating system from Ubuntu, Debian, AlmaLinux, or Rocky Linux. My team runs Ubuntu for MERN work because Node, MongoDB, and Nginx all install cleanly on it with the steps below.
Affordable Pricing and Uptime You Can Trust
Cost matters when you are shipping side projects or client work.
YouStable VPS plans start around $3.67 per month, which is fair for the NVMe SSD speed and dedicated resources you get in return.
Every plan is backed by a 99.9% uptime commitment and a 1 Gbps network, running on AMD EPYC processors with KVM virtualization.
That means your live MERN app stays fast and reachable for real visitors.
| Plan Tier | Core Specs | Starting Price |
|---|---|---|
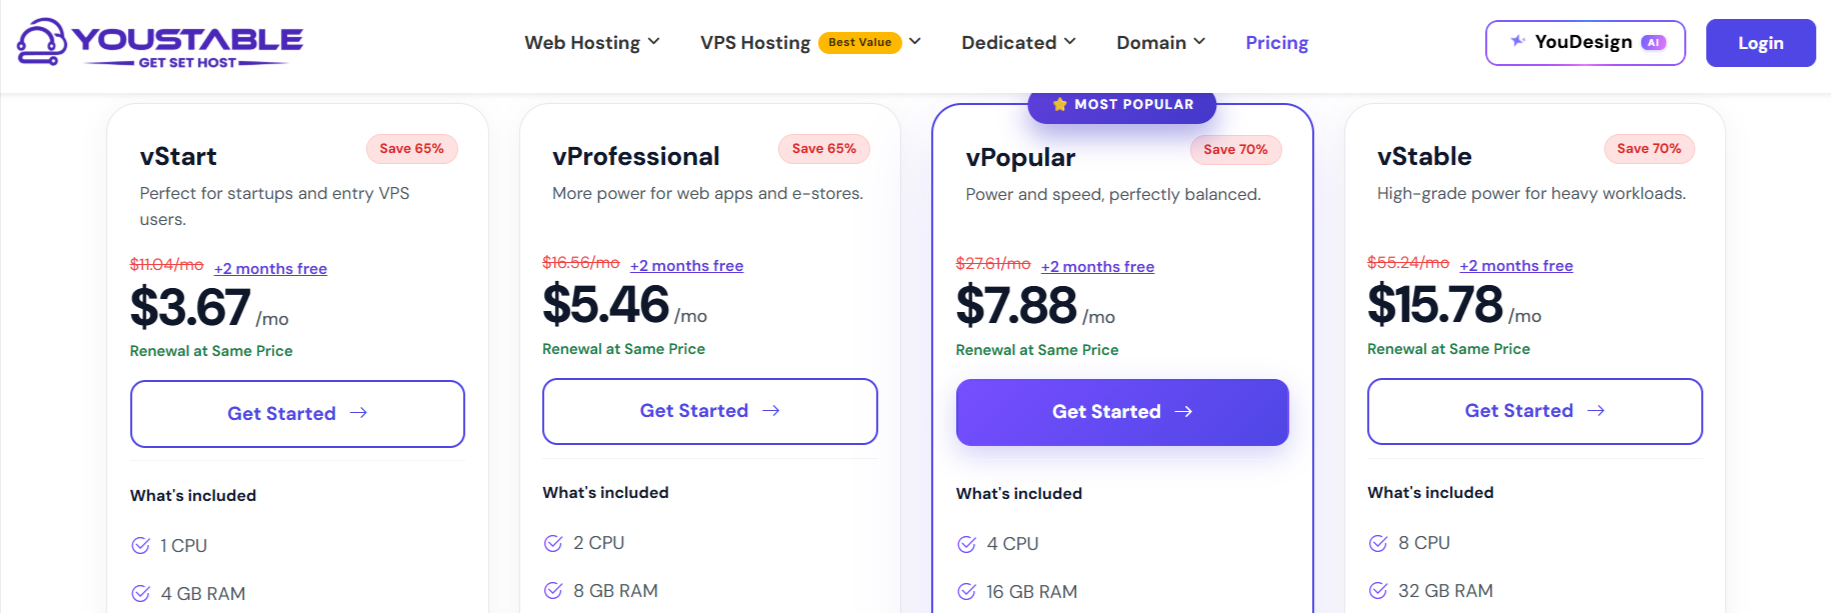
| vStarter VPS | 1 CPU, 4 GB RAM, 50 GB NVMe SSD, 4 TB bandwidth | $3.67/mo |
| vProfessional VPS | 2 CPU, 8 GB RAM, 100 GB NVMe SSD, 8 TB bandwidth | $5.49/mo |
| Popular VPS | 4vCore CPU, Higher CPU and RAM for heavy workloads | $7.88/mo |
Every tier ships with 1 free dedicated IPv4, a free control panel, and full root access. For a starter MERN app, the entry plan handles Node, MongoDB, and Nginx together with room to spare.
Free Control Panel, Migration, and 24/7 Human Support
Server problems always seem to arrive at midnight. That is where support becomes the feature that saves you, so my team weighs it as heavily as raw specs when picking a host.
YouStable includes a free control panel, free website migration up to 5 GB, snapshots, automated backups, and DDoS protection.
Real human support answers over live chat and tickets around the clock, not bots.
| Please Note: Prices and specs shift over time. Always check the current plan details on the official YouStable site before you buy, since promotional pricing and resources are updated regularly across billing cycles. |
How to Buy a VPS Server From YouStable
Let me walk you through getting your server first, because the deployment steps need a live VPS with an IP address. This part takes only a few minutes from start to finish.
Step-by-Step VPS Purchase Walkthrough
Follow this exact path and you will have server login details in your inbox shortly. My team kept the route simple so you spend time building, not clicking around a checkout page.
- Go to the official YouStable website >> open the VPS Hosting menu >> pick Developer VPS or Linux VPS >> choose a plan that matches your app size.
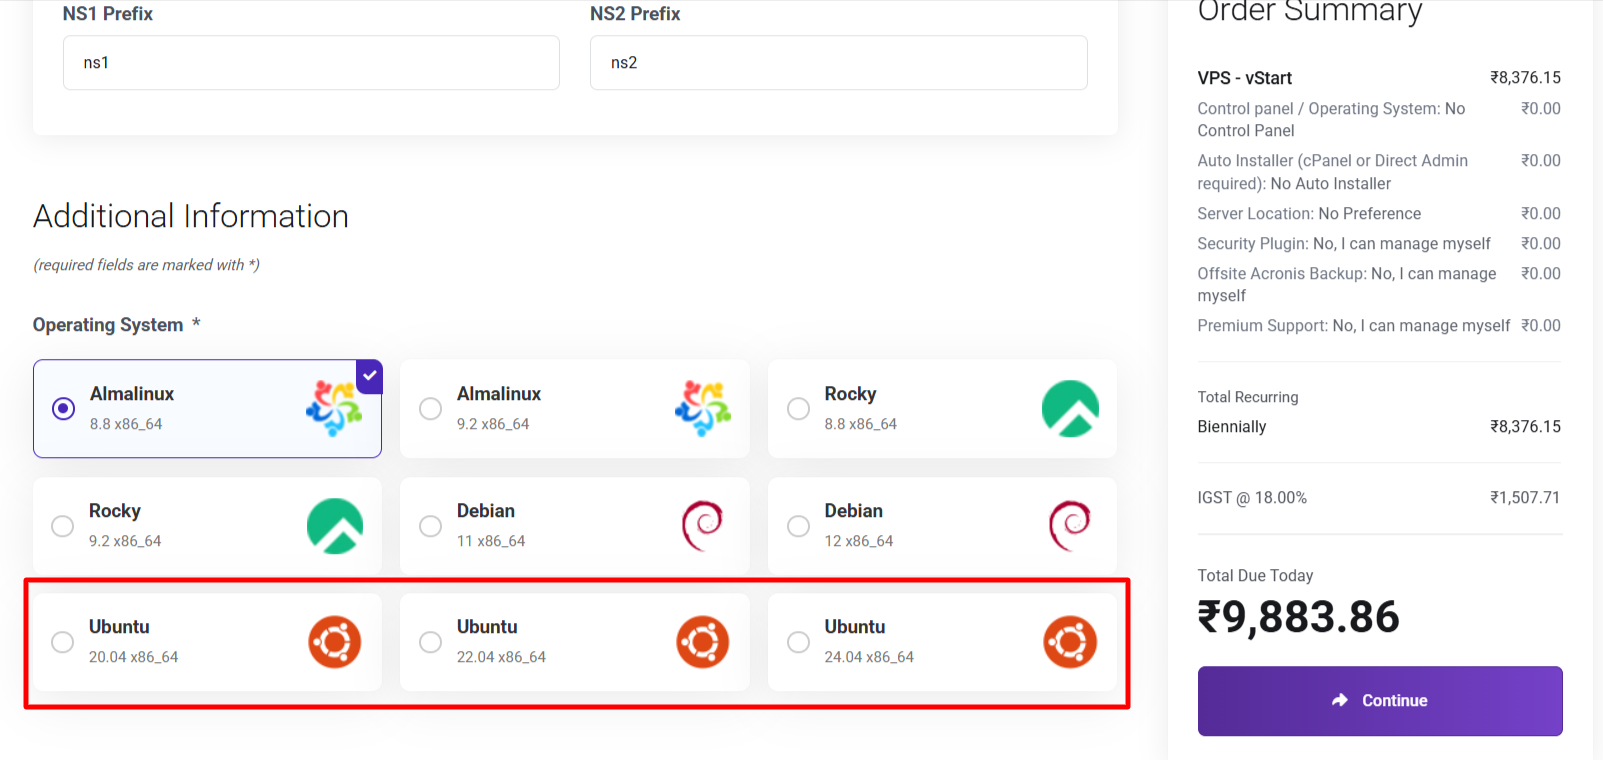
- Select your billing cycle >> choose Ubuntu 24.04 as the operating system >> add your domain when asked >> complete the payment using cards, UPI, or net banking.
- Once the order is confirmed, you receive an email with your server IP address, root username, and password.
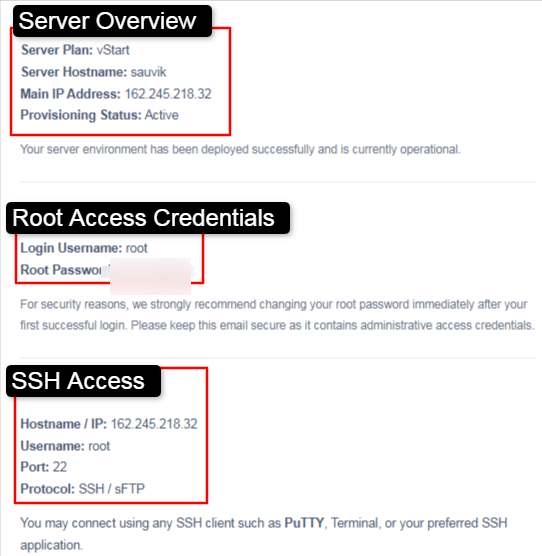
- Keep that email safe, because you need those three details for the very first step below.
| Pro Tip: Choose a longer billing cycle when your project is here to stay. Annual and two-year plans drop the monthly cost sharply, so you pay far less over time for the same dedicated server power. |
How to Deploy a MERN App on a VPS: Step-by-Step Guide
This is the heart of the guide. My tech team tested every command here on a fresh server, so follow them in order and your MERN app will be live and secure by the end.
| Tested Environment Note: These steps were verified on Ubuntu 24.04 LTS with Node.js 24 LTS, MongoDB 8.0, PM2, and Nginx. Replace the sample names, ports, and domains with your own details as you go. |
Step 1: Connect to Your VPS Through SSH
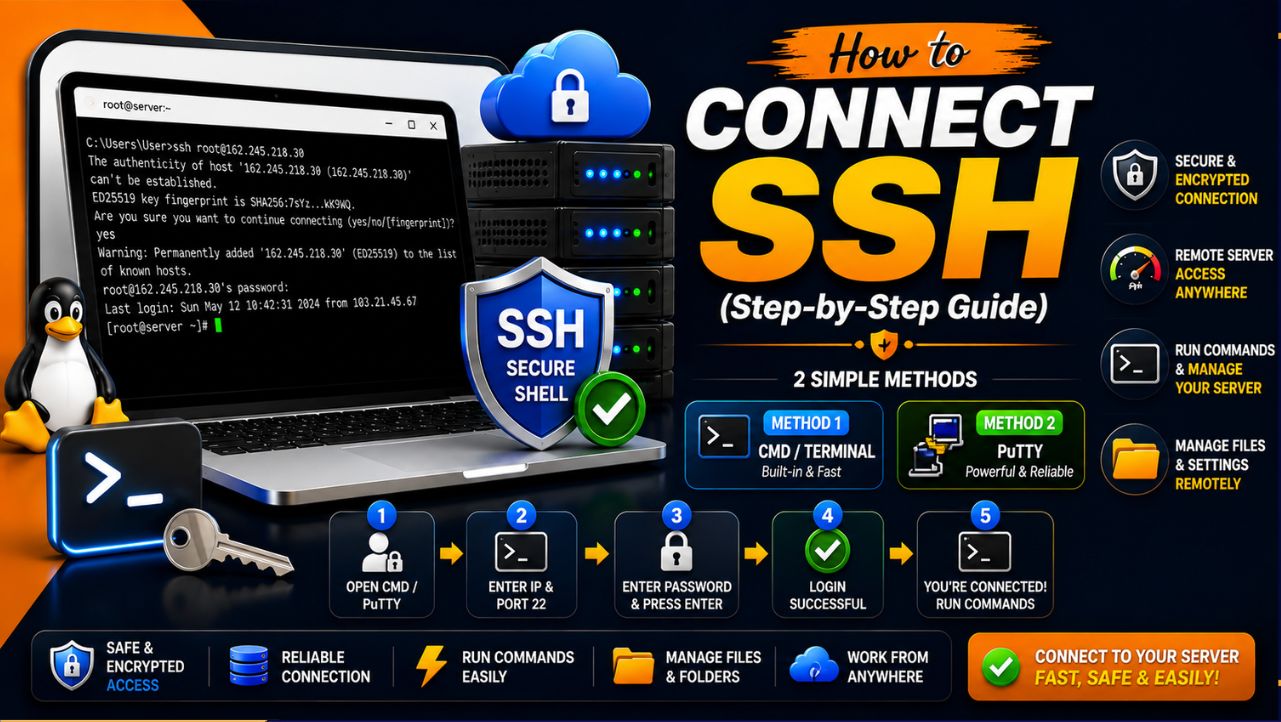
First you log in to the server from your own computer. Open your terminal, then use the IP address from your YouStable welcome email to start a secure SSH session.
Run this on your local machine:
ssh root@your_server_ipType yes when asked to trust the server, then enter your root password. You are now inside your VPS, ready to set it up.
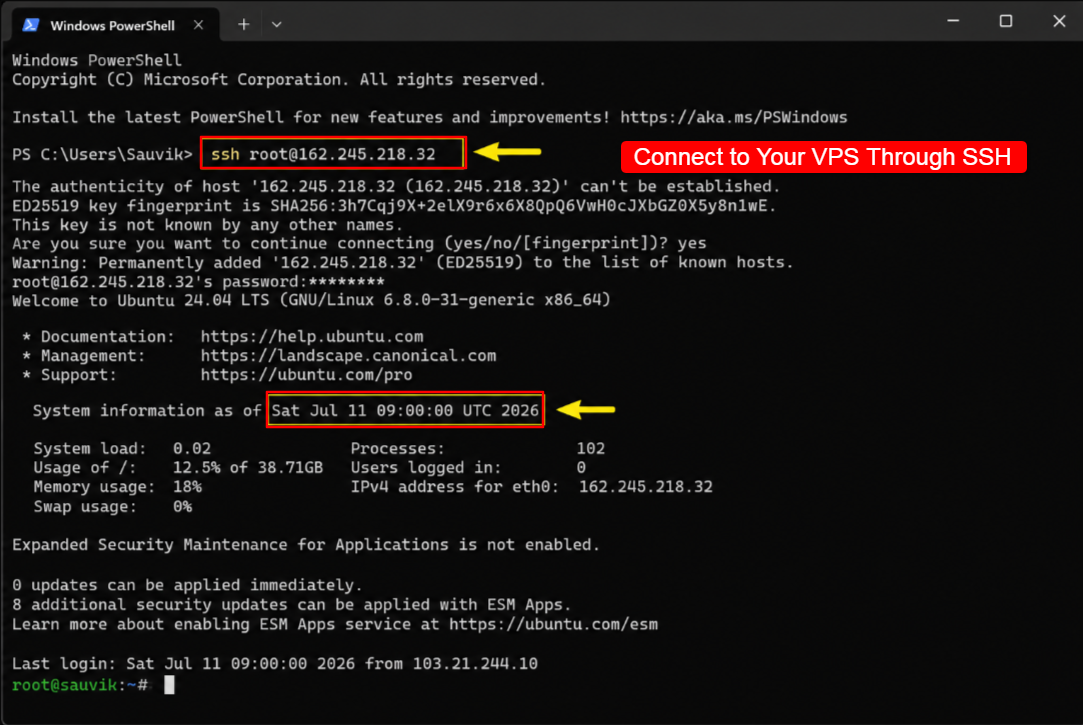
That prompt change means the connection worked.
Step 2: Update the Server and Create a Safe User
A fresh server needs updates first, then a non-root user for daily work. Running everything as root is risky, so my team always creates a dedicated deploy user right away.
Update, then create your user:
sudo apt update && sudo apt upgrade -yadduser deployusermod -aG sudo deploysu - deploySet a strong password when prompted, and press Enter through the extra fields.
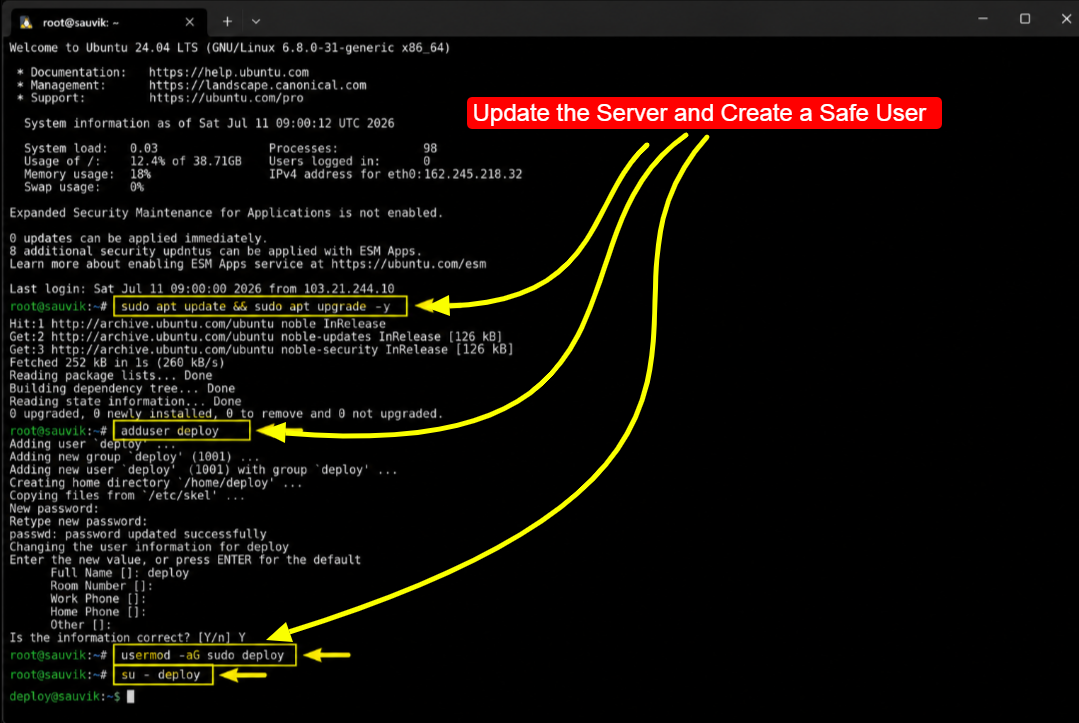
The last command switches you into the new deploy account, which you use for the rest of this guide.
Step 3: Set Up the Firewall
A firewall blocks every port you are not using, which shrinks your attack surface fast. You open only the doors your app truly needs, and keep everything else locked tight.
Allow SSH, then turn on the firewall:
sudo ufw allow OpenSSHsudo ufw enablePress y to confirm.
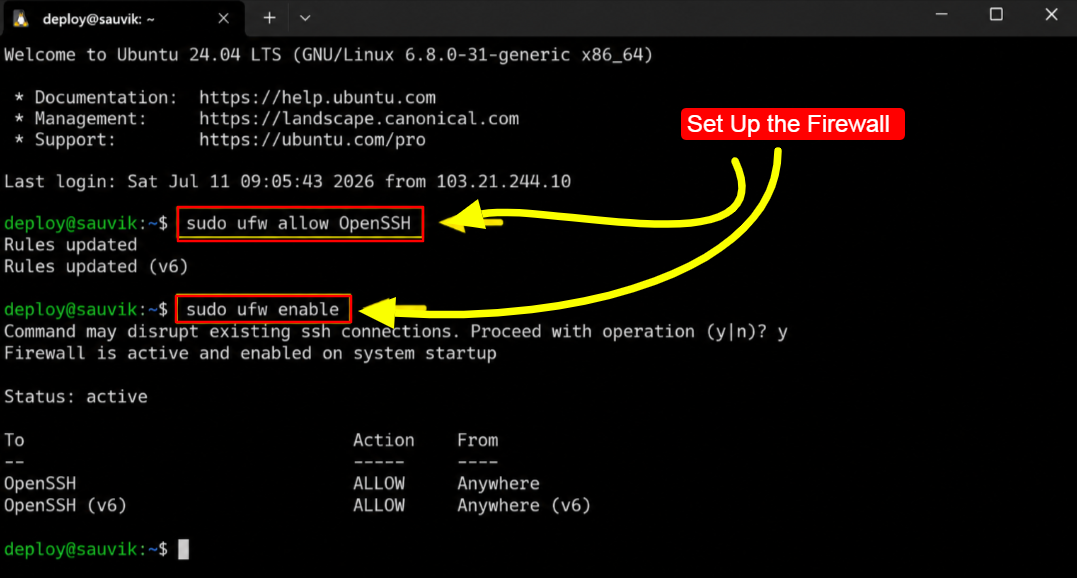
We will open the web ports for Nginx later, once it is installed. For now, SSH access stays protected so you never lock yourself out of the server.
| Please Note: Always allow OpenSSH before enabling the firewall. Skip that one line and you can be locked out of your own server instantly, forcing a painful reset. This order matters more than any other in the guide. |
Step 4: Install Node.js 24 LTS
Your Node backend needs the Node.js runtime.
We install the current Long Term Support version through NodeSource, because it stays stable and works cleanly across the whole server for every user.
Install Node.js 24 LTS:
sudo apt install -y curl ca-certificates gnupgsudo mkdir -p /etc/apt/keyringscurl -fsSL https://deb.nodesource.com/gpgkey/nodesource-repo.gpg.key \ | sudo gpg --dearmor -o /etc/apt/keyrings/nodesource.gpgNODE_MAJOR=24echo "deb [signed-by=/etc/apt/keyrings/nodesource.gpg] \ https://deb.nodesource.com/node_$NODE_MAJOR.x nodistro main" \ | sudo tee /etc/apt/sources.list.d/nodesource.listsudo apt updatesudo apt install nodejs -yNow confirm the install worked by checking the versions.
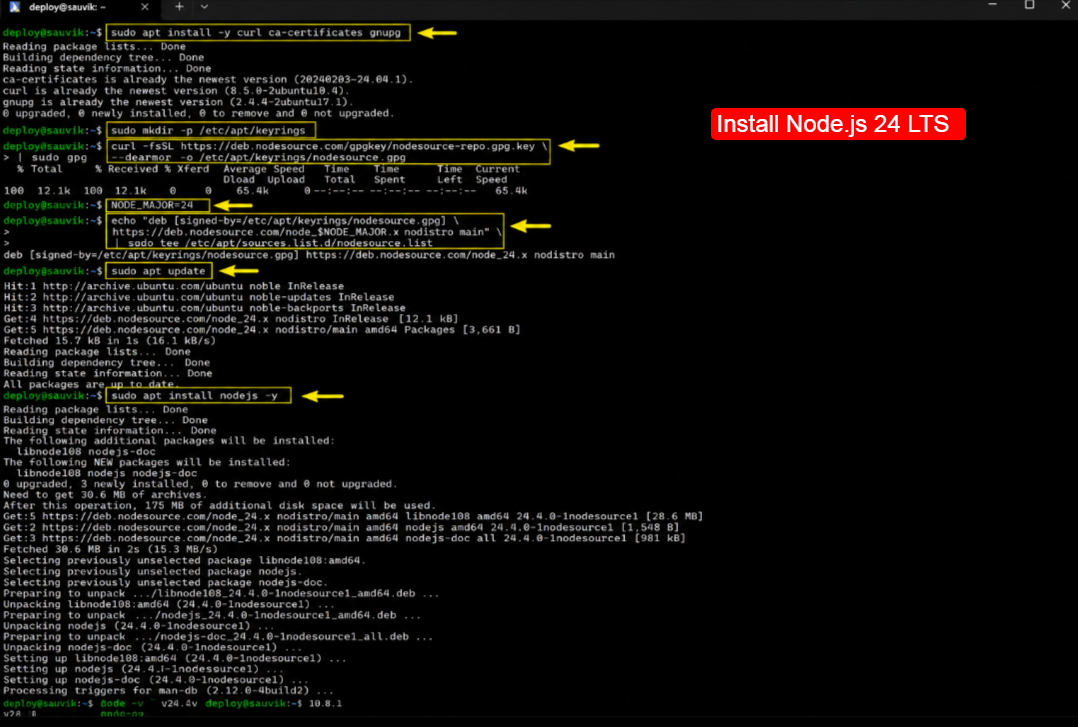
Seeing real version numbers here tells you Node and npm are both ready to run your backend and build your frontend.
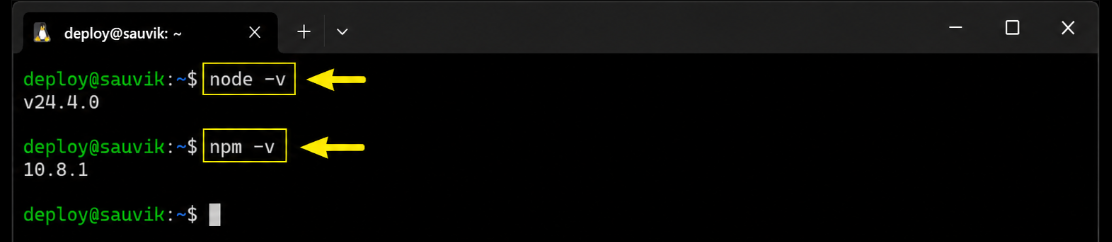
Verify the versions:
node -vnpm -vYou should see a Node version starting with v24 and an npm version alongside it. When both print cleanly, your runtime is set and you can move on to keeping the app alive.
Step 5: Install PM2 to Keep Your App Running
Run node index.js and your app dies the moment you close the terminal. PM2 solves that.
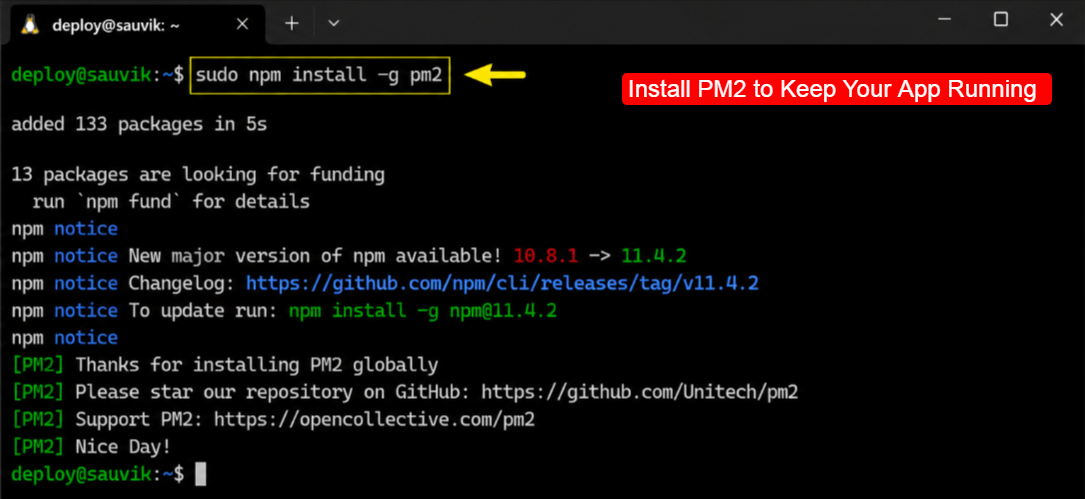
It is a process manager that keeps your Node backend alive and restarts it after any crash.
Install PM2 globally:
sudo npm install -g pm2PM2 is now available across the server. We will point it at your backend a little later, once your code is uploaded and its dependencies are installed. Think of it as your always-on engine.
Step 6: Install and Secure MongoDB
Your database lives on the server too. We install MongoDB Community Edition, start it as a background service, then lock it down with a password so no stranger can reach your data.
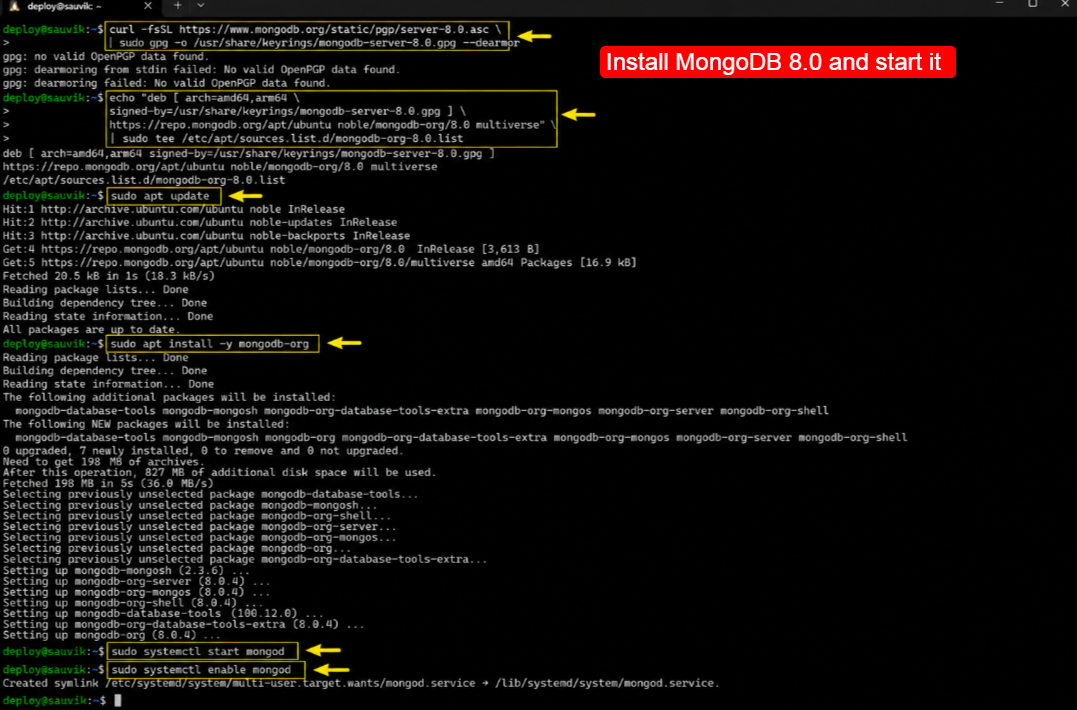
Install MongoDB 8.0 and start it:
curl -fsSL https://www.mongodb.org/static/pgp/server-8.0.asc \ | sudo gpg -o /usr/share/keyrings/mongodb-server-8.0.gpg --dearmorecho "deb [ arch=amd64,arm64 \ signed-by=/usr/share/keyrings/mongodb-server-8.0.gpg ] \ https://repo.mongodb.org/apt/ubuntu noble/mongodb-org/8.0 multiverse" \ | sudo tee /etc/apt/sources.list.d/mongodb-org-8.0.listsudo apt updatesudo apt install -y mongodb-orgsudo systemctl start mongodsudo systemctl enable mongodThe word noble in that command is the codename for Ubuntu 24.04. When you run Ubuntu 22.04, swap noble for jammy so the repository matches your system, then the install runs without errors.
Now secure the database.
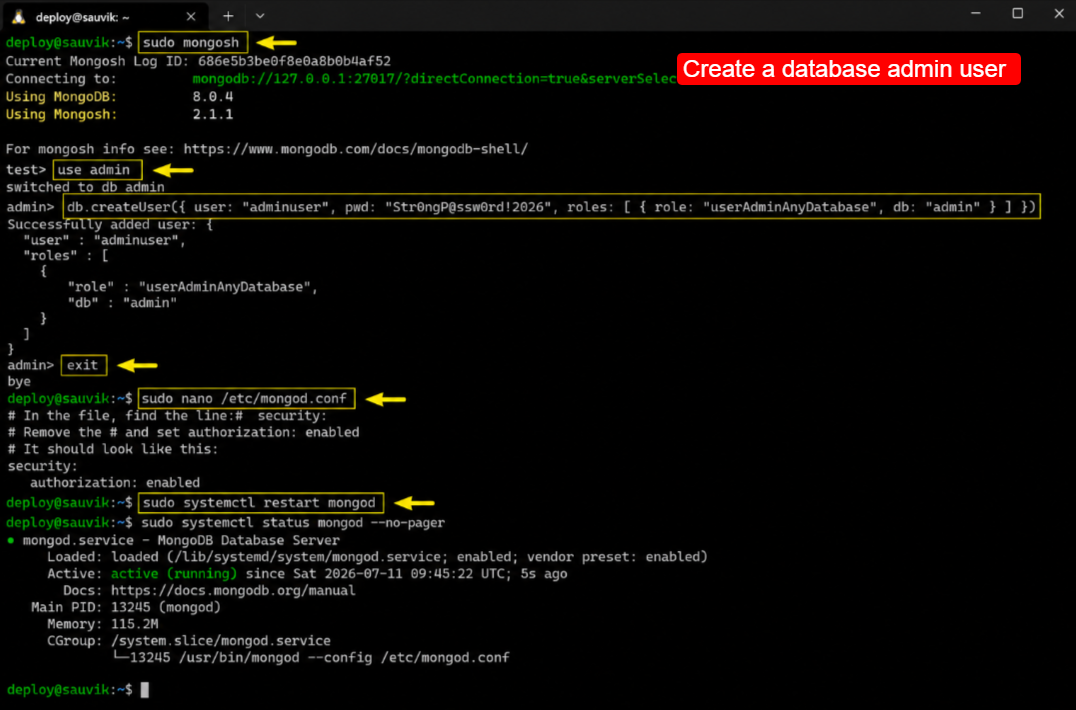
Open the MongoDB shell, create an admin user, then turn on authentication so every connection needs a password.
This one step blocks the most common MongoDB breach.
Create a database admin user:
mongosh use admindb.createUser({ user: "admin", pwd: "your_strong_password", roles: [ { role: "userAdminAnyDatabase", db: "admin" }, "readWriteAnyDatabase" ]})exitNext, tell MongoDB to require that login.
Open its config file, add the security block below, and restart the service so the new rule takes effect across every future connection.
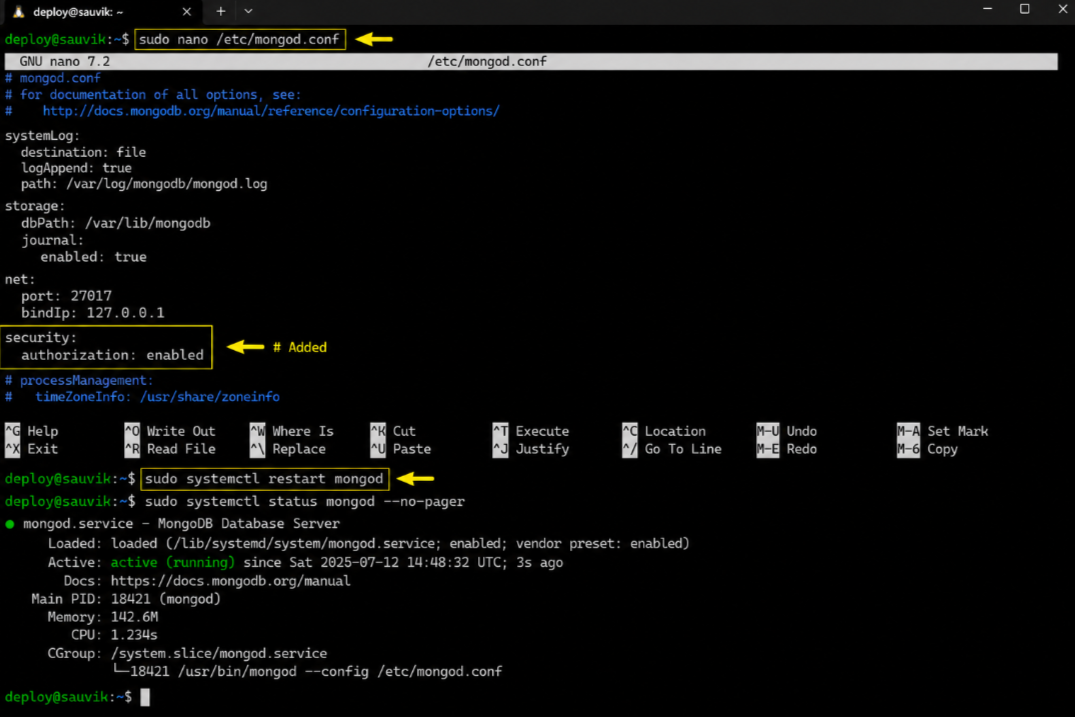
Enable MongoDB authentication:
sudo nano /etc/mongod.conf # Add these two lines, then save:
security:authorization: enabled sudo systemctl restart mongod| Please Note: An open MongoDB with no password is the single most common way databases get wiped by bots. Never skip enabling authorization. My team treats this step as non-negotiable on every live server. |
Step 7: Upload Your MERN App Code With Git
Time to bring your project onto the server. The cleanest method is Git, so you clone your repository straight into a web folder and pull future updates with a single command.
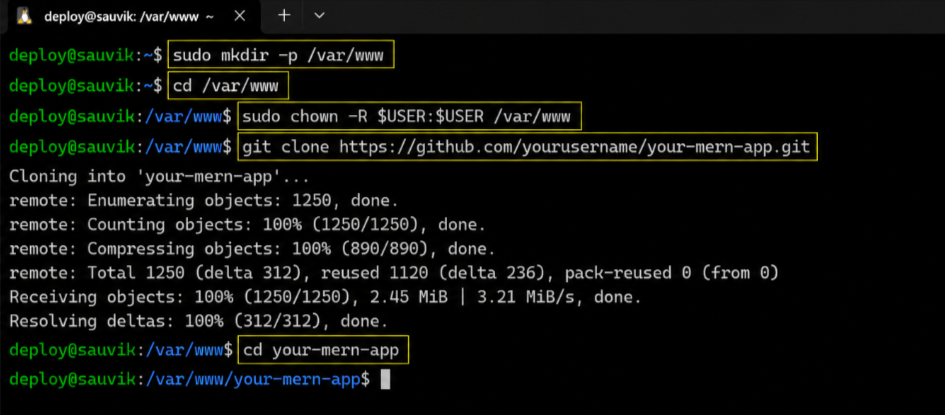
Clone your project into /var/www:
sudo mkdir -p /var/wwwcd /var/wwwsudo chown -R $USER:$USER /var/wwwgit clone https://github.com/yourusername/your-mern-app.gitcd your-mern-appSwap the sample repository link for your own. After this runs, your full project sits on the server. Now we install its dependencies and set the values it needs to connect to the database.
Step 8: Set Up the Backend and Environment Variables
Move into your backend folder and install its packages. Then create the .env file that holds your secrets, like the database link and the port your Express server listens on.
Install backend packages and open .env:
cd backendnpm installnano .envInside that .env file, add your real values.
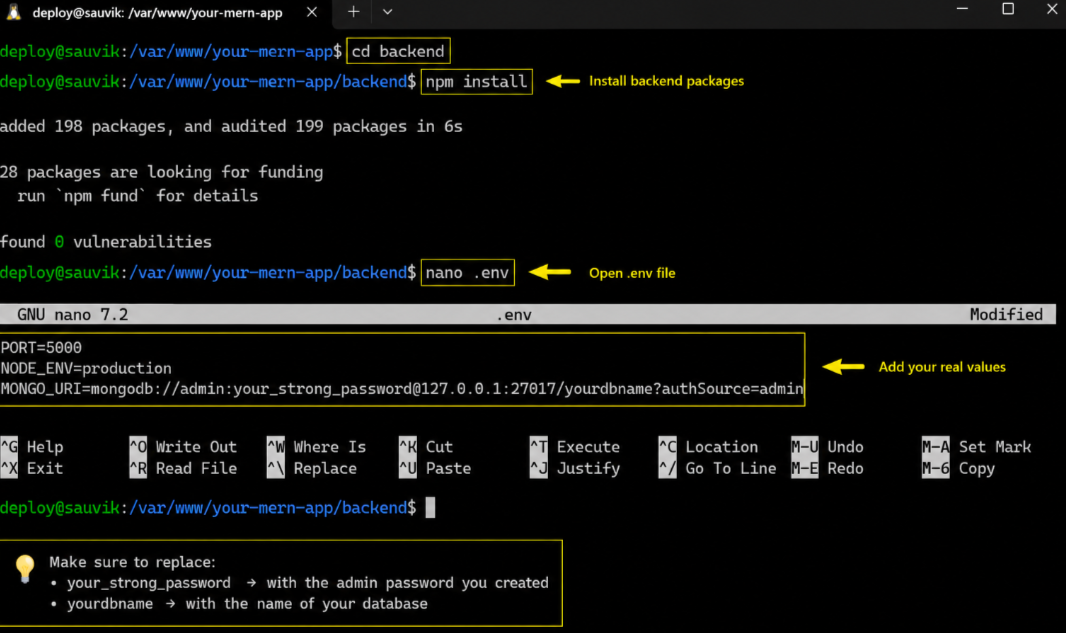
The connection string below uses the admin login you just created, so your Express app can reach MongoDB safely on the same server.
Sample .env values:
PORT=5000NODE_ENV=productionMONGO_URI=mongodb://admin:[email protected]:27017/yourdbname?authSource=adminSave the file with Ctrl+O, then Enter, then Ctrl+X to exit nano. Match the database name and port to whatever your app expects, or the backend will fail to connect on launch.
Step 9: Build the React Frontend
Your React code needs to compile into plain static files the browser can load fast. Move into the frontend folder, install its packages, then run the build command to generate those files.
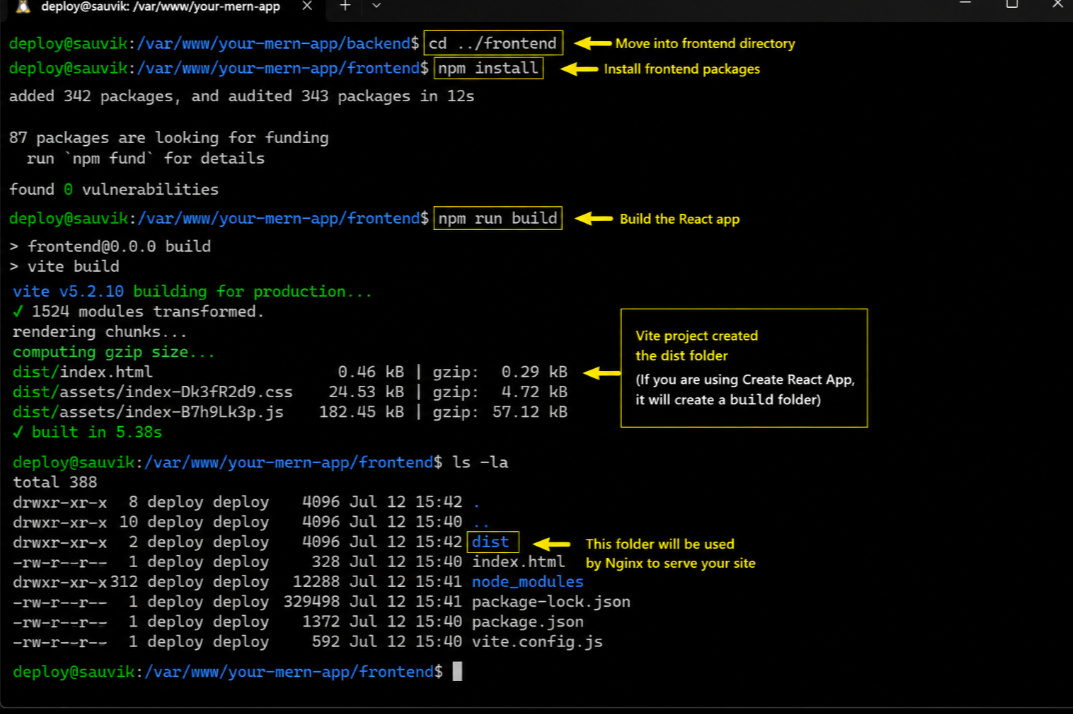
Build the frontend:
cd ../frontendnpm installnpm run buildA Vite project creates a dist folder, while a Create React App project creates a build folder. Note which one appears, because Nginx needs that exact folder path in a moment to serve your site.
| Pro Tip: When your frontend calls the backend, point its API base URL at /api instead of localhost. Nginx will route /api to your Node server, so the same code works on the live domain without changes. |
Step 10: Run the Backend With PM2
Now start your Express backend under PM2 so it runs forever and survives reboots. Move back into the backend folder and launch your main server file with a clear, memorable name.
Start and persist the backend:
cd ../backendpm2 start server.js --name mern-backendpm2 startuppm2 save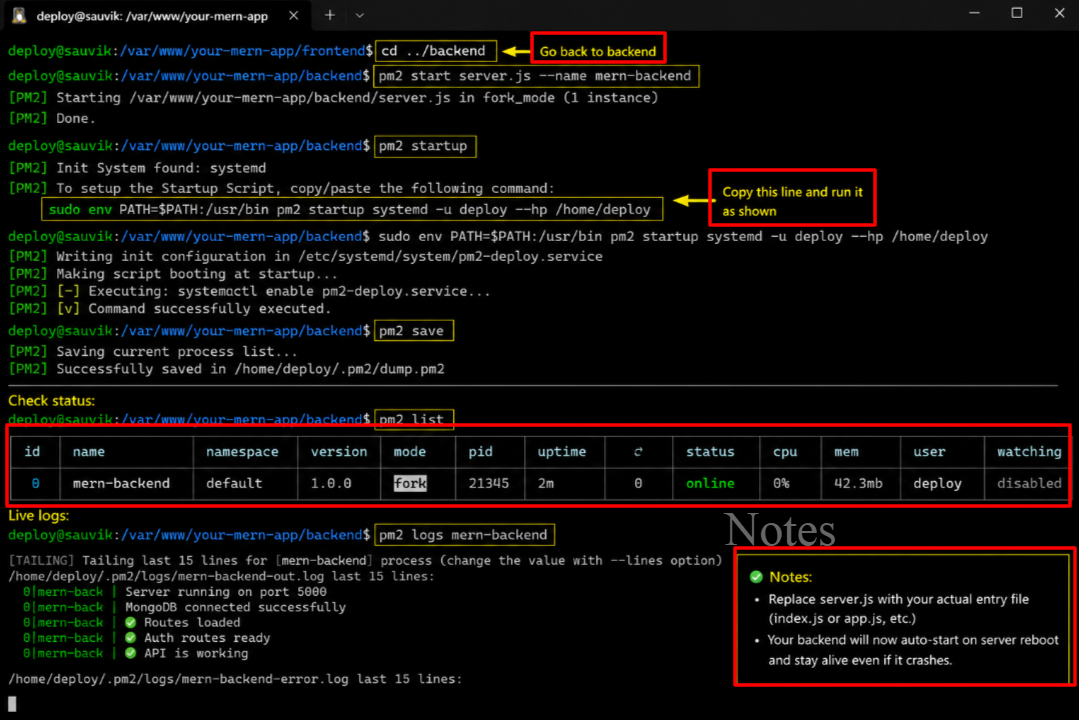
Replace server.js with your real entry file, which is often index.js or app.js. The pm2 startup command prints one line to copy and run, which locks your app to auto-start on every reboot.
Check status and live logs:
pm2 listpm2 logs mern-backendRun these two to confirm the backend shows a status of online. The logs command streams live output, so you can watch the app boot and catch any error the moment it appears.
Step 11: Install and Configure Nginx
Nobody wants to type a port number in the browser. Nginx fixes that. It serves your React files and quietly forwards API calls to your Node backend, all from a clean domain name.
Install Nginx and open web ports:
sudo apt install nginx -ysudo ufw allow 'Nginx Full'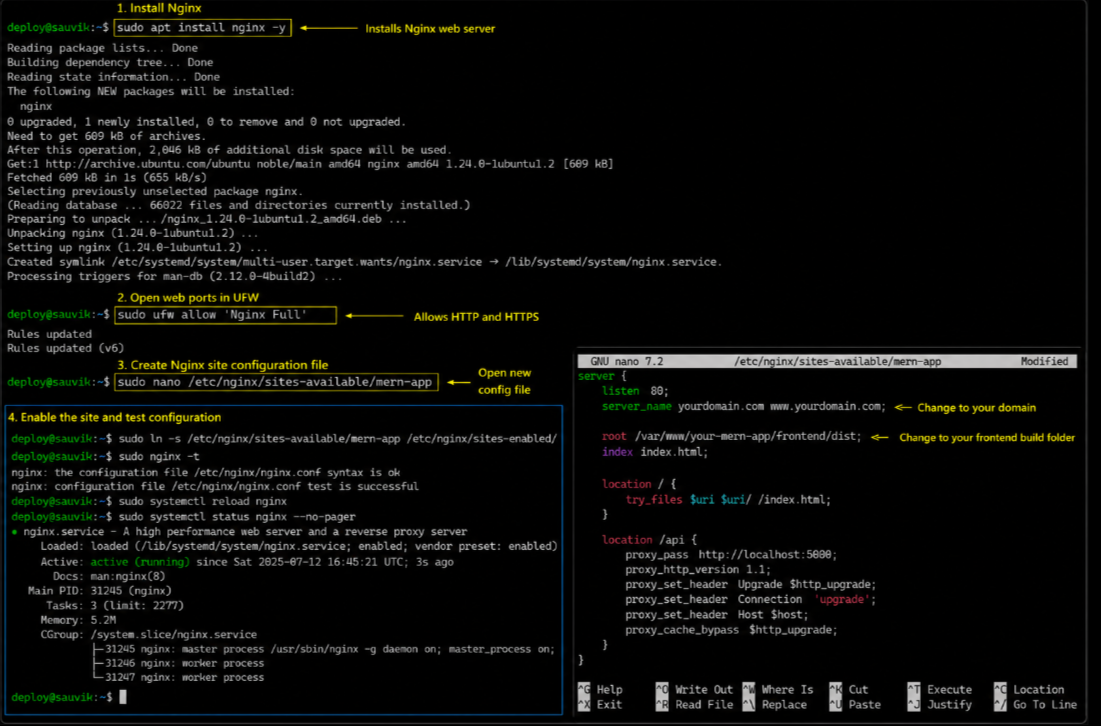
Now create a config file for your site. This tells Nginx where your frontend files live and how to pass any request starting with /api to the backend running on port 5000.
Open a new Nginx config file:
sudo nano /etc/nginx/sites-available/mern-appPaste the block below into that file. Update the domain and the root path to match your own site and the frontend build folder you noted earlier, then save and close the editor.
Nginx site configuration:
server { listen 80; server_name yourdomain.com www.yourdomain.com; root /var/www/your-mern-app/frontend/dist; index index.html; location / { try_files $uri $uri/ /index.html; } location /api { proxy_pass http://localhost:5000; proxy_http_version 1.1; proxy_set_header Upgrade $http_upgrade; proxy_set_header Connection 'upgrade'; proxy_set_header Host $host; proxy_cache_bypass $http_upgrade; }}
Now enable the site, test the config for typos, and reload Nginx. The test step is your safety net, because it catches mistakes before they can take your live server offline.
Enable the site and reload Nginx:
sudo ln -s /etc/nginx/sites-available/mern-app /etc/nginx/sites-enabled/sudo nginx -tsudo systemctl restart nginxWhen nginx -t reports the syntax is ok, you are clear. Visit your domain now and your MERN app should load over plain HTTP. One step remains: locking it with free SSL.
Step 12: Add Free SSL With Let’s Encrypt
A padlock in the browser builds instant trust, and search engines reward it too. Certbot from Let’s Encrypt gives you a free certificate and wires it into Nginx automatically in under a minute.
Install Certbot and issue SSL:
sudo apt install certbot python3-certbot-nginx -ysudo certbot --nginx -d yourdomain.com -d www.yourdomain.com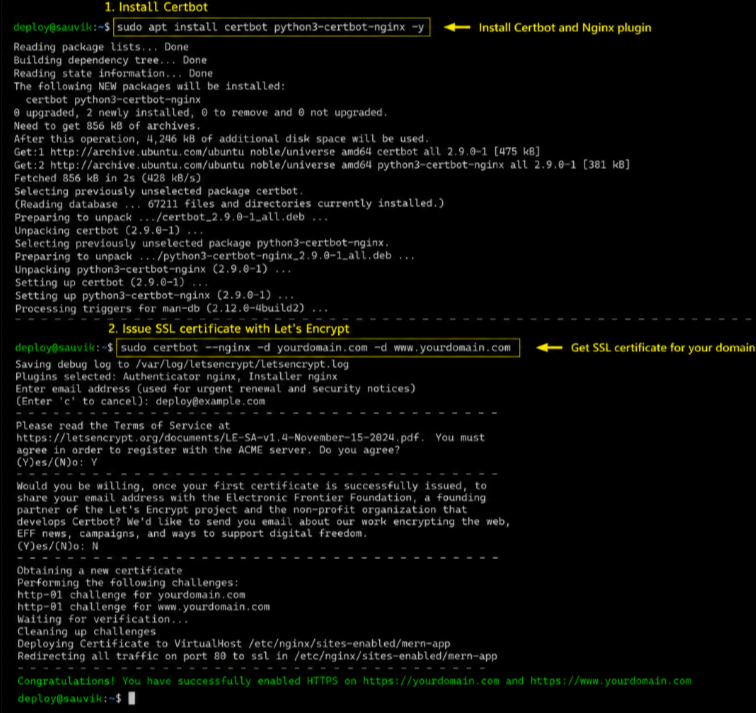
Enter your email, agree to the terms, and pick the option that redirects all traffic to HTTPS. Certbot renews the certificate on its own, so your padlock stays green without you lifting a finger.
| Pro Tip: Confirm auto-renewal works by running sudo certbot renew –dry-run once. A clean dry run means your SSL will refresh silently every ninety days, and your visitors will never see a warning. |
How to Test Everything Before You Go Live
You are almost done, but a quick check now prevents a broken launch later. My team runs the same short list on every deployment to confirm each service is doing its job.
Your Final Verification Checklist
Walk through these four checks in order. Each one confirms a different layer of your stack is healthy, so you can share your link with real confidence instead of crossed fingers.
- Frontend: Open your domain in a browser. Your React frontend should load fast over HTTPS with a padlock.
- Backend: Trigger an action that calls the API, like a login or a data fetch, and confirm it returns real data.
- Database: Add or read a record through your app, then confirm the change persists after a refresh.
- Uptime: Run pm2 list and check your backend still shows online after a test server reboot.
When all four pass, your MERN app is genuinely production ready. That is the moment my team calls a deployment complete, and you have earned the right to share that link far and wide.
| Please Note: Always keep a backup of your code and database. Servers can fail, and a fresh snapshot turns a disaster into a ten-minute recovery. YouStable snapshots make this easy from your control panel. |
Common MERN Deployment Errors and How to Fix Them
Even tested steps hit snags on real projects. My research team logged the errors that trip people up most, along with the exact fix for each, so you never stay stuck for long.
Backend Shows Errored in PM2
When the pm2 list shows errors instead of online, your app crashes on start. Read the logs first, since they almost always name the real cause in plain text near the bottom.
Read the last 50 log lines:
pm2 logs mern-backend --lines 50The usual culprits are a wrong .env value, a missing package, or a bad database link. Fix the line the log points to, then run pm2 restart mern-backend to try again.
Nginx Shows a 502 Bad Gateway
A 502 error means Nginx is running but cannot reach your backend. Nine times out of ten, the backend is down or listening on a different port than your config expects.
Check that PM2 shows the app online, then confirm the proxy_pass port in your Nginx config matches the PORT in your .env file.
Line those two up and the 502 clears right away.
The Frontend Loads but the API Fails
When your site appears but buttons do nothing, the frontend is calling the wrong address. This happens when the API base URL still points at localhost from your development setup.
Set the frontend API base URL to /api, rebuild with npm run build, and reload the page. Nginx then routes those calls to your backend, and the broken buttons spring back to life.
| Writer’s Note: I have debugged each of these errors on live client projects more times than I can count. The fixes above are the exact ones my tech team reaches for first, because they resolve the vast majority of cases. |
FAQs
How long does it take to deploy a MERN app on a VPS?
A first deployment takes about one to two hours when you follow each step carefully. Once you have done it once, later deployments drop to fifteen or twenty minutes, since your server is already configured. The slow part is the initial setup of Node, MongoDB, and Nginx, and that only happens a single time per server.
Do I need a domain name to deploy my MERN app?
No, you can reach your app through the server IP address alone for testing. A domain becomes necessary when you want a clean, shareable link and free SSL, since Let’s Encrypt issues certificates for domains, not raw IP addresses. For any real project or client work, a domain is well worth the small yearly cost.
Should I host MongoDB on the same VPS or use MongoDB Atlas?
Both work well. Hosting MongoDB on the same VPS keeps costs low and latency tiny, which suits small and medium apps nicely. MongoDB Atlas is a managed cloud database that handles backups and scaling for you, at a higher price. My team uses a local install for lean projects and Atlas when a client needs hands-off database management.
Which Node.js version should I use for production?
Use the current Long Term Support release, which is Node.js 24 as of 2026. LTS versions receive security patches for thirty months, so your app stays supported and stable. Avoid brand-new odd-numbered releases for production, since they carry the latest features but a shorter support window and less battle testing.
How do I update my app after deployment?
Pull the latest code with git pull, then reinstall any new packages with npm install. Rebuild the frontend with npm run build, and restart the backend with pm2 restart mern-backend. Those four commands push your updates live in under a minute, with no downtime for your visitors.
Is a VPS secure enough for a production MERN app?
Yes, when you follow the safety steps in this guide. A non-root user, an active firewall, MongoDB authentication, and HTTPS cover the main risks. Add regular updates and backups, and your VPS is as secure as most managed platforms. Security comes from good habits, not from the hosting type alone.
Can I run multiple MERN apps on one VPS?
Yes, and it is a common way to save money. Run each backend under PM2 on its own port, then create a separate Nginx config for each domain or subdomain. As long as your server has enough RAM, one VPS can comfortably host several small apps side by side.
Final Thoughts: Your MERN App Is Ready for the World
You started with an app stuck on localhost, and now you have a full plan to take it live, secure, and always on. That is a real skill, and it opens the door to shipping client work with confidence.
The steps here are the same ones my tech team runs on production servers every week. Follow them in order, lean on the notes and fixes when you hit a snag, and your deployment will hold up under real traffic.
When you need a server that gives you full root access, NVMe speed, and human support at a fair price, YouStable is where my team builds. Grab a plan, follow this guide, and get your project in front of real users today.
| >> Next Step: Launch your Developer VPS on YouStable, follow the twelve steps above, and your MERN app goes live with dedicated resources, full root access, and 24/7 support behind it. |