Moving a website from Wix to WordPress does not mean you have to lose your website content, domain, or Google rankings. However, the migration needs to be completed carefully so that your content, URLs, SEO settings and other important website elements are preserved.
Wix does not provide a one-click tool to move an entire website to WordPress. The migration process depends on the type of content you have on your Wix website. Blog posts can be moved using an RSS feed in some cases. Other elements, such as pages, images, menus, forms, and the website design, usually need to be moved or recreated manually in WordPress.
Before starting the migration, prepare your Wix website and WordPress hosting. Then move your content, recreate the required website elements, match your URLs and test the new website before making it live.
This guide covers the complete process, including:
- What to prepare before migration
- How to move your website content
- How to recreate your design and menus
- How to preserve your URLs and SEO
- How to test the WordPress website
- What to do before and after going live
Once these steps are completed, you can point your domain to the new WordPress website and retire the old Wix site after confirming that everything works correctly.
What You Need Before Moving From Wix to WordPress
Before you start the migration, make sure you have everything you need. Proper preparation helps you avoid missing content, URLs, images or account access during the process.
Keep the following things ready:
- Access to your Wix account and dashboard
- Access to your domain registrar
- A WordPress hosting account
- WordPress installed on your new hosting account
- A list of your important Wix pages and their current URLs
- Copies of important content, images and media files
- Access to Google Search Console and Google Analytics (if you use them)
- A record of important SEO titles, meta descriptions and high-traffic URLs
- Important: Save Your Wix URLs
| Create a complete list of your existing Wix URLs before starting the migration. You will use this list later to match URLs in WordPress and create 301 redirects where necessary. |
Keeping your old URL structure as close as possible can help reduce broken links and unnecessary traffic or SEO issues after the migration.
What Can You Move From Wix to WordPress
Wix does not provide a one-click option to move an entire website to WordPress. Instead, different parts of the website need to be imported, downloaded or recreated separately.
Use the following table to understand how each part of your Wix website can be moved:
| Wix Content | How to Move It |
| Blog posts | Import using an RSS feed where supported |
| Pages | Recreate manually in WordPress |
| Images and media | Download from Wix and upload to WordPress |
| Website design | Rebuild using a WordPress theme or page builder |
| Navigation menu | Create the menu again in WordPress |
| Domain | Connect or transfer the domain separately |
| SEO titles and descriptions | Add them again using an SEO plugin |
| Wix apps and features | Replace them with suitable WordPress plugins or alternatives |
| Contact forms | Recreate them using a WordPress form plugin |
The migration is therefore not a direct copy of your Wix website. You are rebuilding the website in WordPress while moving your important content, URLs, media, and functionality.
This also gives you an opportunity to remove outdated content, replace unnecessary Wix features, and organize the new WordPress website before making it live.
Step by Step: How to Migrate Wix to WordPress
Moving a website from Wix to WordPress involves more than transferring your pages and blog posts.
You also need to set up WordPress hosting, choose a theme, recreate your website design, move images and other content, preserve your existing URLs, configure SEO settings, and test the new website before going live.
The safest approach is to build the WordPress version first and keep your Wix website running until everything has been checked.
Follow the steps below in order.
Step 1: Choose and Register Your Domain
If you have your Wix website on their subdomain (yourusername.wixsite.com/yourwebsitename) and you’re wanting to migrate from Wix to WordPress for easy content management and better outreach, you should go for a custom domain.
So, first you need to register a new domain name.
(If you already have a domain connected to your Wix website, do not buy another domain just for the migration. You can keep your existing domain and connect it to the new WordPress hosting later)
Your domain is the address visitors use to access your website, such as sauvikblogs.com.
Choose a name that is easy to remember, relevant to your website and suitable for your long-term plans. You can get a free domain with a 1-year WordPress hosting plan from YouStable, with 800+ domain extensions available to choose from.
Option 1: Buy the Domain Separately
You can register your domain separately through YouStable. Search for the domain you want, select an available extension and complete the registration.
There is a Bonus point for you if your want to get hosting from YouStable: You can get a free Domain for a year with 1 Year WordPress Hosting
Option 2: Get a Free Domain With an Annual Hosting Service plan
This means you can purchase the WordPress hosting and get the first-year domain registration included instead of purchasing the domain separately.
If you are migrating an existing Wix website, however, you normally already have a domain. In that case, you do not need to purchase another one. Keep your existing domain and connect it to the new WordPress hosting after the migration is complete.
Step 2: Choose Your WordPress Hosting
Hosting provides the server resources where your WordPress files, database, images, themes and plugins will be stored. Your hosting also affects how easily you can install WordPress, manage backups, configure SSL and handle your website as it grows.
YouStable currently offers several hosting options.
YouStable WordPress hosting plans include features such as NVMe storage, free SSL, backups, caching and WordPress-related tools. The current Professional plan supports up to 25 websites, while the Elite plan supports unlimited websites.
You can even use YouStable Discount Coupon code “YouSpecial” and get a flat 10% OFF One Time Discount Instantly (Only applicable on Annual and triennial plans)
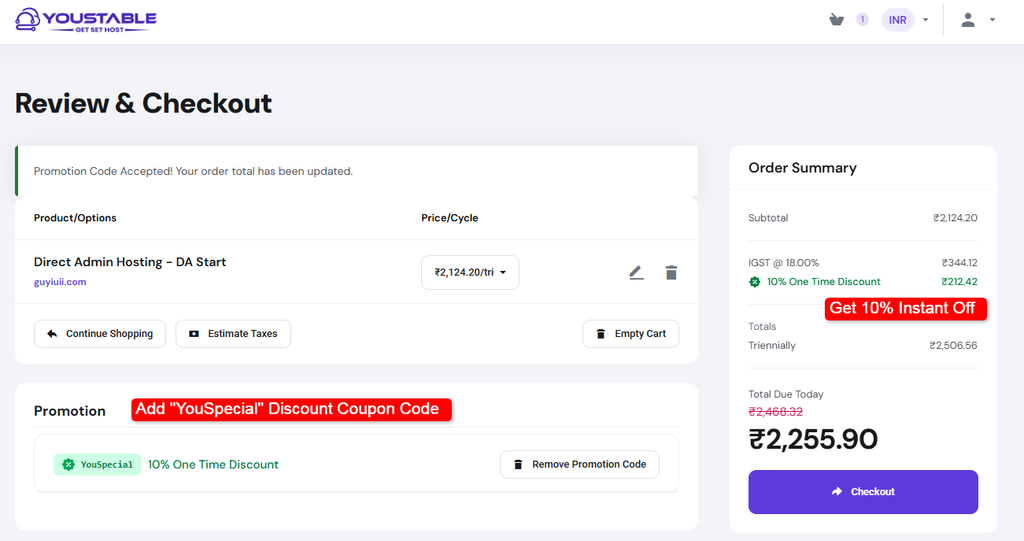
The screenshot shows the checkout page, where a discount coupon code provides a 10% one-time discount on the purchase.
If You Already Have a Wix Domain (You do not need to purchase another domain)
Keep your existing domain with your current registrar and purchase the WordPress hosting separately. During the hosting setup, you can choose to use your existing domain.
YouStable’s WordPress hosting checkout currently provides an option to Use Own Domain, which allows you to use an existing domain and update its nameservers later.
For now, leave your domain connected to Wix. You will change the DNS settings only after the WordPress website has been completed and tested.
Step 3: Install WordPress
After purchasing your hosting, install WordPress on the new hosting account.
Depending on your hosting control panel, you may have access to a one-click or automatic WordPress installer. Follow the hosting provider’s installation process and create your WordPress administrator account.
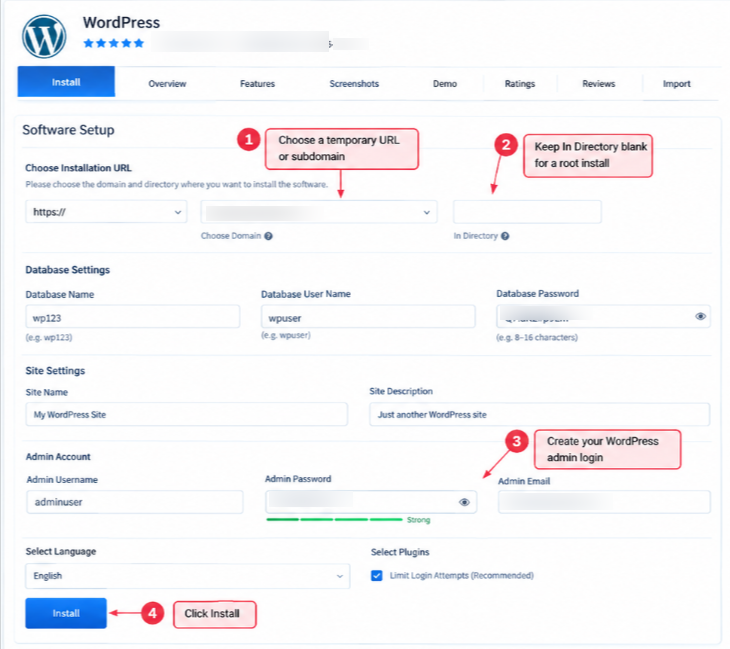
Once WordPress is installed >> log in to the dashboard and check that everything is working.
At this stage, do not point your existing Wix domain to the new server.
If you already have a live Wix website, keep it online while you build the WordPress version. You can use a temporary URL, staging environment or another suitable setup provided by your hosting account.
Before moving forward, check that:
- WordPress opens correctly
- You can access the WordPress dashboard
- Your administrator account works
- SSL can be enabled
- Your hosting account is ready for the website
The goal is to have a working WordPress installation before you start rebuilding the website.
Step 4: Choose >> Install a WordPress Theme
Your Wix template cannot simply be transferred to WordPress. Wix and WordPress use different systems for themes, layouts, and website customization.
This means you need to choose a WordPress theme and recreate the design of your existing website.
Go to WordPress Dashboard >> Appearance >> Themes and browse the available themes.
Choose a theme based on the type of website you are building. For example, a blog, business website, portfolio, news website, or online store may require different layouts and features.
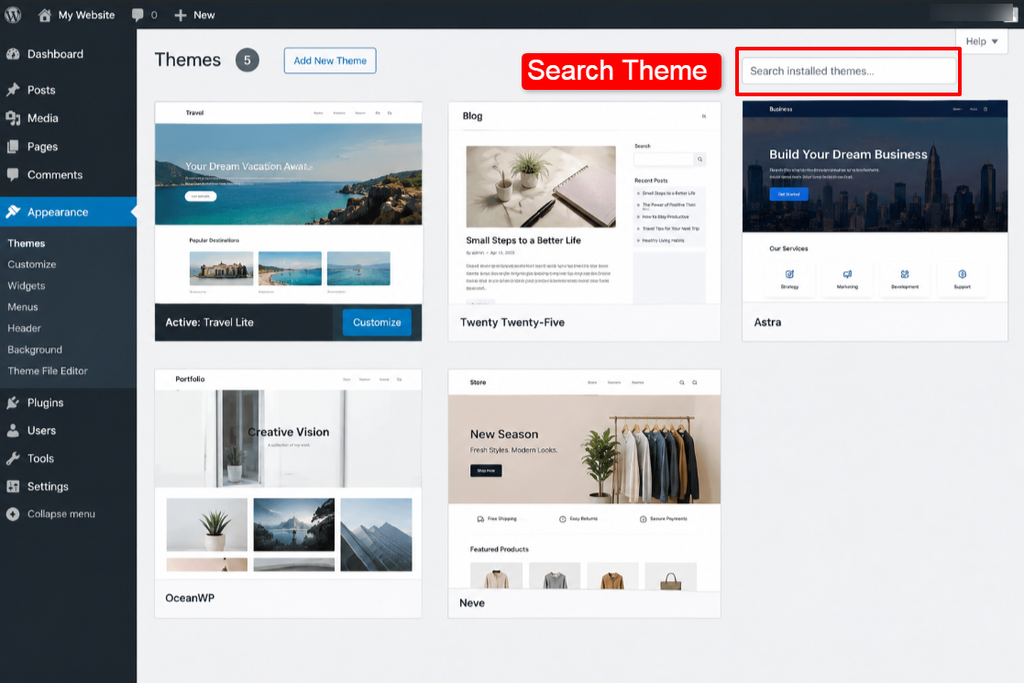
After installing the theme, customize:
- Logo
- Website colors
- Fonts
- Header
- Footer
- Homepage
- Sidebar
- Navigation menu
- Page layouts
You can use the WordPress block editor or a page builder such as Elementor if you need more control over the layout.
| Tip: You do not have to copy every small design detail from Wix. Use the migration as an opportunity to simplify the design and remove elements that you no longer need. |
Step 5: Record All Your Wix URLs
Before moving your content, create a complete list of the important URLs on your Wix website.
This is one of the most important preparation steps because your existing URLs may already have search visibility, backlinks, bookmarks, or traffic.
Open your Wix website and record the full URL of every important page.
Start with:
- Homepage
- About page
- Contact page
- Service pages
- Product pages
- Blog posts
- Pages receiving traffic from Google
You can keep this information in a spreadsheet so you can later record the corresponding WordPress URL and redirect.
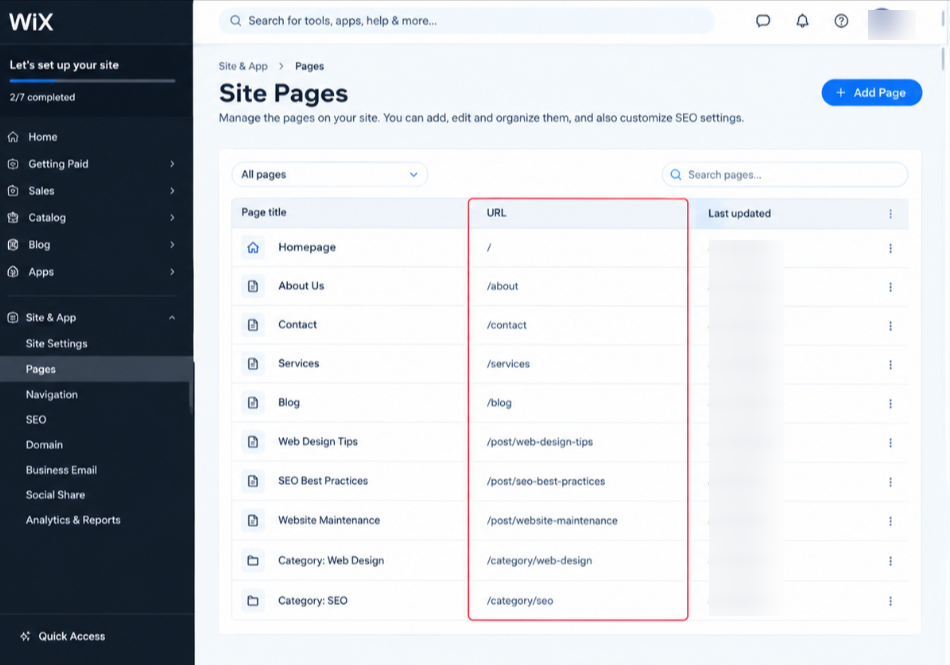
For example:
| Old Wix URL | New WordPress URL | Redirect Required |
| /about-us | /about-us | No |
| /services | /our-services | Yes |
| /contact | /contact | No |
This list gives you a simple migration map and makes it easier to find missing pages before the new website goes live.
Step 6: Move Your Wix Blog Content
If your Wix blog supports RSS export, you may be able to use the RSS feed to move some of your blog content into WordPress.
A Wix blog RSS feed can generally be accessed by adding /blog-feed.xml to your website URL >> After obtaining the feed, go to WordPress Dashboard >> Tools >> Import and use the available RSS importer.
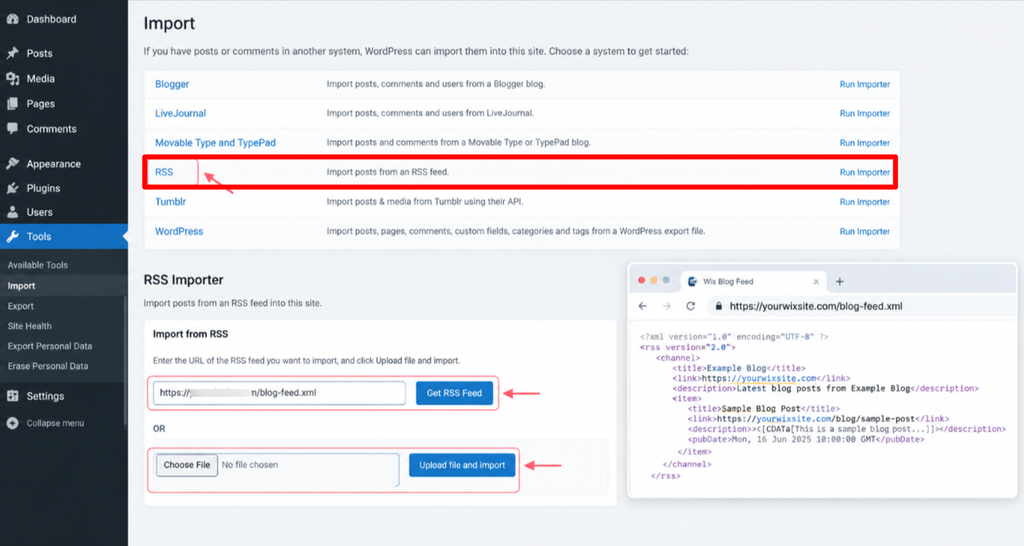
The imported content should then appear in your WordPress posts.
However, do not assume that the migration is complete immediately after importing the feed. Review the imported posts and check their titles, text, formatting, categories, dates, URLs, and images.
RSS does not necessarily transfer everything from your Wix posts. Images and certain formatting elements may require additional work.
Remember: Wix RSS feeds only display up to 20 blog posts at a time. If you have more than 20 posts, you may need to copy the remaining ones manually or use a third party migration tool.
Step 7: Recreate Your Wix Pages
Static Wix pages such as About, Contact, Services, and other custom pages generally need to be recreated manually in WordPress.
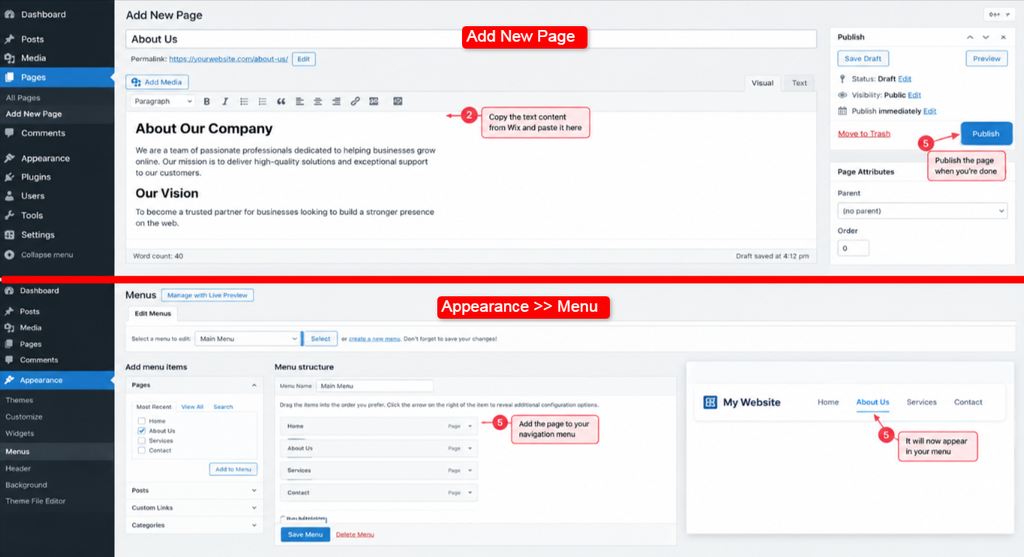
Open the corresponding Wix page in one browser tab and create the new WordPress page in another.
For each page:
- Create a new page in WordPress.
- Copy the required text from Wix.
- Recreate the headings and formatting.
- Upload the required images.
- Add buttons and links.
- Set the correct URL.
- Add the page to the navigation menu.
- Publish the page.
- Open it on the front end and check the result.
Do not delete the Wix page after copying it. Keep the Wix website available as a reference until the complete migration has been tested.
This is especially useful when your website contains older pages that you may not remember having.
Step 8: Move Your Images and Other Media
Images require separate attention during a Wix-to-WordPress migration.
If you imported blog content through RSS, the images may not have been transferred correctly. You should therefore review your important pages and posts and make sure all required images are available in WordPress.
Download the required images from your Wix website and upload them to the WordPress Media Library.
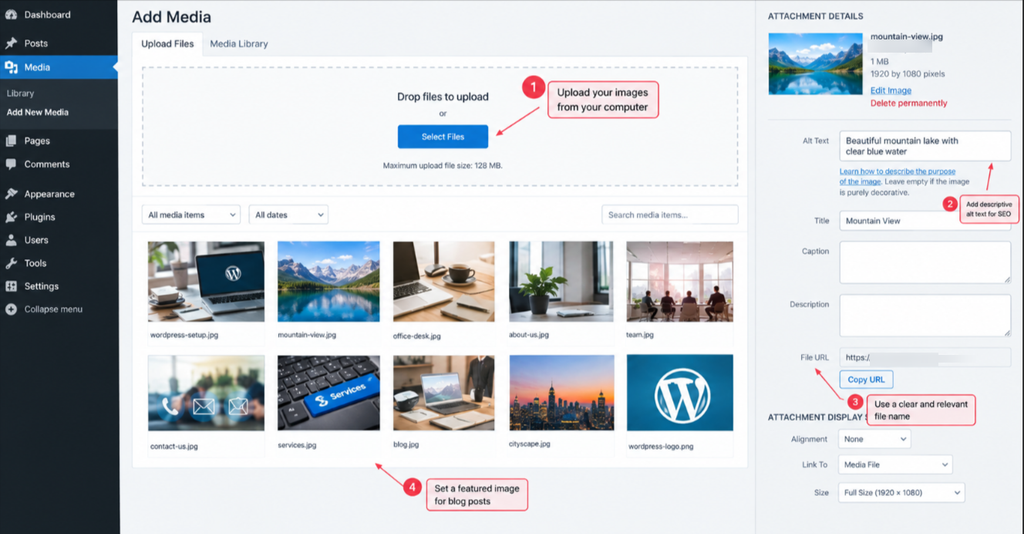
While moving your images, check:
- Image quality
- Image dimensions
- File names
- Alt text
- Featured images
- Images inside blog posts
- Images used on important pages
Use descriptive file names instead of random strings where possible.
For example, instead of (IMG_12345.jpg) use something descriptive such as (wordpress-hosting-dashboard.jpg)
Also check whether you actually need every image from the old website. Removing unused or outdated media can help keep your new WordPress installation organized.
Step 9: Recreate Your Website Features
Your Wix website may use built-in Wix features or third-party Wix apps for different functions.
These features will usually need to be recreated using WordPress plugins or another solution. Make a list of everything your current website does before choosing replacements.
- Contact forms
- Booking systems
- Newsletter signup forms
Search for a suitable WordPress plugin or service for each requirement.
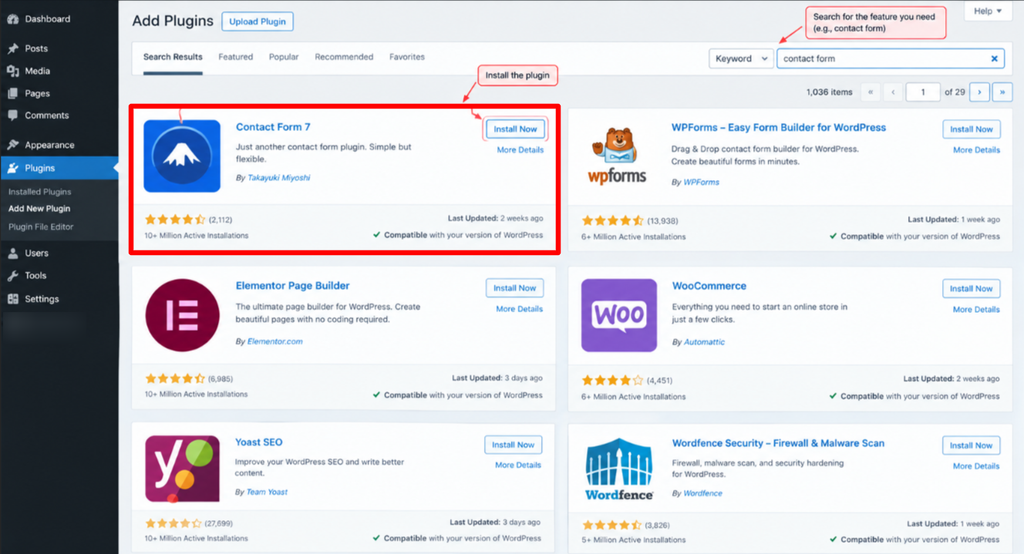
Do not install several plugins that perform the same job. Choose one suitable solution for each feature and test it before going live.
For example, if your Wix website has a contact form, install and configure a WordPress form solution, then send a test submission to confirm that messages are being delivered correctly.
Step 10: Match Your Old URLs Where Possible
Try to keep your WordPress URLs the same as your Wix URLs whenever possible.
For example, if your Wix page was (example.com/about-us) try to use (example.com/about-us) on WordPress as well.
Keeping an existing URL means you may not need a redirect for that particular page.
In WordPress, go to Settings >> Permalinks >> Choose a suitable permalink structure. For many websites, the Post name structure provides simple and readable URLs.
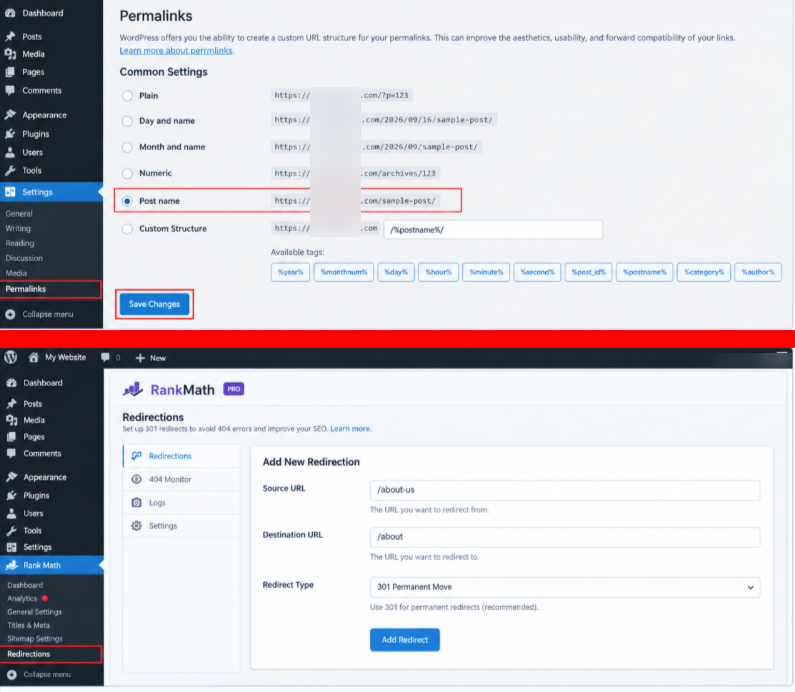
If a URL must change, create a 301 redirect from the old URL to the new URL. (A 301 redirect tells browsers and search engines that the old URL has permanently moved to another location)
Step 11: Recreate Your SEO Settings
SEO settings from your Wix website will need to be reviewed and recreated on WordPress. Install an SEO plugin such as Rank Math or Yoast SEO and configure the basic settings.
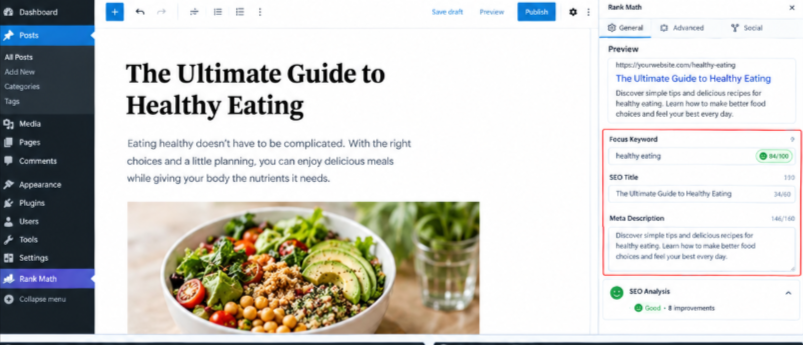
Then review your important pages and posts individually.
Please check these things in the list below:
- SEO title
- Meta description
- H1 heading
- H2 and H3 headings
- Image alt text
- Internal links
- Canonical URL
- XML sitemap
- Robots.txt settings
If your Wix website already has optimized titles and descriptions, you can generally carry those settings across to the corresponding WordPress pages.
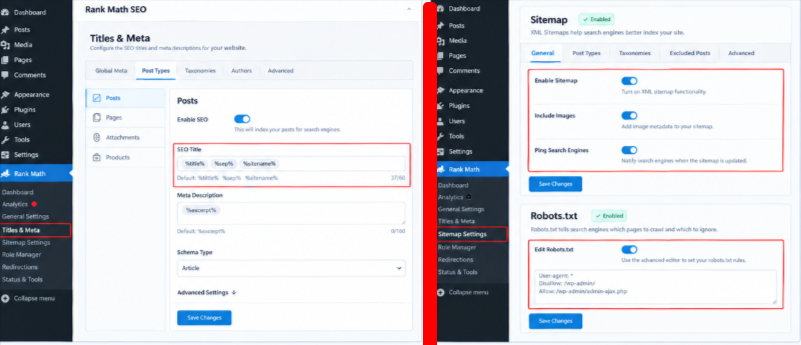
Do not make unnecessary SEO changes at the same time as the migration. Keeping important content, URLs, and SEO elements consistent makes it easier to identify problems after the move.
Also make sure your WordPress sitemap is accessible and that your website is not accidentally blocking search engines.
Step 12: Connect Your Domain to WordPress
Only connect your live domain after the WordPress website has been completely built.
Log in to your domain registrar >> Update the DNS records or nameservers according to the instructions provided by your WordPress hosting provider.
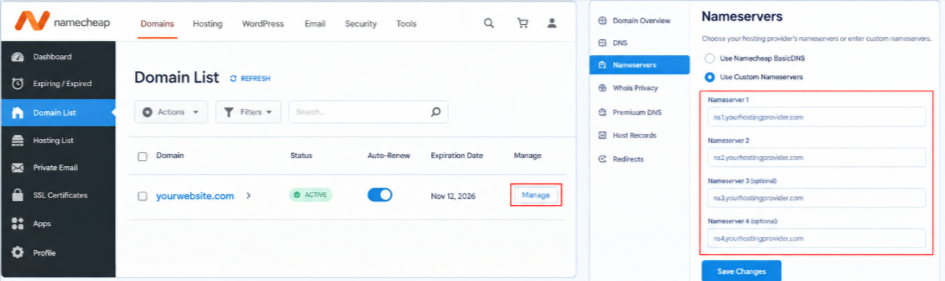
If you purchased your domain through YouStable, you can manage your domain and hosting through your YouStable account.
If your domain is still registered elsewhere, you can keep it there and simply update the DNS settings to point toward your new WordPress hosting.
| Please Remember: Do not delete your Wix website immediately. DNS changes can take time to propagate. During this period, some visitors may still reach the old Wix website while others reach the new WordPress website. Once the DNS change has taken effect, open your domain and verify that the WordPress website is loading correctly. |
Step 13: Check the Website After Going Live
Installing WordPress and moving your content does not mean the migration is complete. Before pointing your domain to the new website, test the WordPress site carefully.
Go through the website as a normal visitor would. Open important pages, click links, submit forms, and check the website on different screen sizes.
Use this checklist:
- Make sure the homepage loads correctly.
- Open all important pages and check their content and layout.
- Check that blog posts contain the correct text, formatting, and images.
- Test the navigation menu on desktop and mobile.
- Submit your contact forms and confirm that messages are delivered.
- Check the website on phones and tablets.
- Click internal links and confirm that they lead to the correct pages.
- Confirm that HTTPS and the SSL certificate are working.
- Check important page titles and meta descriptions.
- Open a non-existent URL and confirm that the 404 page works.
- Test all 301 redirects for URLs that have changed.
- Check the website’s loading speed.
- Confirm that Google Search Console is connected.
- Check Google Analytics tracking if you use it.
Important: Fix broken links, missing images, incorrect redirects, and other problems before making the new website live. Finding these issues before launch is much easier than fixing them after visitors and search engines start using the new website.
What to Do With Your Wix Website After Migration
Do not cancel your Wix plan immediately after the WordPress website goes live.
Keep the Wix website available for a short period while you confirm that the migration is complete. The old website can still be useful as a reference if you discover missing content, images, URLs, or other information.
During this period, check that:
- Your domain points to the new WordPress hosting.
- Important pages open correctly.
- 301 redirects work as expected.
- Contact forms and other website features work correctly.
- Important images and content are available.
- The website works correctly on desktop and mobile.
- Google Search Console does not show important crawl or indexing issues.
Once you have confirmed that you no longer need the old Wix website, you can cancel the Wix plan.
Do not cancel Wix simply because your WordPress website is live. First make sure you have everything you need from the old website.
Common Wix to WordPress Migration Mistakes
A few common mistakes can cause problems during or after a Wix-to-WordPress migration. Checking these areas before launch can help you avoid them.
- Cancelling Wix too early: Keep the Wix website available until the WordPress migration has been checked completely. You may need the old website as a reference for missing content or settings.
- Not recording old URLs: Create a list of your important Wix URLs before starting the migration. This makes it easier to recreate the same URLs or create redirects where they need to change.
- Forgetting 301 redirects: If an important Wix URL changes, create a 301 redirect to the corresponding WordPress URL. Test the redirects before launch.
- Leaving Images behind: Images may require separate handling during the migration. Check your important pages and posts to make sure all required images have been uploaded to WordPress.
- Forgetting SEO settings: Review important SEO titles, meta descriptions, headings, internal links, canonical settings, and other SEO elements before launching the new website.
- Changing too many things at once: Avoid making unnecessary changes to your content, URLs, site structure, and SEO settings at the same time as the migration. Keeping important elements consistent makes problems easier to identify.
- Ignoring mobile users: A website that looks correct on a desktop computer may have layout problems on smaller screens. Test the WordPress website on phones and tablets before launch.
- Forgetting SSL: Make sure your WordPress website loads correctly over HTTPS and that there are no SSL certificate warnings.
- Not checking Google Search Console: Check Google Search Console after the migration for indexing, crawling, sitemap, and other website issues.
Wix to WordPress Migration Checklist
You have now covered all the main steps of moving your website from Wix to WordPress. Use the checklist below to keep track of the migration and make sure you do not miss any important steps.
Go through each section in order and check off each task as you complete it. You can complete the migration at your own pace without doing everything at once.
1. Before Migration
Prepare the website and hosting environment before moving any content.
- Save copies of important Wix content.
- Create a list of important Wix URLs.
- Purchase WordPress hosting.
- Install WordPress on the new hosting account.
- Keep your existing Wix website online.
2. During Migration
Build the new website and move your content to WordPress.
- Move blog posts using RSS where supported or migrate them manually.
- Recreate static Wix pages.
- Download and upload important images and media.
- Install and configure your WordPress theme.
- Rebuild your website design.
- Recreate menus and other website features.
- Install required WordPress plugins.
- Add SEO titles and meta descriptions.
- Match your old URLs where possible.
- Create 301 redirects for changed URLs.
3. Before Going Live
Complete these checks before changing your domain’s DNS settings.
- Test the homepage and important pages.
- Check blog posts and images.
- Test navigation menus.
- Test contact forms and other important features.
- Check the website on desktop and mobile.
- Confirm HTTPS and SSL are working.
- Check page titles and meta descriptions.
- Test 301 redirects.
- Check the 404 page.
- Check website loading speed.
- Connect Google Search Console.
4. After Going Live
Once the domain points to WordPress, perform another check using the live domain.
- Confirm that the domain opens the WordPress website.
- Test important pages and posts.
- Check redirects again.
- Submit the WordPress sitemap in Google Search Console.
- Monitor crawl and indexing issues.
- Check forms and other important features.
- Keep the Wix website available temporarily.
- Cancel the Wix plan only after confirming that the migration is complete.
Please keep this checklist available while migrating your website. Checking each item as you complete it makes it easier to identify anything that still needs attention.
Also Read: Migrate From Magento to WordPress
FAQs
Can I move my Wix website to WordPress for free?
Yes, you can! The migration itself does not require a separate migration fee if you do it yourself. However, you will normally need WordPress hosting, and you may have other costs depending on the theme, plugins, or services you choose.
Will I lose my Google rankings when I move from Wix to WordPress?
No! A migration does not automatically mean that you will lose your rankings. However, rankings can change if URLs, content, internal links, or SEO settings are handled incorrectly. This is why you should record your old URLs, set up the necessary 301 redirects, and check your important SEO settings before and after the move.
How long does a Wix to WordPress migration take?
It depends on the size and complexity of your website. A small website with only a few pages may be moved in a day. A larger website with dozens of pages, lots of images, blog posts, and custom features can take several days or longer.
Can I keep my domain when moving from Wix to WordPress?
Yes! You can keep your existing domain when moving your website to WordPress. You normally need to update the domain’s DNS settings so that the domain points to your new WordPress hosting. You can also transfer the domain to another registrar if you want, but that is a separate process from moving the website.
Do I need coding skills to migrate from Wix to WordPress?
No! You can complete most of the migration without writing code. WordPress themes, plugins, hosting tools, and migration tools can handle many parts of the process.
Conclusion
A Wix-to-WordPress migration involves several separate tasks, including setting up hosting, installing WordPress, recreating the website, moving content and media, matching URLs, configuring SEO, connecting the domain, and testing the new website.
The safest approach is to complete each stage in order and keep the Wix website available until the WordPress version has been fully checked.
Before cancelling Wix, make sure your domain, pages, content, images, forms, redirects, SEO settings, analytics, and other important features are working correctly.
Once everything has been verified, you can complete the migration and continue managing your website through WordPress.