I have deployed Django apps on VPS servers more times than I can count, and let me tell you something. Most guides out there will leave you halfway confused about why Nginx is not loading or why Gunicorn is showing errors.
That is not going to happen here in my guide.
My research team and I put together this guide after testing every single step on a live VPS server.
I have also attached screenshots of every step to help you deploy the django app on a VPS server exactly the way I’ve done.
If you have a Django project on your local machine and you want it live on the internet, this is the only guide you need to read right now.
| Please Note: Every step in this guide has been personally tested and verified by my team on an Ubuntu 22.04 VPS. The commands you see here work. Follow them in order and you will have a live Django app running in production. |
What is a VPS and Why Do You Need a VPS for Django?
A VPS (Virtual Private Server) is a virtual server created from a physical server using virtualization technology. It gives you a dedicated slice of the physical server with your own RAM, CPU cores, NVMe SSD storage, operating system and root access.
The resources of your VPS are reserved ONLY for you and cannot be used by other users on the same physical machine. This provides full control over your server environment.
It allows you to install software, host websites, run databases, deploy applications and configure the server exactly the way you need.
Before you start running commands, you need to understand why a VPS is the right choice for your Django application.
See! A lot of developers try to host Django apps on free shared hosting and wonder why performance is terrible.
It is very important to NOTE that Django apps need a real application server like Gunicorn to handle requests, a proper web server like Nginx to serve traffic and a database like PostgreSQL running on the same machine or nearby.
- Shared hosting does not give you the access or resources needed to set all of this up.
- A VPS does. You get full root access, full control over your server environment and the freedom to install and configure anything you want.
| Why VPS Over Shared Hosting? Shared hosting does not give root access and cannot run Gunicorn or configure Nginx. A VPS gives you the full root access that Django needs to run in production. |
Why I Recommend YouStable VPS for Deploying Django Apps
My team has tried 20+ VPS providers over a decade and when I recommend one to someone who is deploying their first Django app, I always tell them to buy YouStable VPS server. Here is why.
YouStable has been running since 2015 and has built a solid reputation for offering affordable VPS servers packed with features that more expensive providers charge extra for.
When you are deploying a Django app, the last thing you need is a slow server.
Key Reasons to Choose YouStable VPS
Here is what stood out to my research team after reviewing YouStable’s VPS plans:
- Pricing starts at around $3.67 per month with discounts available, making it one of the most affordable options for getting started.
- 99.99% uptime guarantee backed by their infrastructure, so your Django app stays online.
- NVMe SSD storage, which means your database queries and file reads are significantly faster than normal servers.
- Full root access, which you absolutely need to install Python packages, configure Nginx, and set up Gunicorn.
- Choice of control panel including CyberPanel, cPanel, and DirectAdmin for those who want a GUI on top of their server.
- Free migration up to 5 GB if you are moving an existing project.
- DDoS protection built into every plan, which protects your Django app from traffic-based attacks.
- 1 Gbps network speed for fast response times.
- Support for multiple operating systems including Ubuntu, AlmaLinux, Rocky, and Debian.
- 24/7 customer support via chat, call, and tickets, with real humans responding.
- AMD EPYC processors powering the servers for high compute performance.
| Disclaimer: YouStable is a recommended hosting provider based on my team’s research and experience. Pricing and features may vary. Always check the official YouStable website at youstable.com for the latest plans before purchasing. |
How to Get a YouStable VPS Server
Getting a VPS from YouStable is a straightforward process. Let me walk you through it so you are ready before we get into the Django deployment steps.
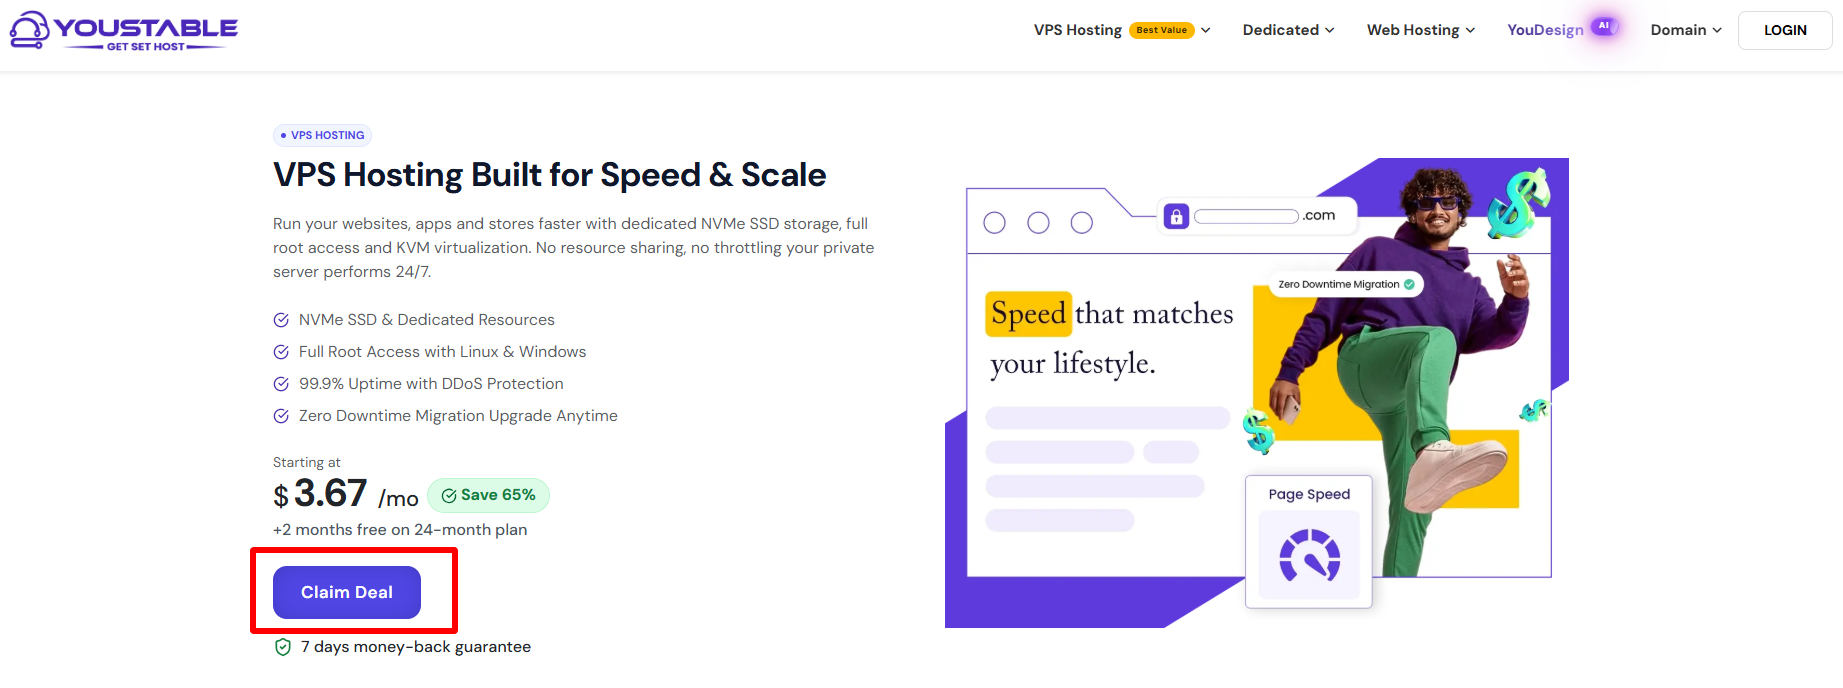
- Go to youstable.com in your browser >> Click on VPS Hosting from the top navigation menu
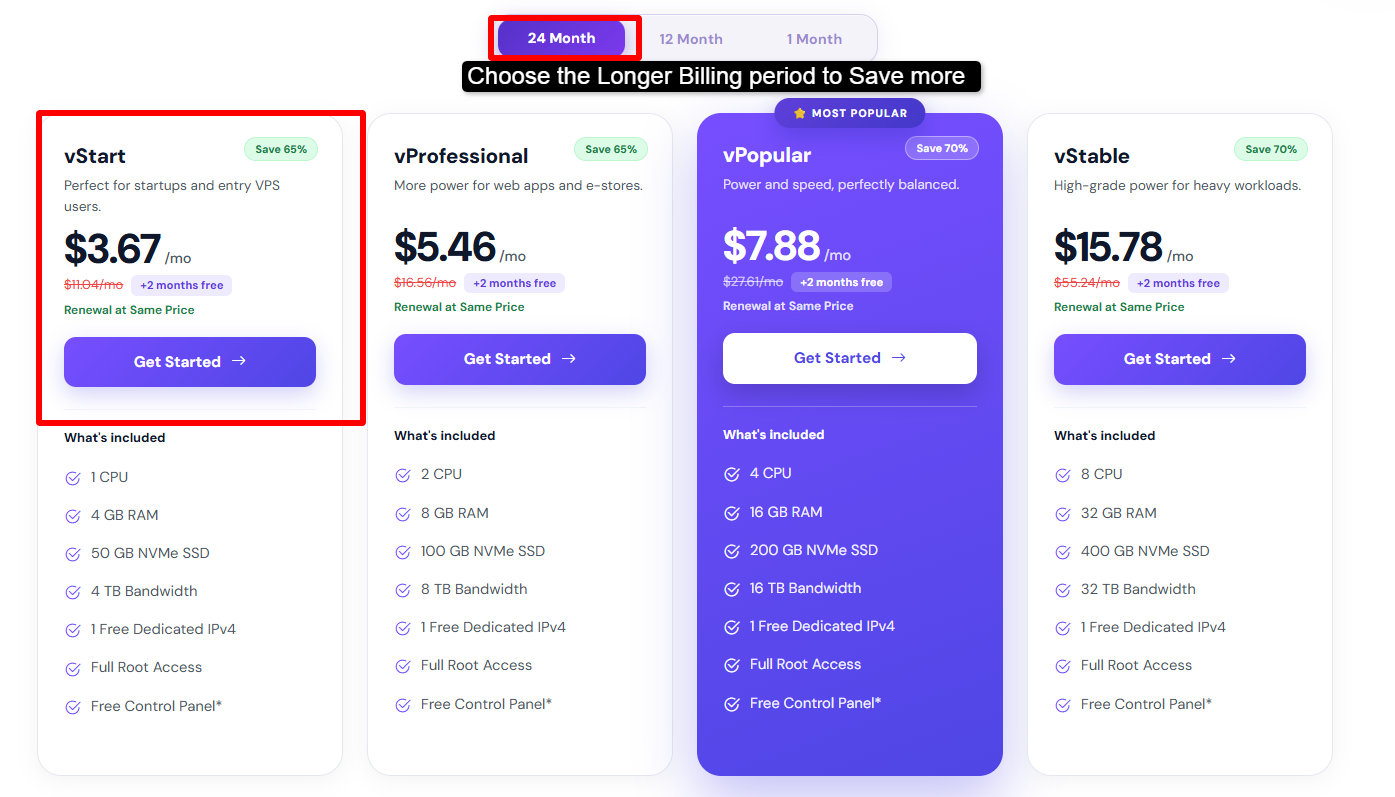
- You will see different VPS plans >> For a beginner Django app, the entry-level plan works well & For a production app expecting real traffic >> Go for a plan with at least 2 GB RAM >> Click Get Started on the plan you want
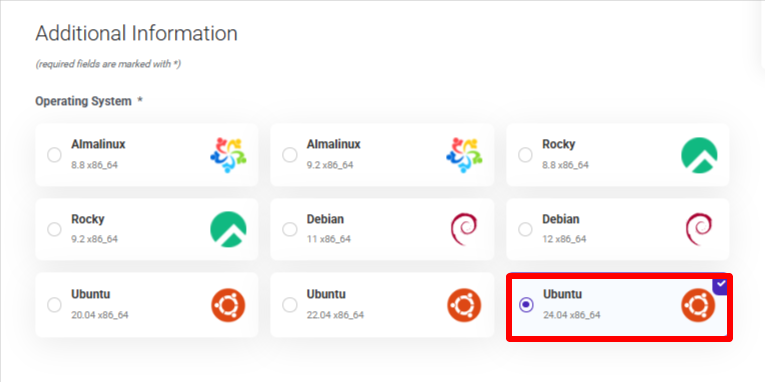
- On the configuration page >> Choose your operating system >> Select Ubuntu 24.04 LTS for this guide
- Select your data center location >> Pick one closest to your target audience for best speed
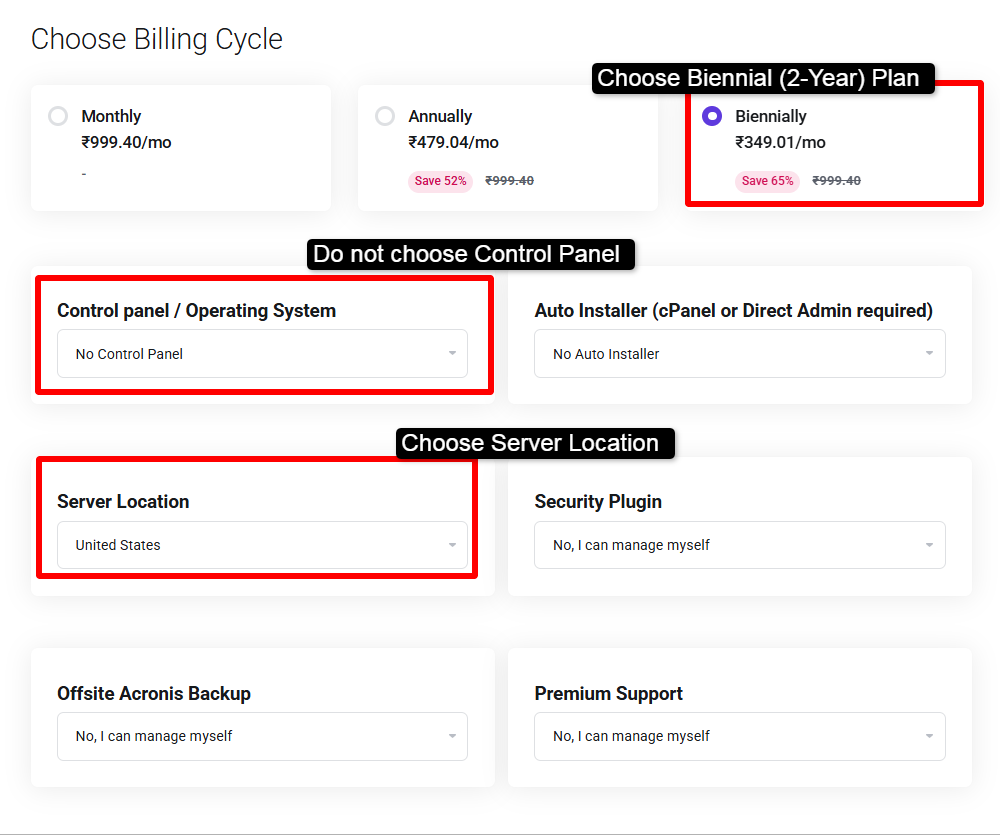
- Complete the billing details >> Create your account >> Make the Payment
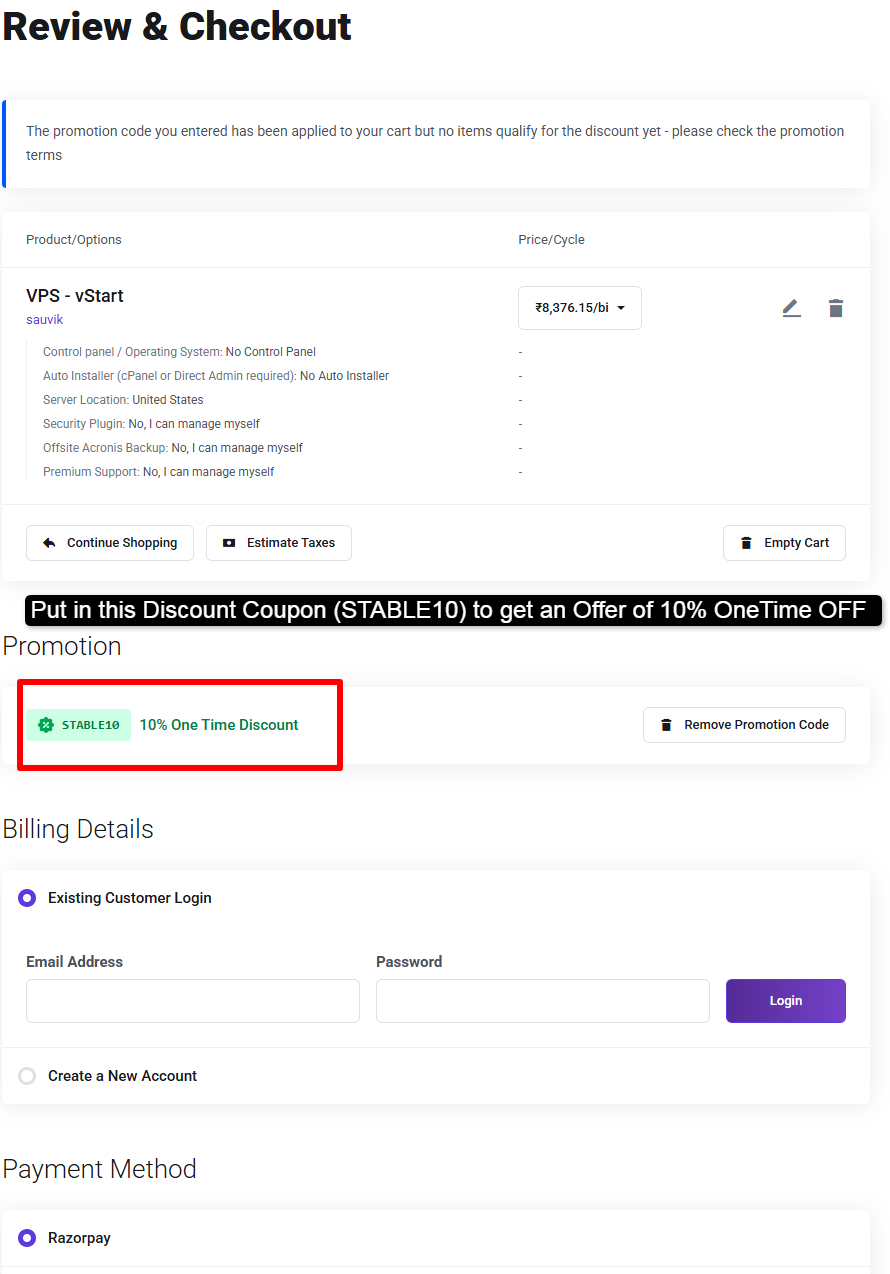
- YouStable will send you an email with your VPS IP address, root username, and password
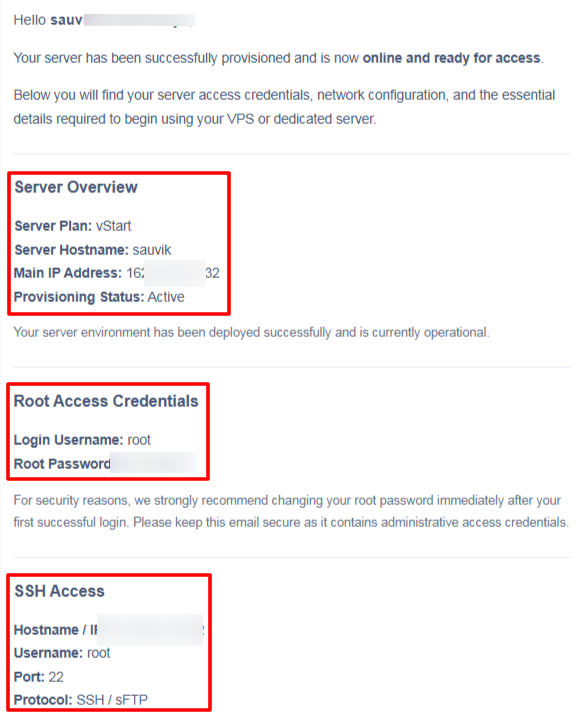
- You are now ready to connect to your server and start deploying your Django app
| Pro Tip: You can use the coupon code STABLE10 during checkout to get a discount on your YouStable VPS plan. |
What You Need Before Deploying Django on VPS
A lot of people jump straight into the steps and then get stuck because something is missing. My team always checks these requirements first before touching the server.
Here is what you need to have ready before you start:
- A VPS running Ubuntu 22.04 LTS with root SSH access
- Your Django project fully developed and tested locally
- A requirements.txt file listing all Python dependencies
- Basic knowledge of the Linux command line
- A domain name pointed to your VPS IP address (optional but recommended for production)
- SSH client installed on your local machine (Terminal on Mac/Linux, PuTTY or Windows Terminal on Windows)
Please Note: This guide uses Ubuntu 22.04 LTS. The steps also work on Ubuntu 20.04 and Debian-based systems with minor variations. My team has tested on both.
Understanding the Django Deployment Architecture
Before running any commands, I want you to understand what we are building. A lot of tutorials skip this and leave you confused when something breaks.
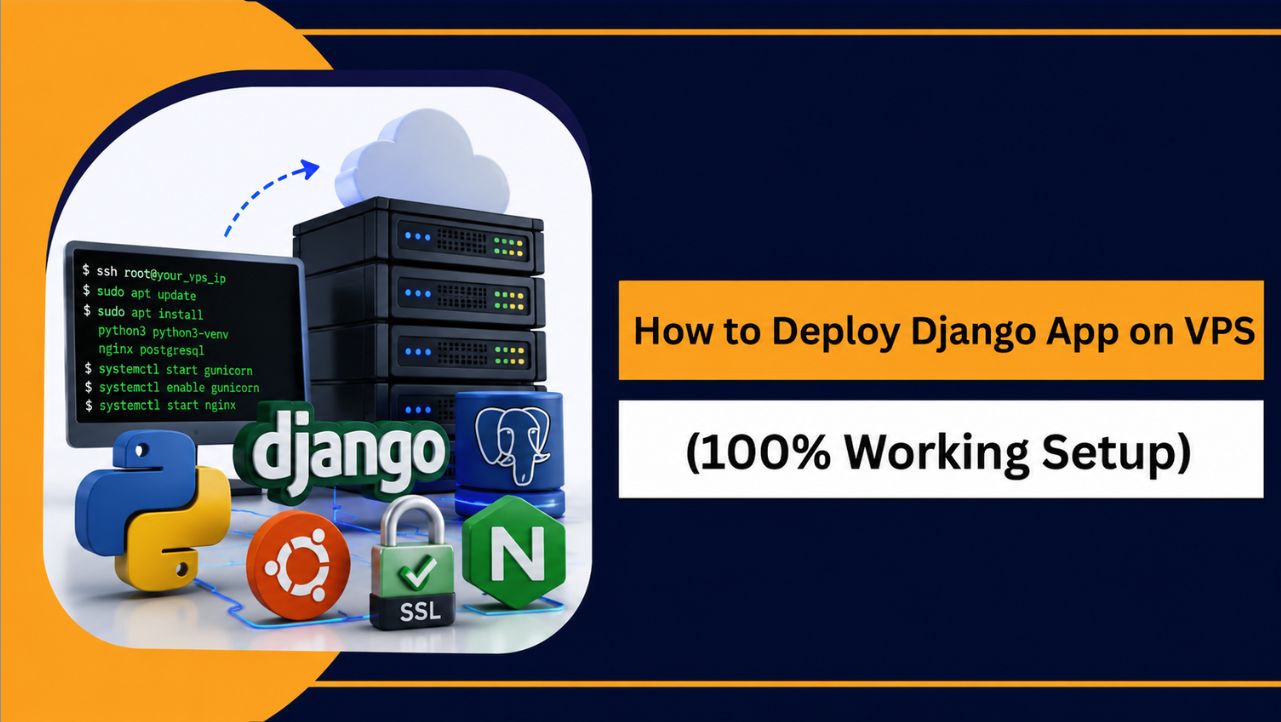
Here is how the pieces fit together on your VPS:
- Nginx sits at the front and receives all incoming requests from browsers
- Nginx passes dynamic requests to Gunicorn over a Unix socket
- Gunicorn is the WSGI server that actually runs your Django code
- Django processes the request, queries PostgreSQL if needed, and returns a response
- Nginx also serves static files like CSS and images directly without involving Django
- Systemd manages Gunicorn as a service so it auto-starts on server reboot
This setup handles real production traffic efficiently. Django’s built-in development server is single-threaded, has no security hardening, and is not meant for public traffic. Never use it in production.
How to Deploy Django App on VPS: Step-by-Step Process
I have put all the commands in boxes so that you simply have to copy and paste it in your terminal. This way you do not have to write your commands and the deployment process becomes smooth.
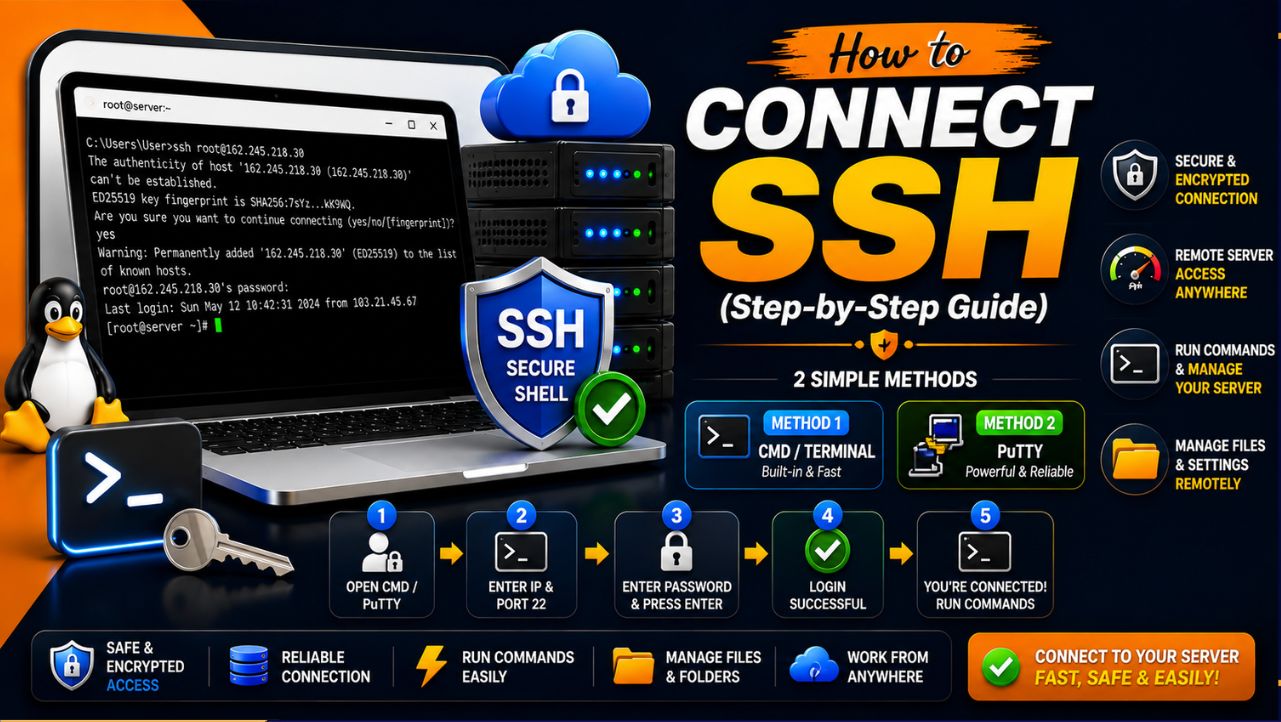
Step 0: Connect to Your VPS via SSH
The first thing you need to do is connect to your VPS. You will do everything through the terminal from here on.
Open your terminal and run this command:
ssh root@YOUR_VPS_IP_ADDRESSReplace YOUR_VPS_IP_ADDRESS with the actual IP address YouStable sent to you in the welcome email.
You will be asked for your password >> Enter it and you are in.
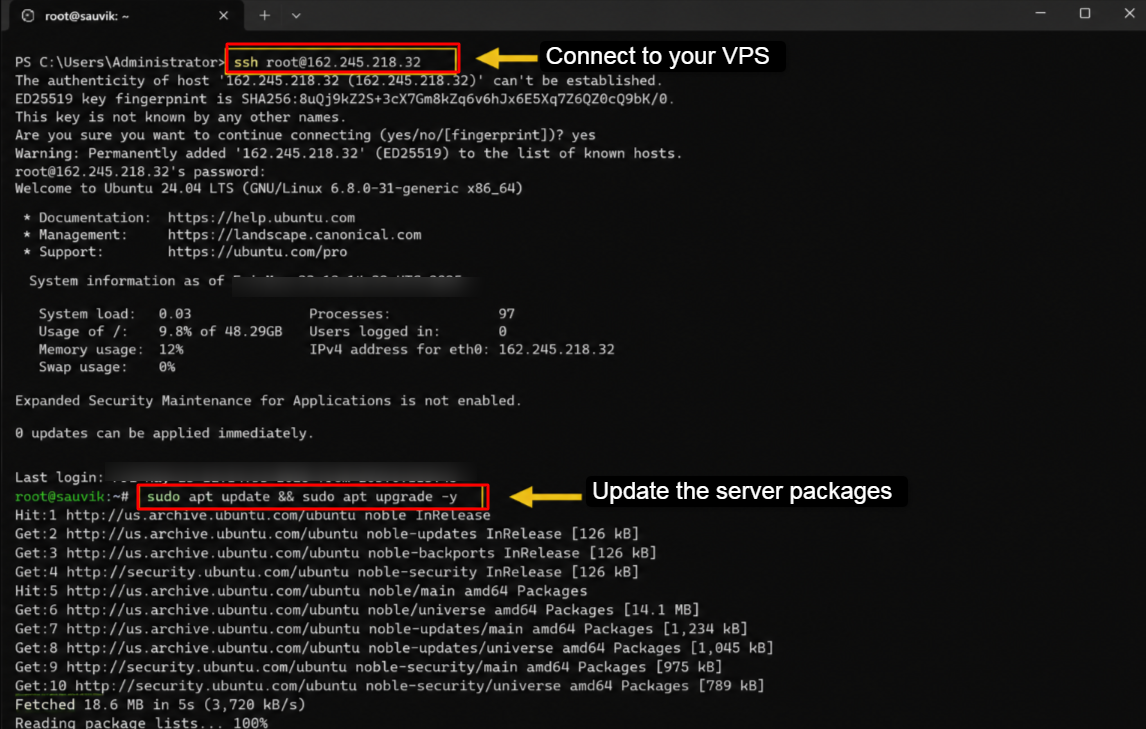
Once you are logged in, the first thing my team always does is update the server packages. This is not optional. A fresh VPS often has outdated packages with known vulnerabilities.
sudo apt update && sudo apt upgrade -yThis will take a minute or two. Let it complete fully before moving on.
| Security Note: It is strongly recommended to create a non-root sudo user before proceeding in a full production setup. Running everything as root increases your attack surface. |
Step 1: Install Required Packages on the Server
Now that your server is updated, you need to install the packages that your Django deployment depends on.
This one command installs everything you need. Run the following command on your VPS:
sudo apt install python3 python3-pip python3-venv python3-dev libpq-dev postgresql postgresql-contrib nginx certbot python3-certbot-nginx git -yHere is what each package does:
- python3, python3-pip, python3-venv, python3-dev: Python and its development tools
- libpq-dev: Required for psycopg2 to connect Django to PostgreSQL
- postgresql, postgresql-contrib: The PostgreSQL database system
- nginx: The web server that will handle incoming requests
- certbot, python3-certbot-nginx: For setting up free SSL certificates later
- git: To pull your project code from your repository
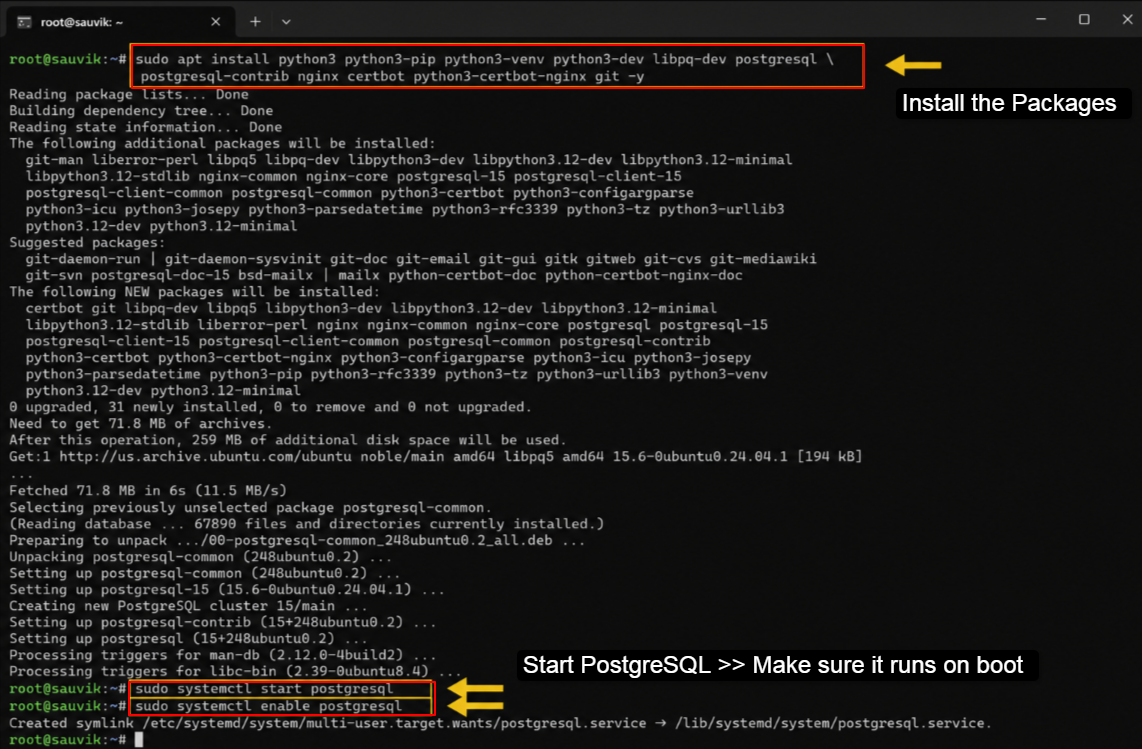
After the installation finishes, start PostgreSQL and make sure it runs on boot:
sudo systemctl start postgresqlsudo systemctl enable postgresqlStep 2: Set Up Your PostgreSQL Database
Your Django app needs a database.
My technical team always recommends PostgreSQL for production over the default SQLite. SQLite is fine for development but not built to handle concurrent writes on a live server.
Switch to the PostgreSQL user and open the database shell:
sudo -u postgres psql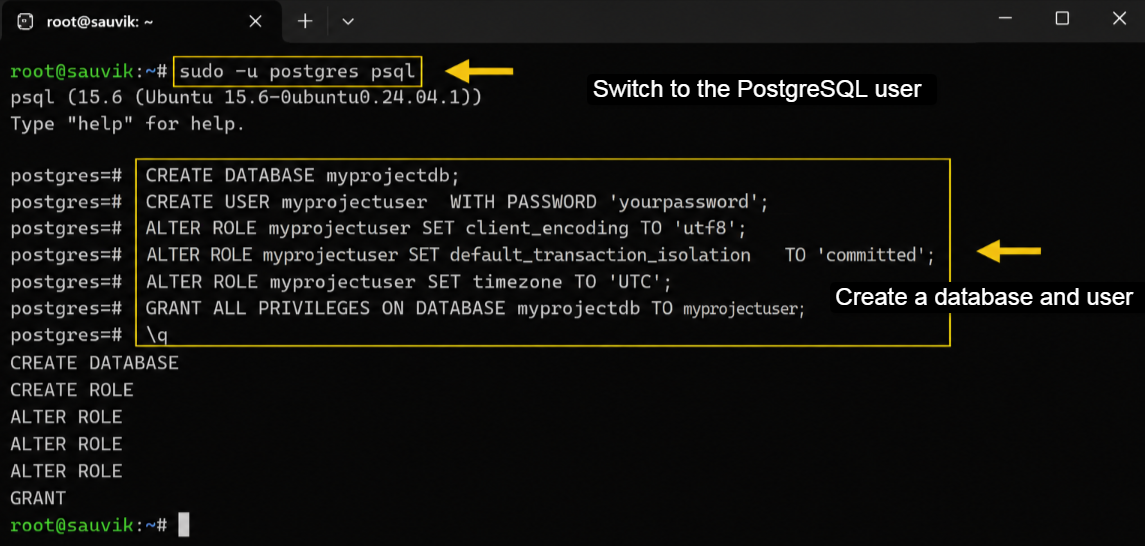
You are now inside the PostgreSQL shell. Create a database and user for your Django app. Replace the names and password with your own:
CREATE DATABASE myprojectdb;CREATE USER myprojectuser WITH PASSWORD 'yourpassword';ALTER ROLE myprojectuser SET client_encoding TO 'utf8';ALTER ROLE myprojectuser SET default_transaction_isolation TO 'read committed';ALTER ROLE myprojectuser SET timezone TO 'UTC';GRANT ALL PRIVILEGES ON DATABASE myprojectdb TO myprojectuser;\qThe \q command exits the PostgreSQL shell. You are back to your regular terminal.
| Important: Write down your database name, username, and password. You will need these in your Django settings file. Do not use simple passwords in production. |
Step 3: Upload Your Django Project to the VPS
Now it is time to get your Django project onto the server. The cleanest way to do this is using Git.
| Make sure your project is pushed to GitHub or GitLab before this step. |
Create a directory for your project and clone it:
mkdir -p /opt/myprojectcd /opt/myprojectgit clone https://github.com/yourusername/yourproject.git appcd app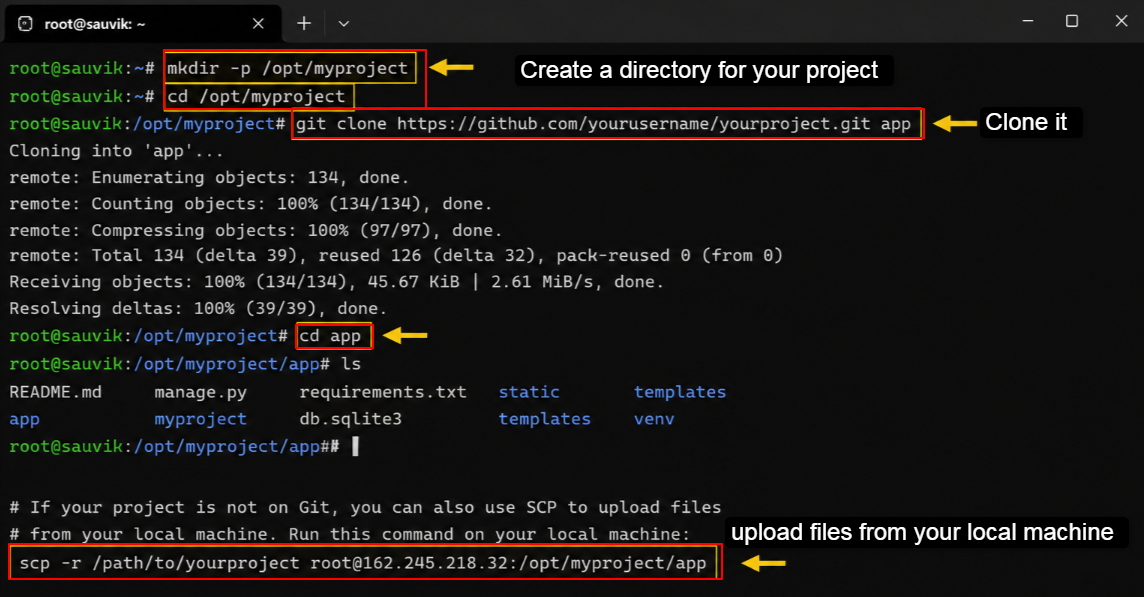
If your project is not on Git, you can also use SCP to upload files from your local machine. On your local machine run:
scp -r /path/to/yourproject root@YOUR_VPS_IP:/opt/myproject/appStep 4: Create a Python Virtual Environment
You never install Python packages globally on a server. A virtual environment keeps your project dependencies isolated from the system Python and from other projects on the same server.
Create and activate the virtual environment inside your project directory:
python3 -m venv venvsource venv/bin/activateYour terminal prompt will now show (venv) at the beginning. That means the virtual environment is active.
Now, install your project dependencies:
pip install -r requirements.txtpip install gunicorn psycopg2-binary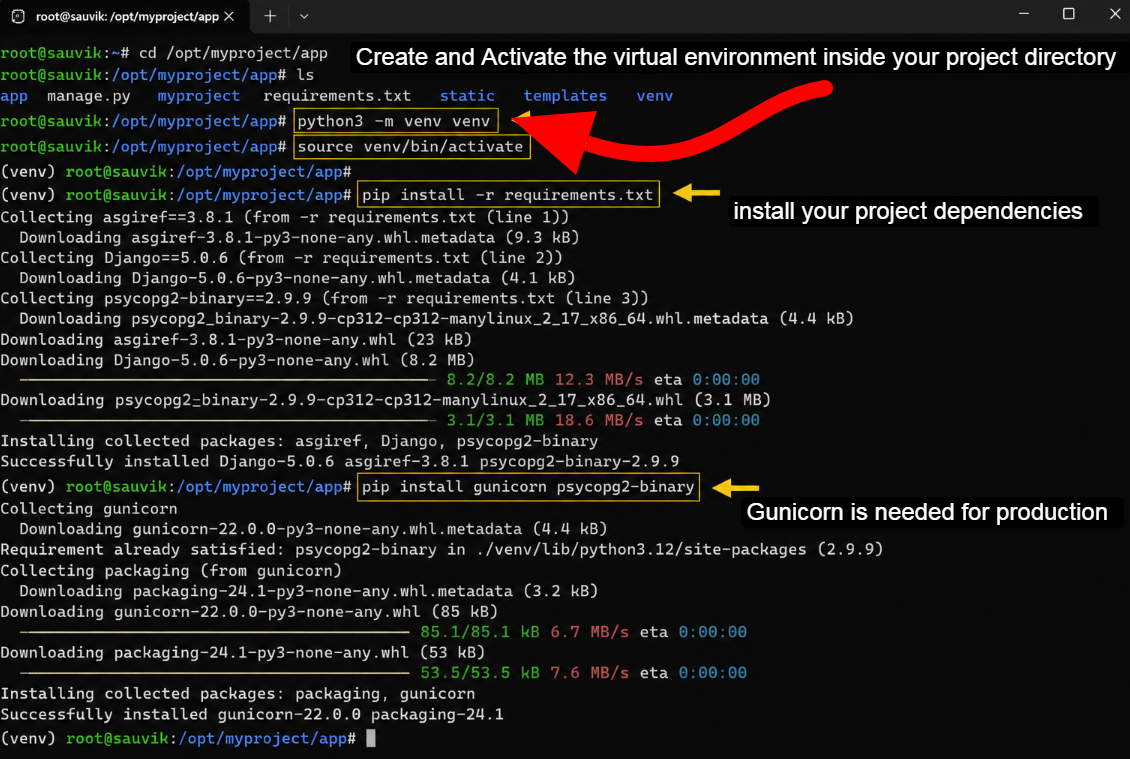
Gunicorn is the application server you need for production. Psycopg2-binary is the PostgreSQL adapter for Python.
| Pro Tip: If you see errors during pip install, make sure libpq-dev and python3-dev were installed in Step 2. These are required to compile psycopg2. |
Step 5: Configure Django Settings for Production
Your Django settings file needs to be updated before you can run the app in production. My team always makes these changes and we never skip them.
Open your settings.py file:
nano /opt/myproject/app/yourproject/settings.pyMake the following changes:
- Set DEBUG to False
DEBUG = False- Never run DEBUG = True in production. It exposes your source code, settings, and database queries to anyone who triggers an error.
- Update ALLOWED_HOSTS
ALLOWED_HOSTS = ['yourdomain.com', 'www.yourdomain.com', 'YOUR_VPS_IP']- Update Database Settings
DATABASES = { 'default': { 'ENGINE': 'django.db.backends.postgresql', 'NAME': 'myprojectdb', 'USER': 'myprojectuser', 'PASSWORD': 'yourpassword', 'HOST': 'localhost', 'PORT': '5432', }}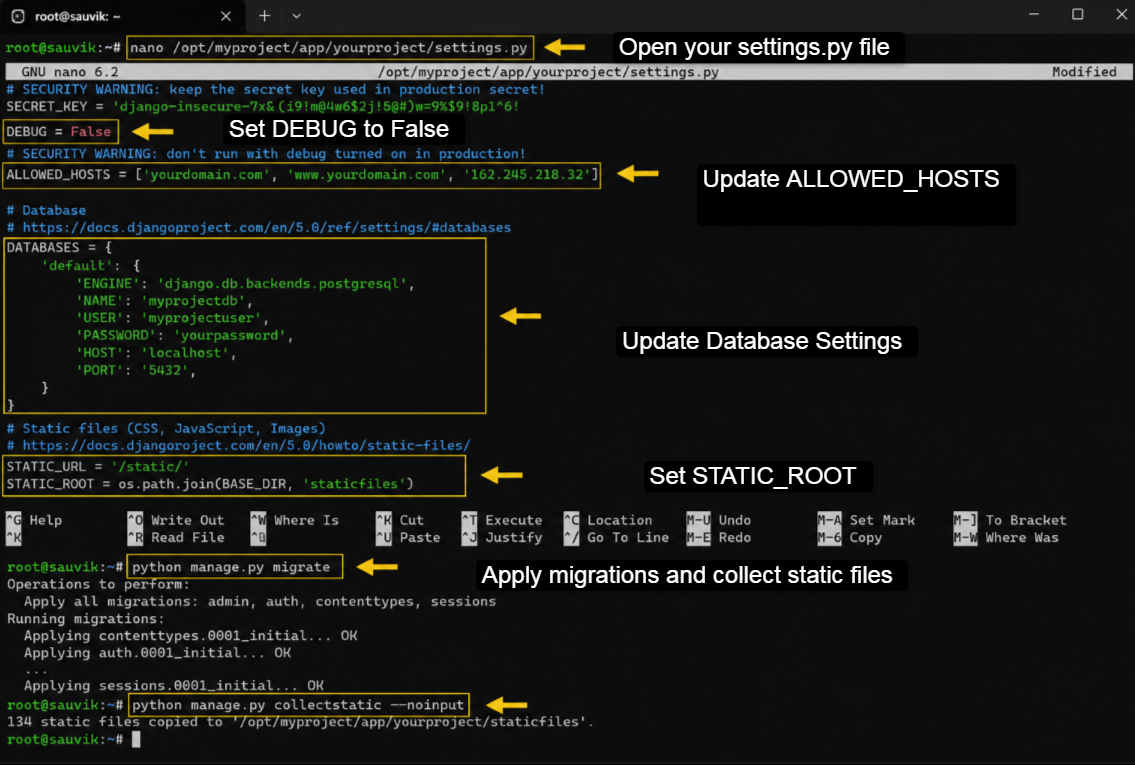
- Set STATIC_ROOT
STATIC_URL = '/static/'STATIC_ROOT = os.path.join(BASE_DIR, 'staticfiles')- After updating settings, run these commands to apply migrations and collect static files:
python manage.py migratepython manage.py collectstatic --noinputPlease note down one thing: Avoid hardcoding passwords in settings.py. Use environment variables or a .env file with a library like python-decouple to keep sensitive data out of your codebase.
Step 6: Set Up Gunicorn as a Systemd Service
Gunicorn is what actually runs your Django app. Without it, Nginx has nothing to pass requests to. My team sets it up as a systemd service so it runs automatically when the server starts and restarts automatically if it crashes.
Create the Gunicorn service file:
sudo nano /etc/systemd/system/gunicorn.serviceAdd the following content. Replace the paths and usernames with your actual setup:
[Unit]Description=gunicorn daemonAfter=network.target [Service]User=rootGroup=www-dataWorkingDirectory=/opt/myproject/appExecStart=/opt/myproject/app/venv/bin/gunicorn \ --access-logfile - \ --workers 3 \ --bind unix:/opt/myproject/app/gunicorn.sock \ yourproject.wsgi:application [Install]WantedBy=multi-user.target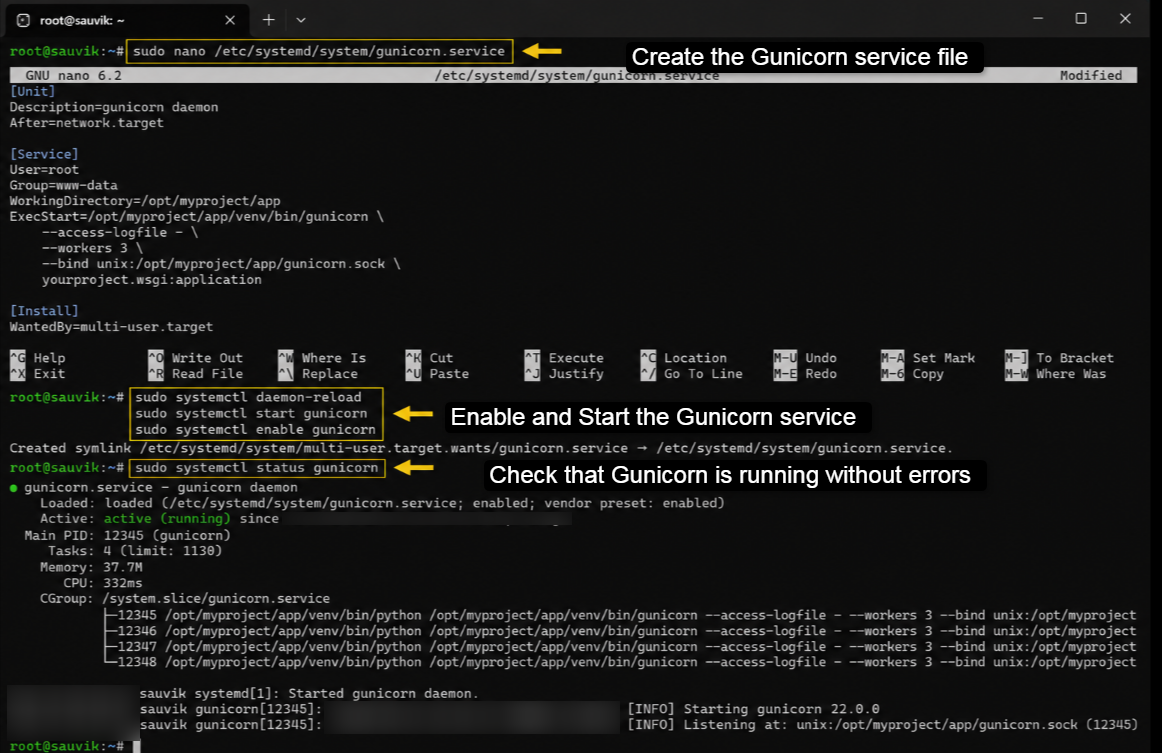
Save the file with Ctrl + O, >> Enter, >> Exit with Ctrl + X. Now enable and start the Gunicorn service:
sudo systemctl daemon-reloadsudo systemctl start gunicornsudo systemctl enable gunicornCheck that Gunicorn is running without errors:
sudo systemctl status gunicornYou should see active (running) in the output. If you see an error, check that the path in ExecStart points to the correct gunicorn binary inside your venv.
Worker Count Formula: Set the number of Gunicorn workers to 2 x (number of CPU cores) + 1. For a 1-core VPS, use 3 workers. For a 2-core VPS, use 5 workers.
Step 7: Configure Nginx as a Reverse Proxy
Nginx is the public-facing part of your setup. It receives all browser requests and passes them to Gunicorn. It also serves your static files directly without going through Django, which speeds things up considerably.
- Create an Nginx configuration file for your project:
sudo nano /etc/nginx/sites-available/myproject- Add this configuration:
upstream gunicorn_myproject { server unix:/opt/myproject/app/gunicorn.sock fail_timeout=0;} server { listen 80; server_name yourdomain.com www.yourdomain.com; location /static/ { alias /opt/myproject/app/staticfiles/; } location /media/ { alias /opt/myproject/app/media/; } location / { proxy_pass http://gunicorn_myproject; proxy_set_header Host $http_host; proxy_set_header X-Real-IP $remote_addr; proxy_set_header X-Forwarded-For $proxy_add_x_forwarded_for; proxy_set_header X-Forwarded-Proto $scheme; proxy_redirect off; }}- Save and close the file. Now enable this configuration by creating a symlink:
sudo ln -s /etc/nginx/sites-available/myproject /etc/nginx/sites-enabled/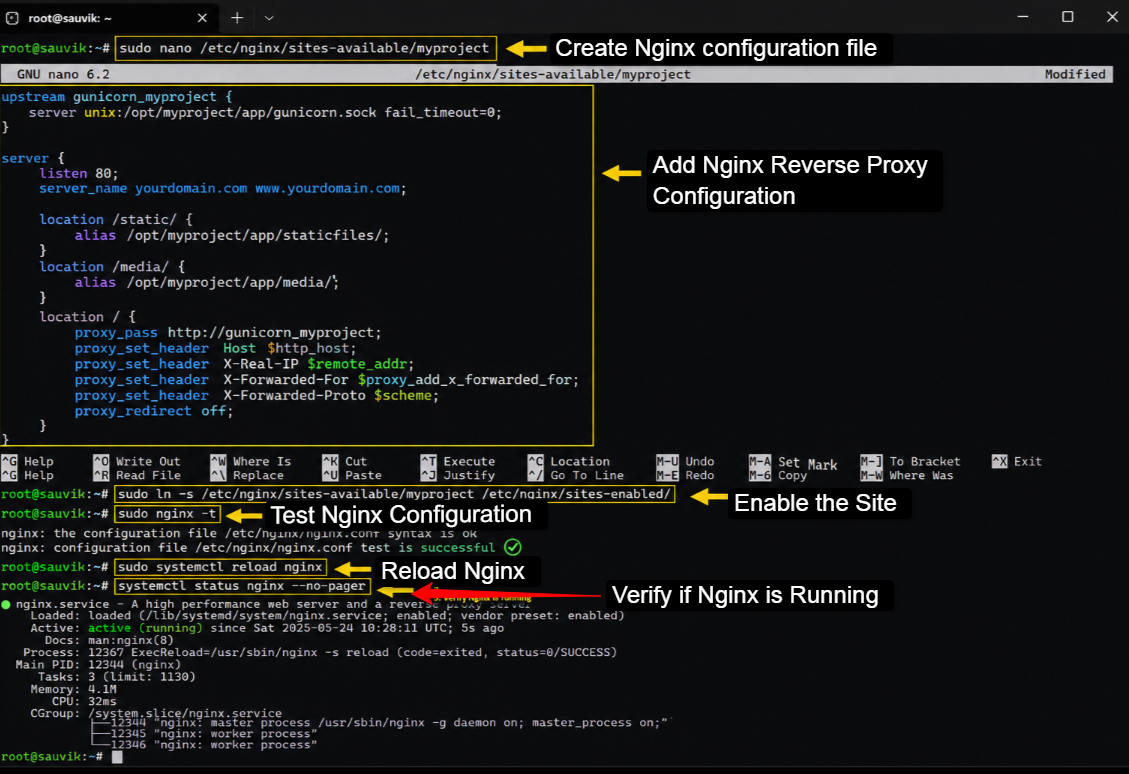
- Test your Nginx configuration for errors:
sudo nginx -t- If you see syntax is ok and test is successful, reload Nginx:
sudo systemctl reload nginxPlease Note: If you used your VPS IP address instead of a domain in server_name, replace yourdomain.com with your IP address. For production, always use a domain name.
Step 8: Configure the Firewall
Your server has a firewall that controls which ports accept traffic. You need to allow Nginx and SSH through so your site is accessible.
sudo ufw allow 'Nginx Full'sudo ufw allow OpenSSHsudo ufw enable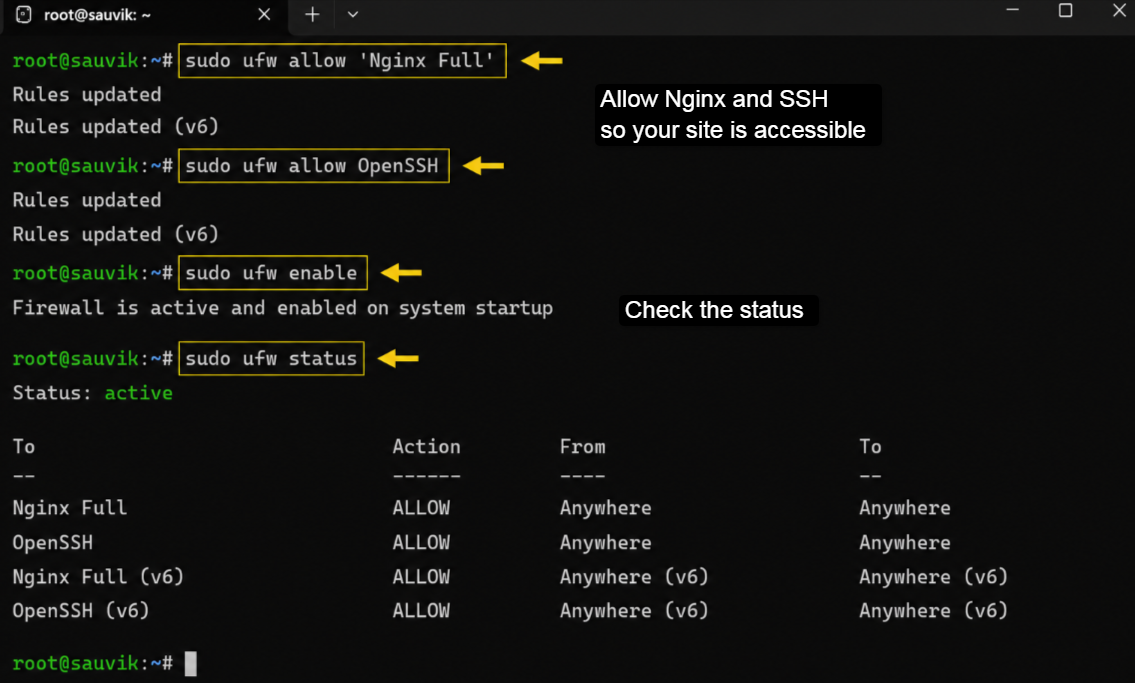
Check the status:
sudo ufw statusYou should see both Nginx Full and OpenSSH in the allowed list.
Step 9: Set Up Free SSL with Let’s Encrypt
Running your Django app over HTTP is not acceptable for production. Google penalizes HTTP sites in search rankings and browsers show security warnings to your visitors. My team always sets up SSL immediately after getting the site running.
Certbot makes this completely free and takes under two minutes:
sudo certbot --nginx -d yourdomain.com -d www.yourdomain.comCertbot will ask for your email address and ask you to agree to the terms. After that, it automatically updates your Nginx configuration to handle HTTPS and sets up automatic certificate renewal.
Test that automatic renewal works:
sudo certbot renew --dry-run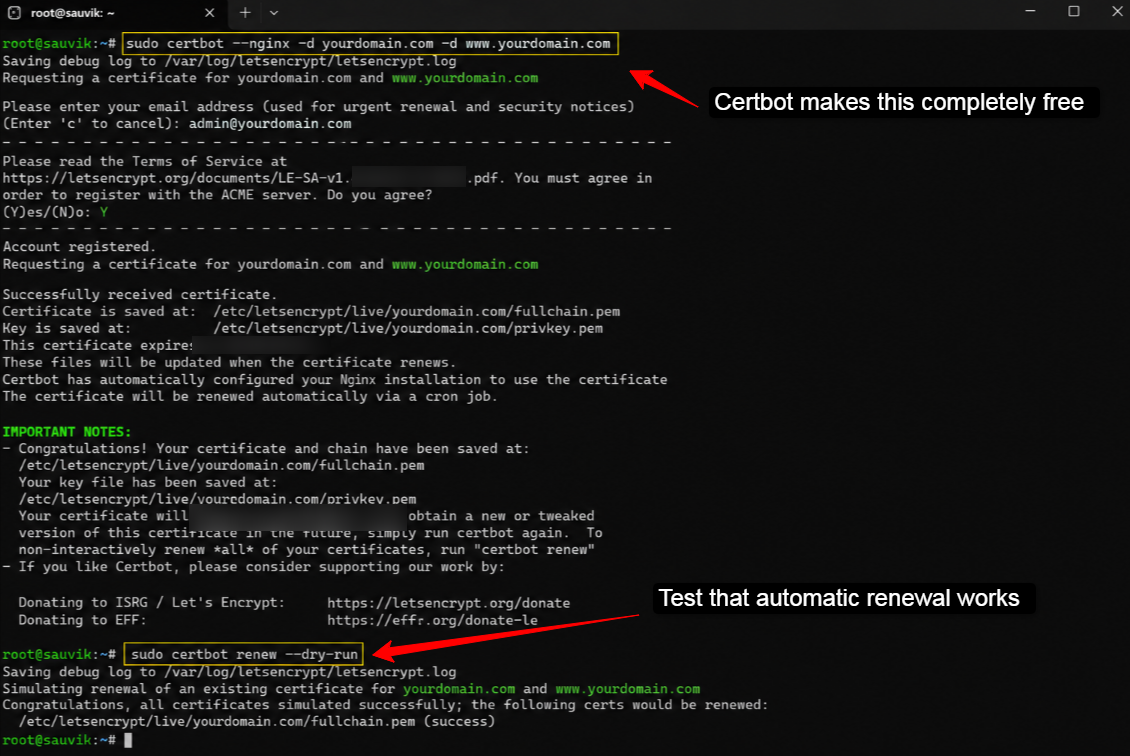
Your Django app is now running over HTTPS.
| Disclaimer: Let’s Encrypt SSL certificates are free and valid for 90 days. Certbot sets up automatic renewal via a systemd timer or cron job. You do not need to manually renew them. |
Step 10: Test Your Django Deployment
Now open your browser and visit your domain or VPS IP address. You should see your Django app loading correctly.
If you see a 502 Bad Gateway error, the most common cause is Gunicorn not running. Check its status:
sudo systemctl status gunicorn
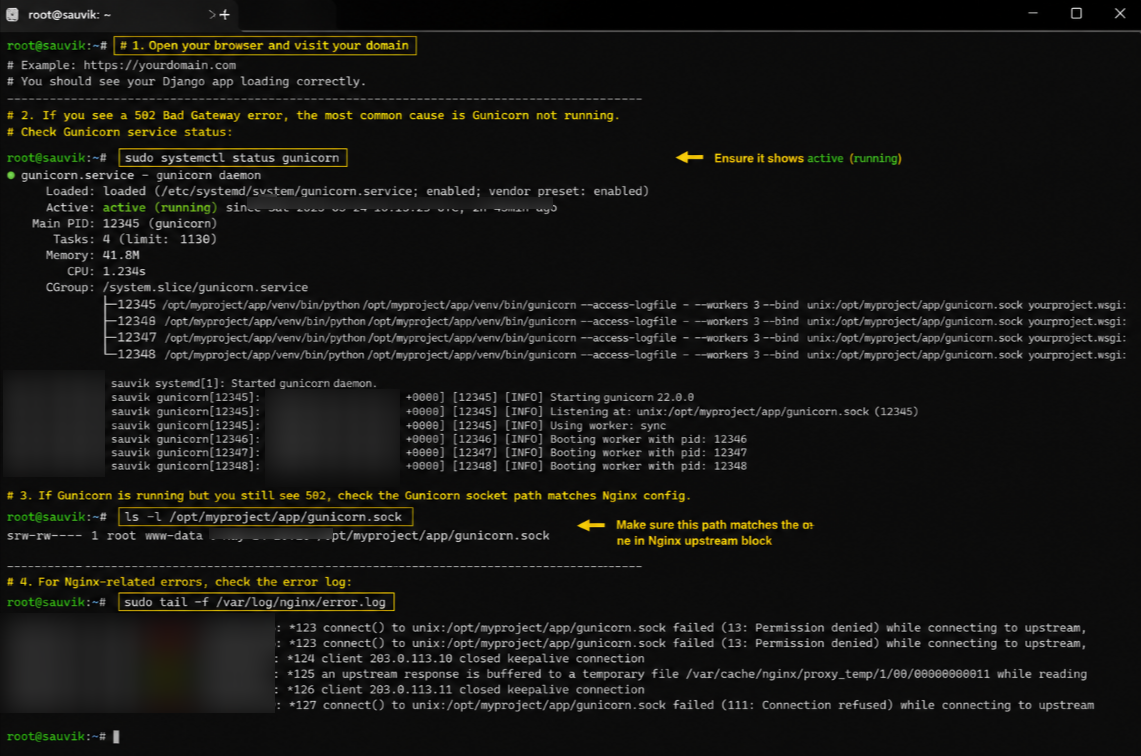
If Gunicorn is running but you still see 502, check the Gunicorn socket path matches what you put in Nginx:
ls -l /opt/myproject/app/gunicorn.sockFor Nginx-related errors, check the error log:sudo tail -f /var/log/nginx/error.logYour Django App is now Live 👍
How to Update Your Django App on VPS After Changes
Once your app is live, you will make changes and need to push updates to the server. Here is the process my team uses every time.
- Pull the latest code on your server:
cd /opt/myproject/appgit pull origin main- Activate the virtual environment and install any new dependencies:
source venv/bin/activatepip install -r requirements.txt- Apply any new database migrations:
python manage.py migrate- Collect static files again if you changed them:
python manage.py collectstatic --noinput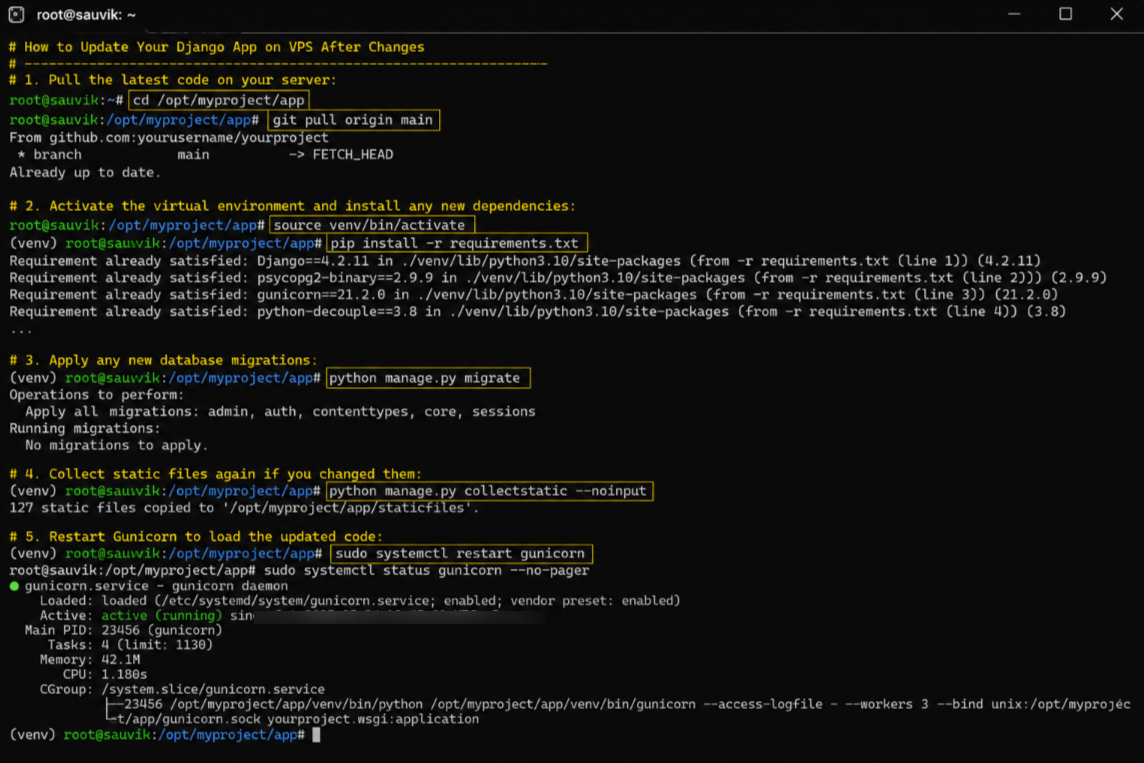
- Restart Gunicorn to load the updated code:
sudo systemctl restart gunicornYou do not need to restart Nginx unless you changed the Nginx configuration file.
Pro Tip: If you restart Nginx along with Gunicorn, there may be a brief moment where requests fail. Restarting only Gunicorn causes zero Nginx downtime.
Common Errors When Deploying Django on VPS & How to Fix Them
My research team compiled the most common issues developers run into when deploying Django on a VPS. Here are the problems and their solutions.
502 Bad Gateway
This means Nginx cannot reach Gunicorn.
Check that Gunicorn is running with sudo systemctl status gunicorn and verify the socket path in both the gunicorn.service file and the Nginx configuration match exactly.
Static Files Not Loading
This happens when STATIC_ROOT is not set correctly in settings.py or when you forgot to run python manage.py collectstatic.
Run it again and make sure the alias path in Nginx matches your STATIC_ROOT value.
DisallowedHost at /
This error means the domain or IP you are using is not in ALLOWED_HOSTS. Open settings.py and add your domain and VPS IP to the ALLOWED_HOSTS list.
Database Connection Refused
Check that PostgreSQL is running with sudo systemctl status postgresql. Also verify the database name, username, and password in settings.py match what you created in Step 3.
Permission Denied on Gunicorn Socket
This means Nginx cannot read the Gunicorn socket. Make sure the Nginx user (www-data) has read access to the socket file.
You may need to adjust the User setting in your gunicorn.service file.
Best Practices for Running Django in Production on VPS
Getting Django running is one thing. Keeping it running reliably and securely is another. My team has learned these practices the hard way so you do not have to.
- Always keep DEBUG = False in production. This is not negotiable
- Use environment variables for all sensitive settings like SECRET_KEY and database passwords
- Set up automated daily backups of your PostgreSQL database
- Monitor your server with tools like Netdata or UptimeRobot to catch issues before your users do
- Rotate your SSH keys periodically and disable password authentication for SSH
- Keep your server packages updated regularly with sudo apt update && sudo apt upgrade
- Set SECURE_SSL_REDIRECT = True and SECURE_HSTS_SECONDS = 31536000 in your Django settings after SSL is configured
- Enable Django’s CSRF and session cookie security settings for production
FAQs
Can I deploy Django on a VPS without using Nginx?
Yes, you can deploy Django on a VPS without using Nginx by running Gunicorn directly and exposing its port to the internet. This works for development, testing, or small internal applications, but it is not recommended for production deployments.
How much RAM do I need for a Django VPS?
You need a minimum of 1 GB RAM for a Django VPS. Higher traffic applications should scale to 4 GB or more.
Do I need a domain name to deploy Django on VPS?
No! You do not need a domain to get Django running. You can access your app using the VPS IP address. But for production use, a domain name is important for SSL and professional presentation.
What is the difference between Gunicorn and Nginx?
Gunicorn is a Python WSGI server that runs your Django application code and handles Python-level concurrency. Nginx is a web server that handles HTTP connections, serves static files, terminates SSL, and proxies requests to Gunicorn.
How do I restart my Django app after making code changes?
After pushing updated code to your VPS, run git pull, activate your virtual environment, install any new dependencies, run migrations, collect static files if needed and then restart Gunicorn with sudo systemctl restart gunicorn.
Is it safe to use SQLite in production on a VPS?
No! SQLite is not recommended for production Django apps on a VPS. It does not handle concurrent writes well, which becomes a problem the moment more than one user tries to write to the database at the same time.
How do I check if my Django app is running correctly on VPS?
Check the Gunicorn service status with sudo systemctl status gunicorn. Check Nginx status with sudo systemctl status nginx. Visit your domain or VPS IP in a browser. Check Nginx error logs with sudo tail -f /var/log/nginx/error.log for any errors.
Can I host multiple Django apps on one VPS?
Yes. You can host multiple Django apps on one VPS. Each app gets its own Gunicorn service file with a different socket path, its own Nginx server block in a separate sites-available file, its own virtual environment, and its own PostgreSQL database.
My Final Verdict: Your Django App is Now Live on VPS
My team and I have mentioned every step you need to get a Django application running on a VPS.
How to choose the Django VPS server at YouStable to configure PostgreSQL, Gunicorn, Nginx and SSL, everything is covered here.
You started with a blank VPS and now you have a production-ready Django deployment that can handle real traffic, serves HTTPS, restarts automatically after crashes and keeps static files loading fast.
The most important things to remember from this guide:
- always set DEBUG = False,
- always use PostgreSQL over SQLite,
- always put Nginx in front of Gunicorn,
- and always set up SSL before sending real users to your site.
If you are still looking for a reliable and affordable VPS to host your Django app, head over to youstable.com and take a look at their VPS plans.
Starting at under $4 per month with NVMe SSD storage, full root access and 99.99% uptime, it is the server my team trusts for hosting Python and Django applications.
Final Note: This guide has been written and tested by my research team using a live YouStable VPS running Ubuntu 22.04 LTS. All commands shown have been verified to work as mentioned. If you run into an issue, check the common errors section above first.