As websites and online applications grow, many users eventually realize that shared hosting no longer provides the performance or flexibility they need. Slow loading times, limited server control, and resource restrictions often become noticeable as traffic increases. At this stage, many businesses and developers start considering Windows VPS hosting as a more powerful solution.
Migrating to a Windows VPS allows you to run applications on a dedicated virtual server with better performance, more control, and the ability to install custom software. However, for beginners, the idea of moving a website or application to a new server can seem complicated.
The good news is that migration can be completed smoothly when done step by step. With proper preparation and careful execution, you can move your website or application to a Windows VPS with minimal downtime. This guide explains how to migrate to Windows VPS hosting in India using a clear and practical process.
What Is Windows VPS Hosting?
A Windows VPS (Virtual Private Server) is a virtual server created from a physical server using virtualization technology. The physical machine is divided into several virtual servers, each operating independently with its own operating system and resources.
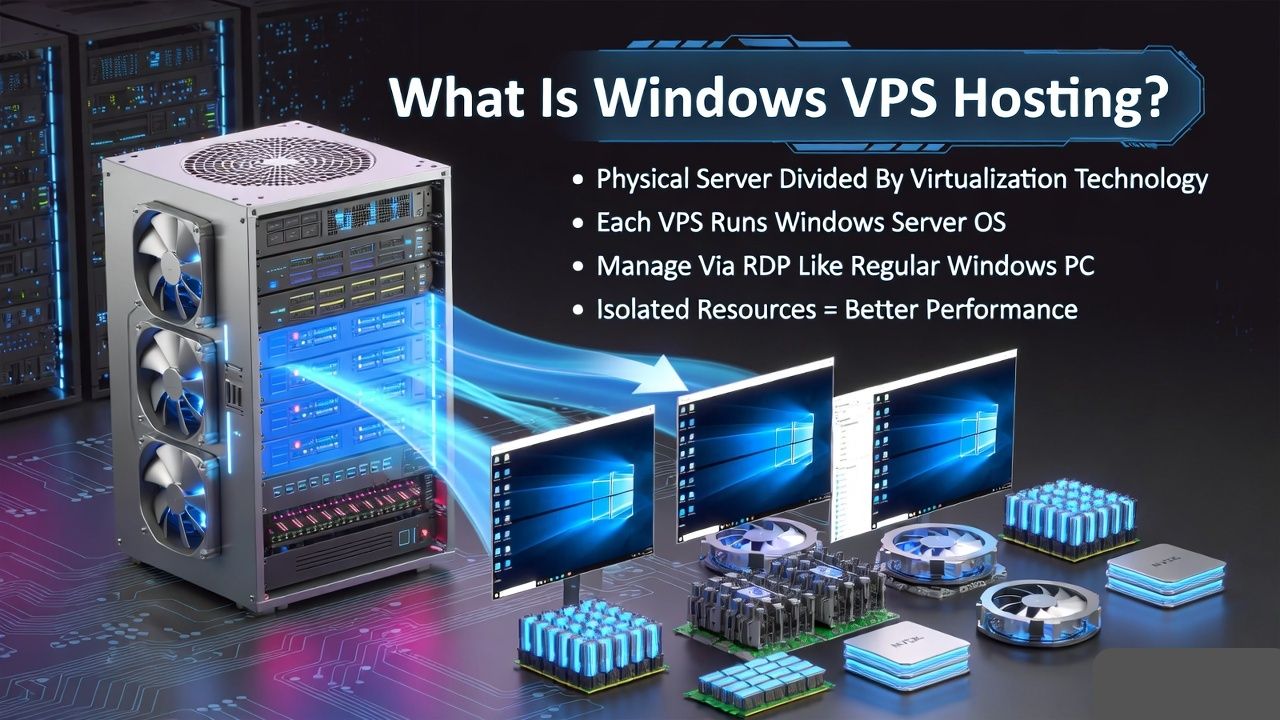
A Windows VPS runs the Microsoft Windows Server operating system, allowing users to access the server through Remote Desktop Protocol (RDP) and manage it like a regular Windows computer.
Each VPS receives dedicated resources such as:
- CPU cores
- RAM memory
- Storage space
- Network bandwidth
Because these resources are isolated, VPS hosting provides better stability and performance compared to shared hosting.
Windows VPS servers are commonly used for:
- Hosting ASP.NET websites
- Running Microsoft SQL Server databases
- Business applications
- Remote desktop work environments
- Software development and testing
Why Migrate to Windows VPS Hosting?
Many websites start on shared hosting because it is affordable and easy to use. However, shared hosting environments place multiple websites on the same server, which means resources are shared among many users.
When website traffic grows or applications require more resources, shared hosting limitations become noticeable.
Migrating to a Windows VPS offers several advantages:
- Improved Performance: Dedicated server resources help maintain consistent website speed.
- Greater Control: Users gain administrator access and can install custom applications.
- Better Security: VPS servers operate in isolated environments, reducing security risks.
- Scalability: Resources such as RAM and CPU can be upgraded as the website grows.
Because of these benefits, many businesses in India migrate to Windows VPS hosting from providers like YouStable, which offer NVMe storage, scalable plans, and reliable server infrastructure.
When Should You Consider Migrating to a Windows VPS?
Certain situations indicate that your website or application may benefit from moving to a VPS environment.
Common signs include:
- Website performance becoming slow
- Increasing website traffic
- Applications requiring custom server software
- Databases growing in size
- Shared hosting limitations affecting performance
If your project requires more flexibility and server resources, migrating to a Windows VPS can provide a better long term solution.
What to Prepare Before Migrating to Windows VPS
Preparation is essential for a smooth migration process. Before moving your website or application, make sure you complete the following steps.
Create a Full Backup
Back up all important files, databases, and configuration settings. This ensures that data can be restored if something goes wrong during migration.
Check Software Requirements
Confirm that the Windows VPS supports the required software such as:
- ASP.NET framework
- Microsoft SQL Server
- IIS web server
- Other application dependencies
Record DNS Settings: Make a note of your current DNS settings so you can update them later when the migration is complete.
Prepare Login Credentials: Ensure you have access to both the old hosting account and the new VPS server.
Proper preparation reduces the risk of downtime and data loss.
Step by Step Guide to Migrate to Windows VPS Hosting
Following a structured migration process helps ensure a smooth transition.
Step 1: Choose a Reliable Windows VPS Provider
The first step is selecting a VPS hosting provider with reliable infrastructure and good performance.
Important factors to consider include:
- NVMe SSD storage
- High network speed
- Secure data centers
- Reliable uptime guarantees
- Technical support availability
Many developers and businesses choose YouStable Windows VPS hosting because it provides modern server hardware, scalable plans, and stable infrastructure designed for Windows based workloads.
Step 2: Set Up Your Windows VPS Server
Once the VPS plan is activated, the hosting provider will send the server details.
These typically include:
- Server IP address
- Administrator username
- Password
Using these credentials, connect to the VPS through Remote Desktop Connection (RDP).
After logging in, perform initial server setup tasks such as:
- Installing Windows updates
- Configuring firewall settings
- Setting administrator passwords
Step 3: Install Required Server Software
The server environment should be configured according to your website or application requirements.
Common software installations may include:
- Internet Information Services (IIS) for web hosting
- ASP.NET frameworks
- Microsoft SQL Server
- Additional application dependencies
Ensuring the correct software environment helps your application run properly after migration.
Step 4: Transfer Website Files
Next, move your website files from the old hosting server to the new VPS.
This can be done using tools such as:
- FTP clients like FileZilla
- Remote Desktop file transfer
- Backup restoration methods
Make sure all website directories, images, scripts, and configuration files are transferred correctly.
Step 5: Import Databases
If your website uses a database, it must be transferred to the new server.
Typical database migration steps include:
- Export the database from the old server
- Import it into Microsoft SQL Server or another database system on the VPS
- Update database user permissions if necessary
After importing the database, verify that all data is accessible.
Step 6: Update Website Configuration
Many websites contain configuration files that define database connections and server paths.
After migration, these settings must be updated to match the new server environment.
Common configuration updates include:
- Database connection strings
- File system paths
- Application environment settings
Ensuring correct configuration prevents application errors.
Step 7: Test the Website on the VPS
Before pointing your domain to the new server, thoroughly test the website.
Check the following:
- Website loading speed
- Database functionality
- Login systems
- Application features
- Error messages
Testing helps ensure everything works correctly before making the server live.
Step 8: Update DNS Settings
After confirming that the website works properly, update the domain’s DNS settings.
Change the A record of your domain to the new VPS server IP address.
DNS propagation may take several hours, during which traffic gradually moves to the new server.
Step 9: Monitor Server Performance
After migration is complete, monitor the server to ensure everything is running smoothly.
Important metrics to check include:
- CPU usage
- RAM usage
- Disk space
- Server logs
Monitoring helps detect potential issues early.
Step 10: Secure Your Windows VPS
Once migration is finished, secure your server environment.
Important security steps include:
- Changing default passwords
- Enabling firewall protection
- Installing antivirus tools
- Creating regular backups
- Updating the operating system
These steps help protect your server from security threats.
Read Also: How to Migrate Your Website to a Dedicated Server (Without Downtime)
Common Migration Mistakes to Avoid
During VPS migration, certain mistakes can cause problems or downtime.
Common issues include:
- Skipping full backups before migration
- Incorrect database connection settings
- Incomplete file transfers
- Updating DNS before testing the website
Careful planning helps avoid these problems.
Benefits of Migrating to Windows VPS Hosting
After migration, most users notice several improvements.
These include:
- Faster website performance
- Better server stability
- More control over the hosting environment
- Ability to install custom software
- Greater scalability for future growth
These benefits make VPS hosting a strong upgrade from shared hosting.
Learn: How to Secure Your Windows VPS in India – 10 Essential Tips
FAQs
Is migrating to Windows VPS difficult?
Migration can be straightforward when completed step by step with proper preparation.
Will my website experience downtime during migration?
Downtime can be minimized by testing the website on the VPS before updating DNS settings.
Can I migrate from shared hosting to Windows VPS?
Yes. Most websites can move from shared hosting to VPS by transferring files and databases.
Do I need technical knowledge for VPS migration?
Basic server knowledge is helpful, although many hosting providers offer migration assistance.
Conclusion
Migrating to Windows VPS hosting allows websites and applications to run on a more powerful and flexible server environment. With dedicated resources, improved performance, and greater server control, VPS hosting is a strong upgrade for growing projects.
By following a structured migration process and preparing properly, you can move your website to a Windows VPS with minimal disruption. Choosing a reliable provider such as YouStable Windows VPS Server can also help ensure stable infrastructure and a smooth transition to a more scalable hosting environment.