I have been working with MongoDB deployments across multiple VPS environments for years. Me and my research team have tested every step in this guide on how to set up MongoDB on a VPS server.
MongoDB is one of the most powerful NoSQL databases out there and running it on your own VPS gives you complete control, better performance and the kind of flexibility you simply cannot get on shared hosting. The steps below assume an Ubuntu VPS, which is what the LTS commands in this guide target.
By the end of this guide, you will have MongoDB fully installed, secured and ready to handle your applications.
Let us get into it.
What is MongoDB and Why Should You Run It on a VPS
Before you jump into the setup steps, it helps to understand what you are working with. MongoDB is not your typical relational database. It does not store data in rows and columns like MySQL or PostgreSQL.
Instead, it uses a document-based model where data is stored in flexible JSON-like structures called BSON (Binary JSON).
This makes it an excellent choice for applications that deal with dynamic or unstructured data.
Running MongoDB on a VPS is the right choice when you need full control over your database environment.
- On shared hosting, you are restricted by the host’s configurations.
- On a VPS, you get root access, dedicated resources, and the freedom to configure everything exactly the way you need it.
My team has consistently seen better query performance and more reliable uptime when MongoDB is deployed on a properly configured VPS compared to managed cloud-only setups.
| Why is MongoDB in demand? It is so because MongoDB stores data as flexible documents rather than rigid tables. This means you can change your data structure at any time |
Key Features of MongoDB You Should Know About
Understanding these features will help you make better decisions during setup.
My research team specifically evaluated these capabilities before recommending MongoDB for production environments.
- Schema-less design: Collections can hold documents with different structures
- Horizontal scaling via sharding across multiple servers
- Replica sets for automatic failover and high availability
- Rich query language with full indexing support
- Aggregation framework for complex data processing
- Native support for geospatial, text, and time-series data
These capabilities make MongoDB suitable for e-commerce platforms, real-time analytics, content management systems, mobile backends and any application where data structures change frequently.
What You Need Before Setting Up MongoDB on Your VPS
Getting the requirements right before you start will save you a lot of frustration.
I have seen people skip this section and end up spending hours troubleshooting issues that could have been avoided in the first place.
Here is what you need to have in place before running a single command.
| Minimum Server Requirements for MongoDB RAM: 2 GB minimum (4 GB or more recommended for production) CPU: 2 cores minimum Storage: 20 GB SSD or NVMe minimum OS: Ubuntu 22.04 LTS or Ubuntu 24.04 LTS Network: SSH access with a stable connection Access Level: Full root access |
On the software side, you need SSH access to your VPS, a basic understanding of Linux terminal commands, and an Ubuntu-based operating system.
My team has tested this guide specifically on Ubuntu 22.04 LTS and Ubuntu 24.04 LTS, and we confirm the steps work reliably on both versions.
Choosing the Right VPS for MongoDB
The performance of your MongoDB instance depends heavily on the quality of your VPS.
You want NVMe SSD storage for fast read/write operations, dedicated RAM so MongoDB is not competing with other users, and full root access so you can configure everything without restrictions.
I recommend YouStable VPS hosting to anyone looking to run MongoDB on a VPS.
My team has evaluated their infrastructure, and here is why YouStable makes sense for this kind of setup.
Why I Recommend YouStable VPS for Running MongoDB
Not all VPS providers are created equal.
When you are running a database like MongoDB, you need a server environment that gives you performance, control, and reliability at an affordable price.
YouStable checks every one of those boxes, and I want to explain why before you go ahead with the setup.
| About YouStable: YouStable has been a web hosting leader since 2015. They offer VPS plans powered by AMD EPYC processors with NVMe SSD storageAlso offers a 99.99% uptime guarantee, full root access, CyberPanel & cPanel control panel options and 24/7 expert support via call, chat, and ticket. Plans start at just $3.86/month with current promotions. |
Here is what makes YouStable a solid choice for a MongoDB VPS deployment:
- Full Root Access: You get complete control over your server. You can install MongoDB, configure it, set up authentication, and tune performance without any restrictions.
- NVMe SSD Storage: MongoDB performs significantly better on NVMe storage compared to regular SSDs. YouStable equips all their VPS plans with NVMe SSD drives, which directly translates to faster read/write speeds for your database.
- 99.99% Uptime Guarantee: For a production database, downtime is not an option. YouStable’s infrastructure is backed by Tier-3 and Tier-4 data centers with a 99.99% uptime commitment.
- Multiple Control Panels: YouStable gives you CyberPanel, cPanel, and DirectAdmin options. For developers setting up MongoDB, this makes server management much easier.
- DDoS Protection: Your database server stays protected from malicious traffic attacks without any additional configuration on your end.
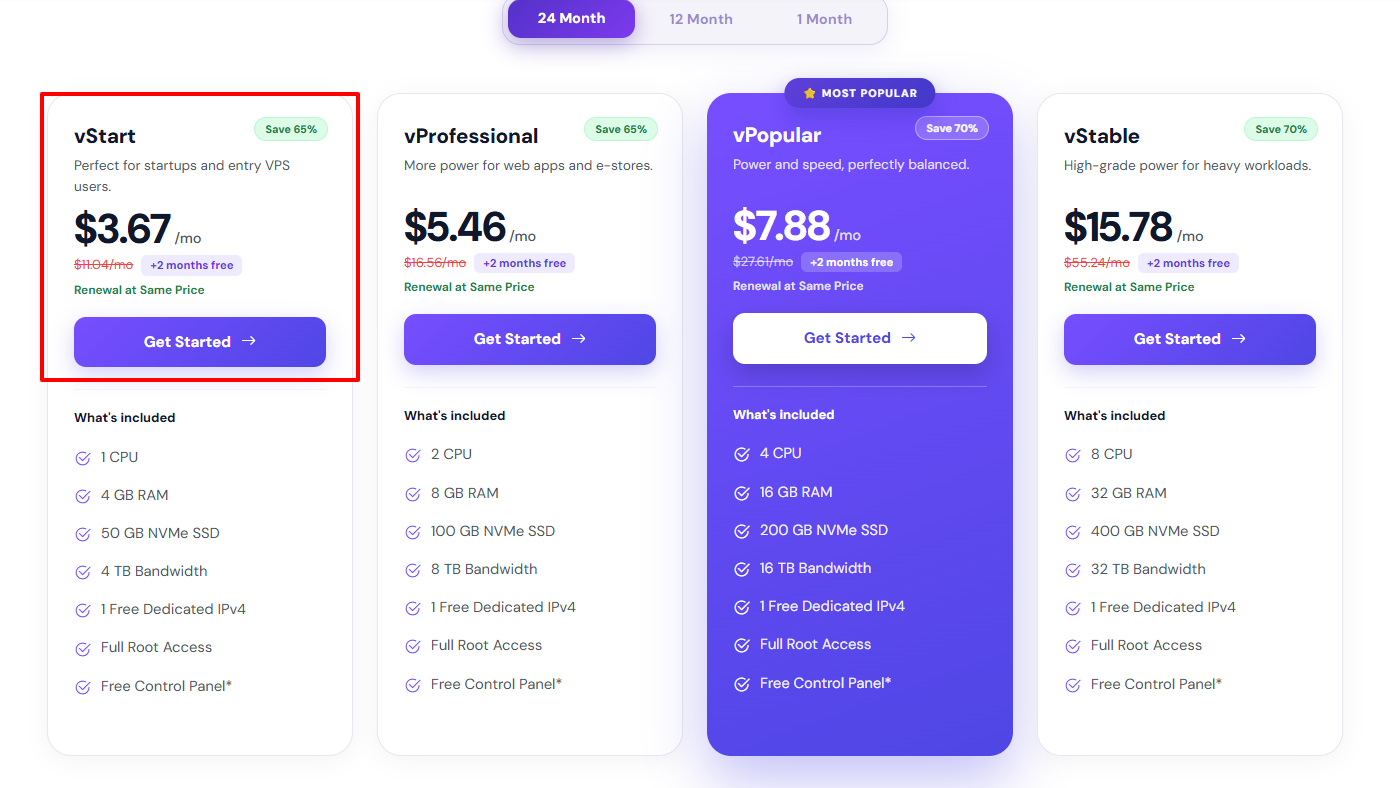
- Affordable Pricing: VPS plans start as low as $3.67/month, with a flat 65% discount available. This is production-grade infrastructure at a price that makes sense for startups and growing businesses.
- Free Migration: If you are moving from another host, YouStable migrates up to 5 GB of data for free with zero downtime.
YouStable has been rated 4.6 out of 5 on HostAdvice based on genuine user reviews, which reflects the consistency of their service.
My team has found their infrastructure to be well-suited for database-heavy workloads like MongoDB.
How to Get a VPS from YouStable Before You Start
Before you can install MongoDB, you need a VPS server ready to go.
Here is how to get one from YouStable quickly. This process takes less than ten minutes and you will have an active server ready for MongoDB setup.
Follow these steps to get your YouStable VPS up and running.
My team has walked through this process and it is simple from start to finish.
- Go to www.youstable.com >> Navigate to VPS Hosting from the top menu.
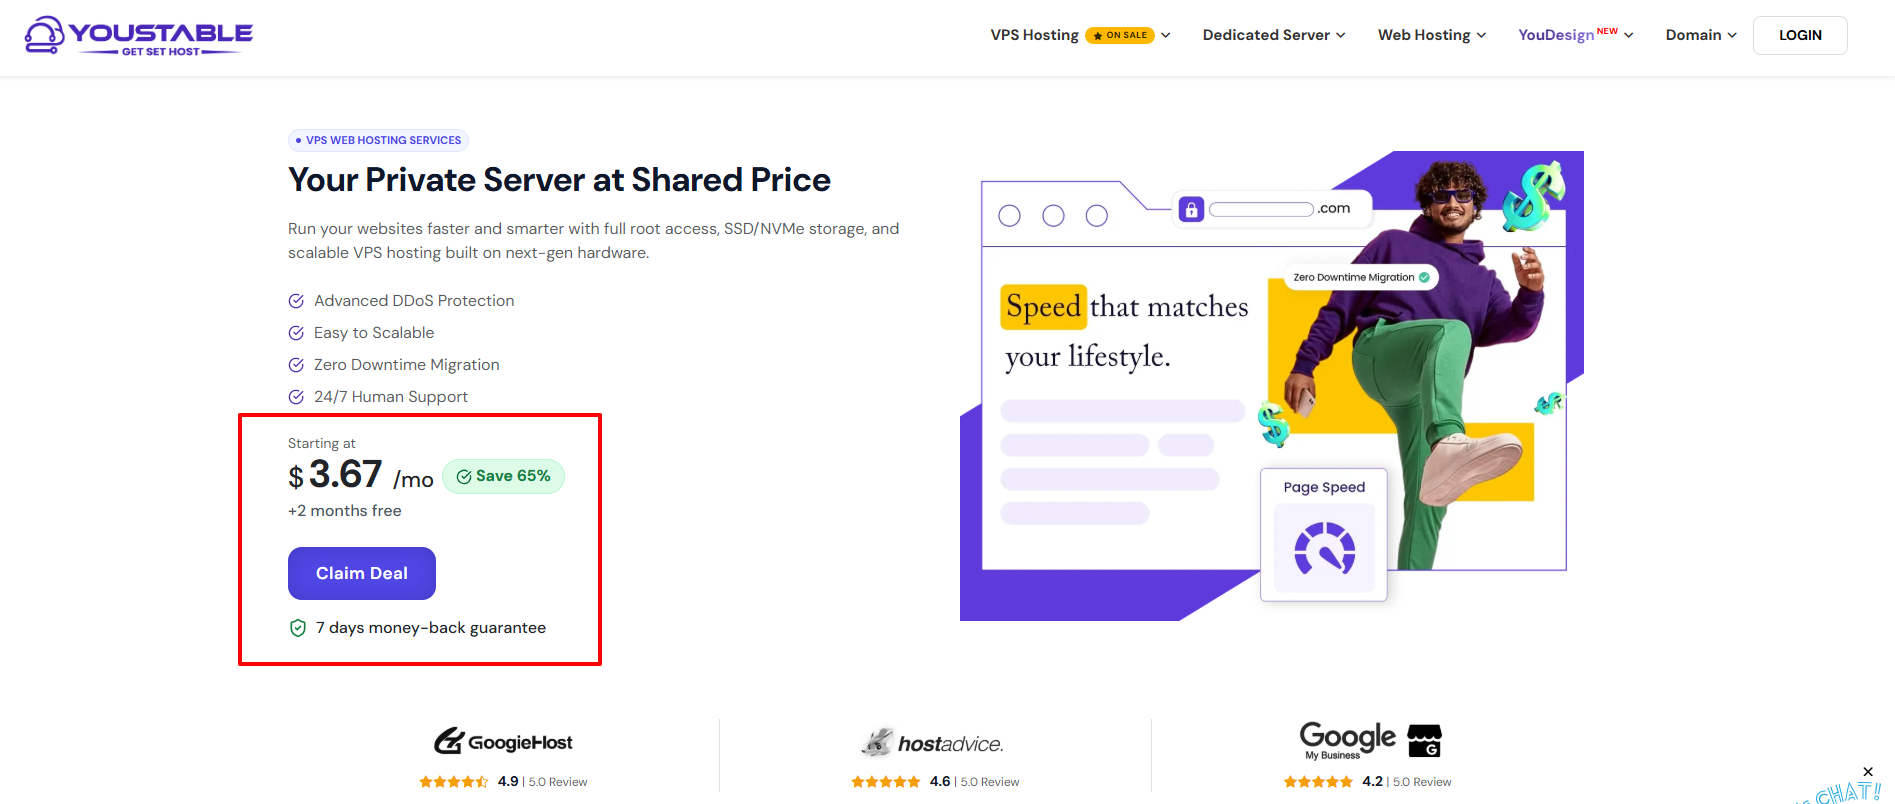
- Browse the available VPS plans >> For MongoDB, select a plan with at least 2 GB RAM and 20 GB NVMe SSD storage >> Click Order Now on your chosen plan.
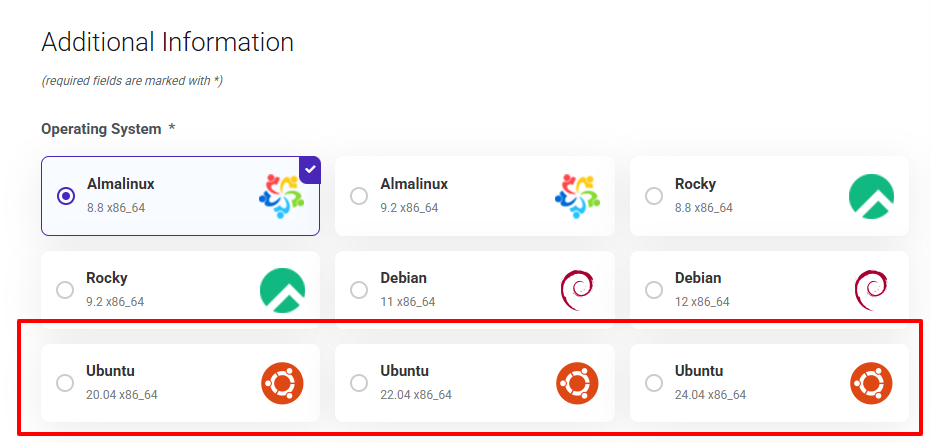
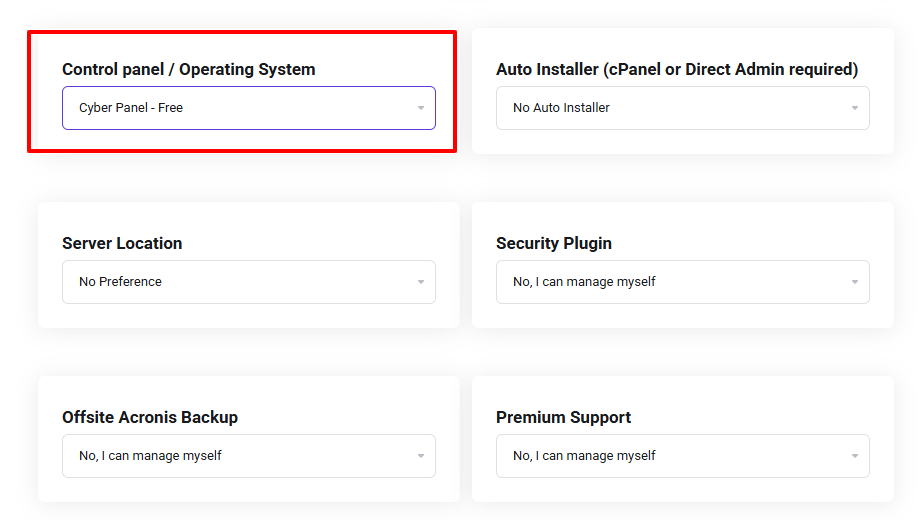
- On the configuration page >> Select your preferred operating system >> Choose Ubuntu 22.04 LTS or Ubuntu 24.04 LTS for this guide.
- Select your control panel preference >> CyberPanel is free and works well for developers.
- Choose your data center location based on where your users are. YouStable has server locations in India, USA, and Netherlands.
- Fill in your billing details >> Complete the payment. YouStable accepts UPI, PayPal, credit/debit cards, net banking, and bank transfer.
- Once the order is confirmed, you will receive your VPS login credentials including your server IP address, root username, and password via email.

| Please Note Keep your VPS credentials safe. You will need your server’s IP address, root username, and password to connect via SSH. If you lose these, you will need to reset them through the YouStable control panel. |
Step 0: Connect to your VPS server
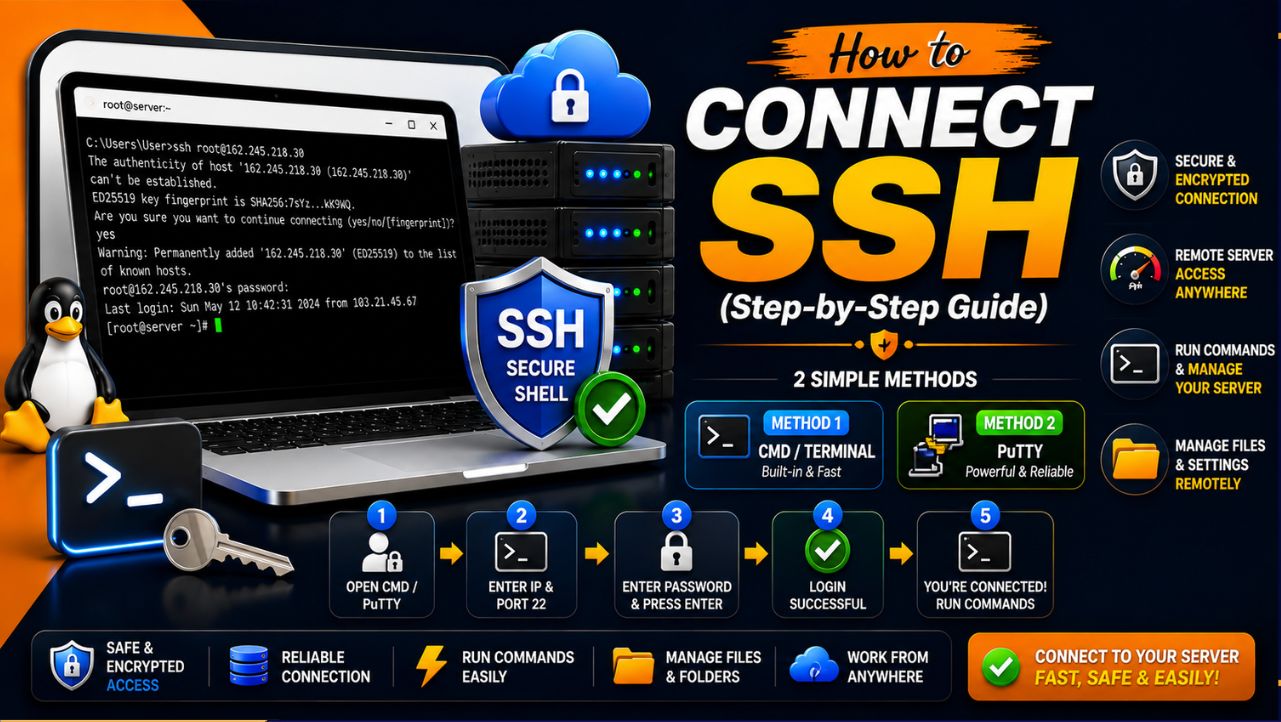
Once you have your server credentials >> Open your terminal (or you can also open an SSH client like PuTTY on Windows) >> Connect to your VPS using the command below
ssh root@YOUR_SERVER_IPReplace YOUR_SERVER_IP with the actual IP address from your welcome email.

You are now logged into your VPS and ready to set up MongoDB on a VPS server. Let us go through the steps one by one.
How to Set Up MongoDB on Your VPS: Complete Step-by-Step Process
These steps have been tested by my team on live YouStable VPS servers running Ubuntu 22.04 LTS and Ubuntu 24.04 LTS. Follow each step carefully and in the order listed. Do not skip any step, since each one builds on the previous.
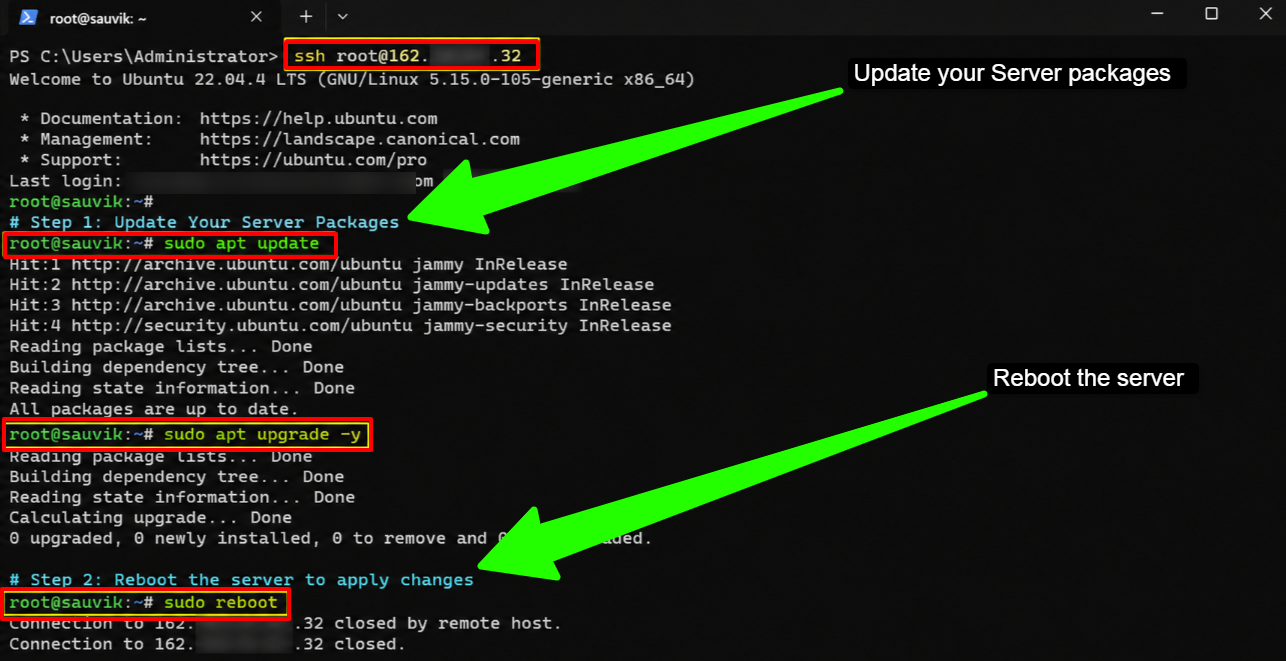
Step 1: Update Your Server Packages
The first thing you should always do on a fresh VPS is update the package list and upgrade any existing packages. This ensures you are working with the latest and most secure versions of all system components.
sudo apt updatesudo apt upgrade -yThis may take a minute or two depending on how many updates are available. Once done, restart the server to apply all changes cleanly.
sudo rebootWait about 30 seconds for the server to restart, then reconnect via SSH before moving to the next step.
| Please Note Always run apt update and apt upgrade before installing any software on a new VPS. This prevents dependency conflicts and ensures you are working with a stable base system. |
Step 2: Install Required Dependencies
MongoDB requires gnupg and curl to be installed before you can add the official repository.
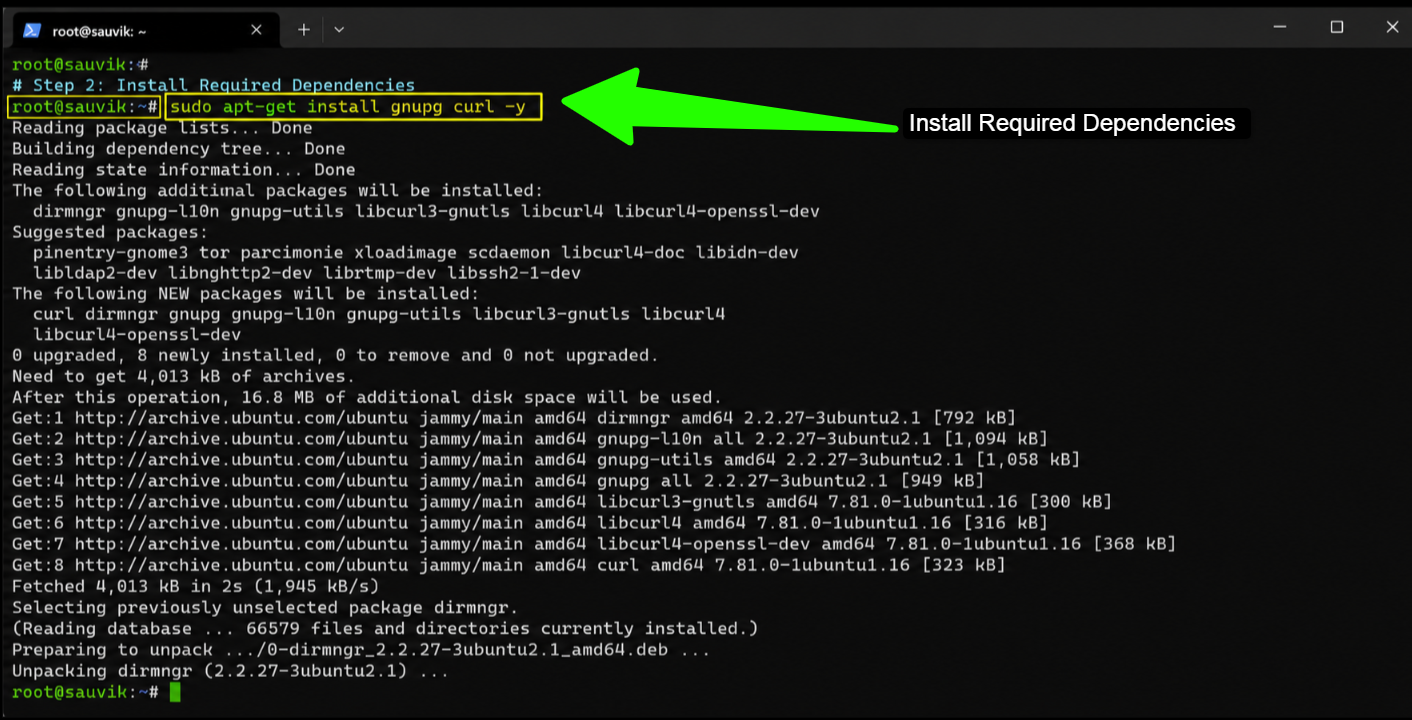
Run the following command to install them.
sudo apt-get install gnupg curl -yThese tools allow you to securely download and verify the MongoDB repository signing key, which is an important security step that confirms you are getting the official MongoDB packages and not something modified.
Step 3: Add the Official MongoDB Repository
Ubuntu’s default repositories do not always carry the latest version of MongoDB.
To get the current stable release, you need to add the official MongoDB repository.
My team strongly recommends using only the official MongoDB repository and never the unofficial mongodb package from Ubuntu’s own repos.
- First, import the MongoDB public GPG key. The command below works for MongoDB 8.0, which is the current stable release as of 2025.
curl -fsSL https://www.mongodb.org/static/pgp/server-8.0.asc | sudo gpg -o /usr/share/keyrings/mongodb-server-8.0.gpg --dearmor- Now add the MongoDB 8.0 repository to your system’s source list. Use the command that matches your Ubuntu version.
For Ubuntu 22.04:echo "deb [ arch=amd64,arm64 signed-by=/usr/share/keyrings/mongodb-server-8.0.gpg ] https://repo.mongodb.org/apt/ubuntu jammy/mongodb-org/8.0 multiverse" | sudo tee /etc/apt/sources.list.d/mongodb-org-8.0.list
For Ubuntu 24.04:echo "deb [ arch=amd64,arm64 signed-by=/usr/share/keyrings/mongodb-server-8.0.gpg ] https://repo.mongodb.org/apt/ubuntu noble/mongodb-org/8.0 multiverse" | sudo tee /etc/apt/sources.list.d/mongodb-org-8.0.list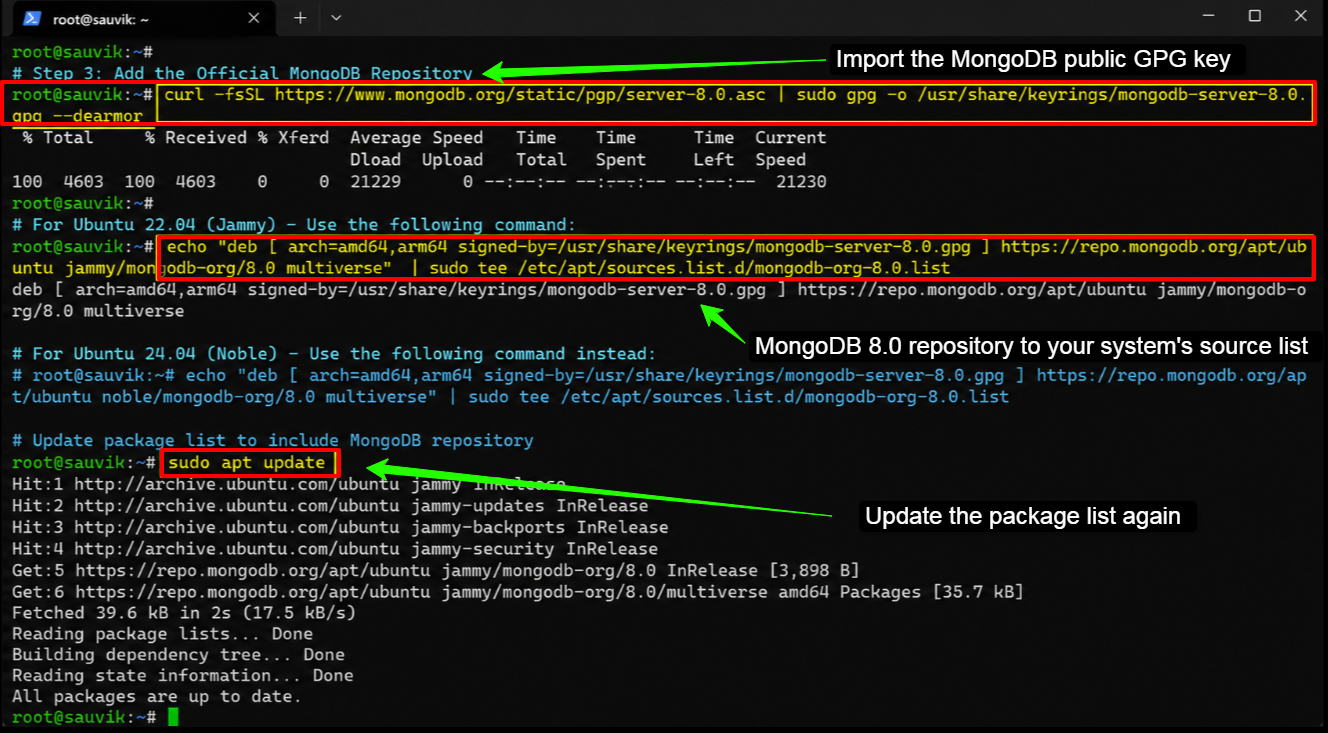
- After adding the repository, update the package list again so your system picks up the new MongoDB packages.
sudo apt updateStep 4: Install MongoDB
Now you are ready to install MongoDB. Run the command below to install the latest stable version from the official repository you just added.
sudo apt-get install -y mongodb-orgThis command installs the mongodb-org package along with all required components including mongod (the MongoDB daemon), mongosh (the MongoDB shell), and other tools you will need.
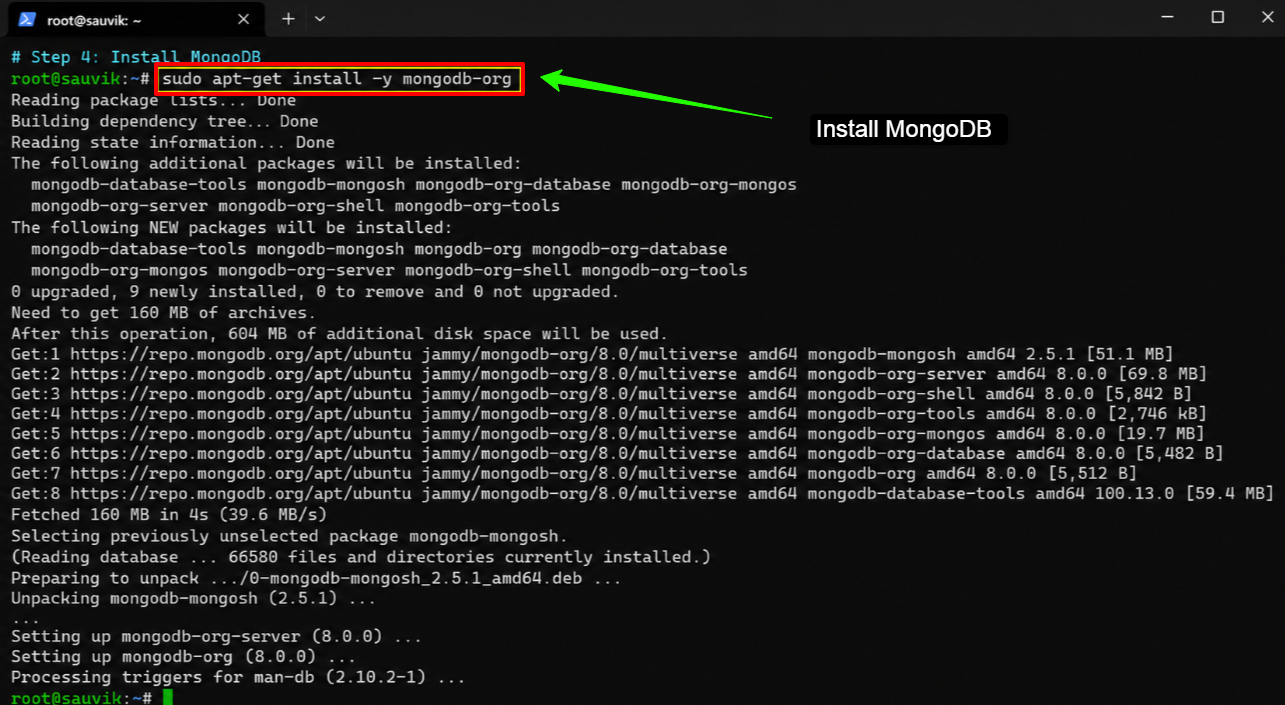
| Disclaimer Make sure you are installing mongodb-org and not mongodb. The mongodb package found in Ubuntu’s default repos is maintained by the community, not by MongoDB Inc., and may be significantly out of date. Always use the official mongodb-org package for reliable performance and security. |
Step 5: Start MongoDB and Enable It on Boot
Once installation is complete, start the MongoDB service and configure it to start automatically whenever your server reboots.
This is critical for production environments where you cannot manually restart services every time.
sudo systemctl start mongodsudo systemctl enable mongod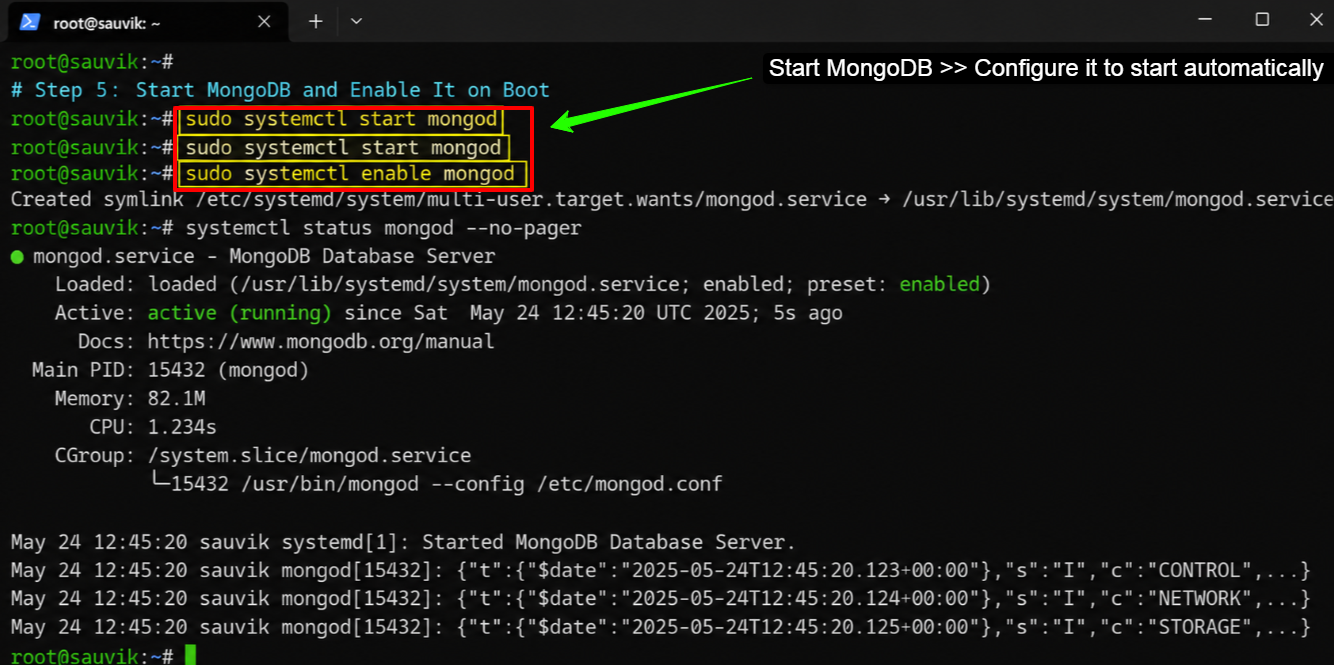
Now verify that MongoDB is running correctly by checking its status.
sudo systemctl status mongodYou should see a line that says active (running) in the output. If you see that, MongoDB is up and listening for connections.
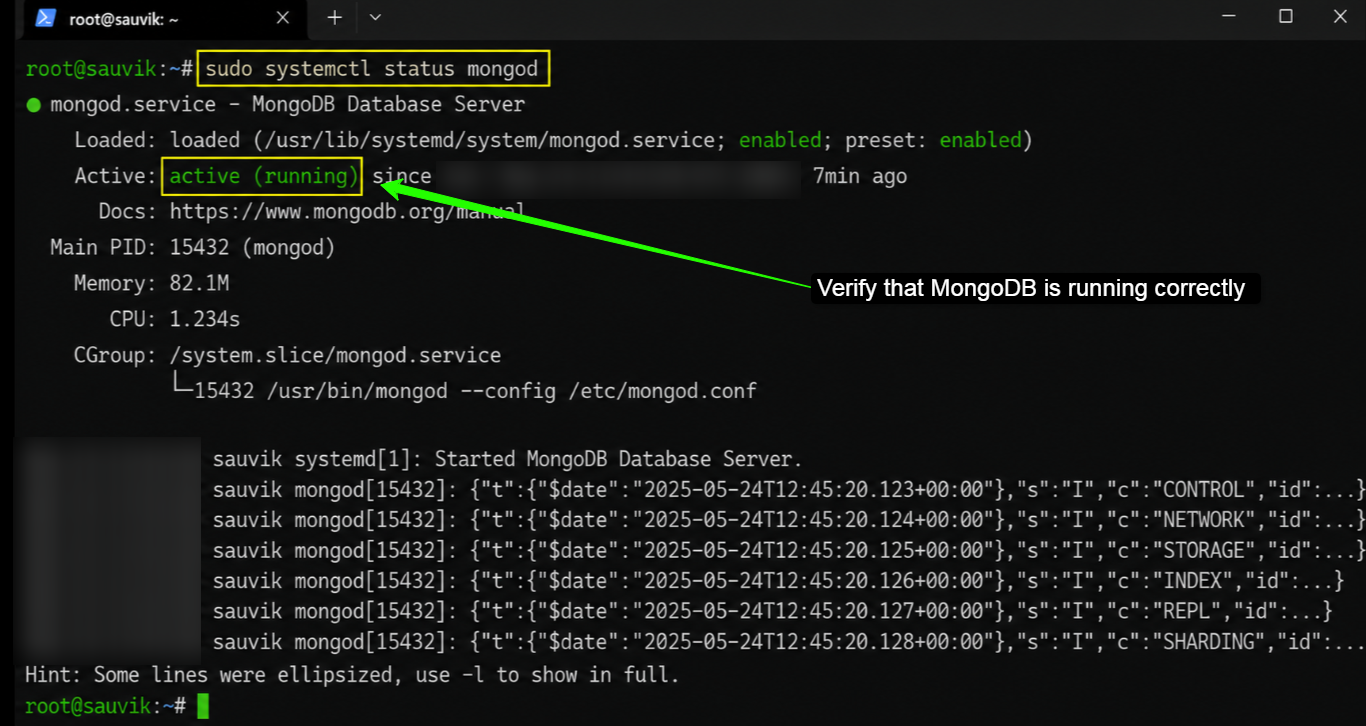
If the status shows as failed or inactive, jump to the troubleshooting section at the end of this article.
Step 6: Secure MongoDB by Creating an Admin User
By default, MongoDB does not require authentication, which is fine for local development but completely unacceptable for a production VPS.
You must create an admin user and enable authentication before doing anything else.
- Connect to the MongoDB shell using mongosh.
mongosh- Switch to the admin database where you will create the administrator user.
use admin- Now create the admin user. Replace the username and password below with something strong and unique.
db.createUser({ user: "adminuser", pwd: "YourStrongPasswordHere", roles: [ { role: "userAdminAnyDatabase", db: "admin" } ] })\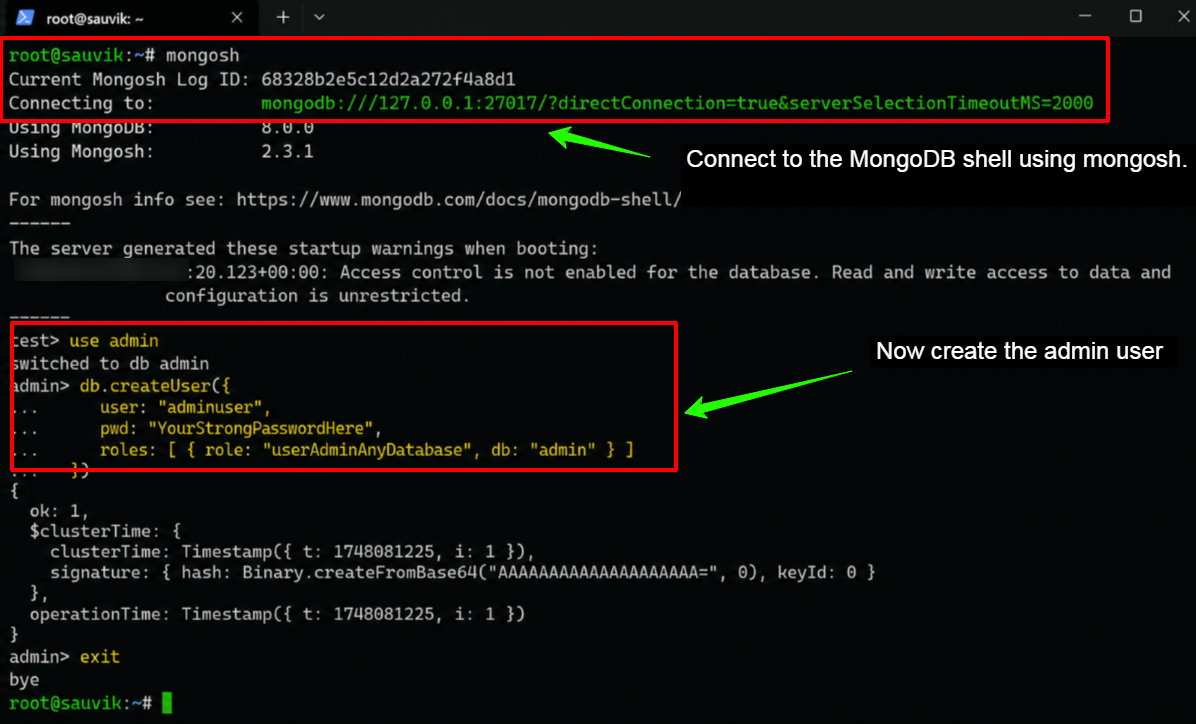
Once the user is created, exit the shell.
exitImportant Security Warning
- Never use simple passwords for your MongoDB admin account.
- Use a combination of uppercase, lowercase, numbers, and special characters.
- A weak password on a publicly accessible database server is one of the most common causes of data breaches.
Step 7: Enable Authentication in the MongoDB Configuration File
Creating the user alone is not enough. You need to tell MongoDB to enforce authentication for all connections.
- Open the MongoDB configuration file using the command below.
sudo nano /etc/mongod.conf- Scroll down until you find the security section. It will look like this commented out by default.
#security:- Uncomment it and add the authorization line so it looks exactly like this.
security: authorization: enabled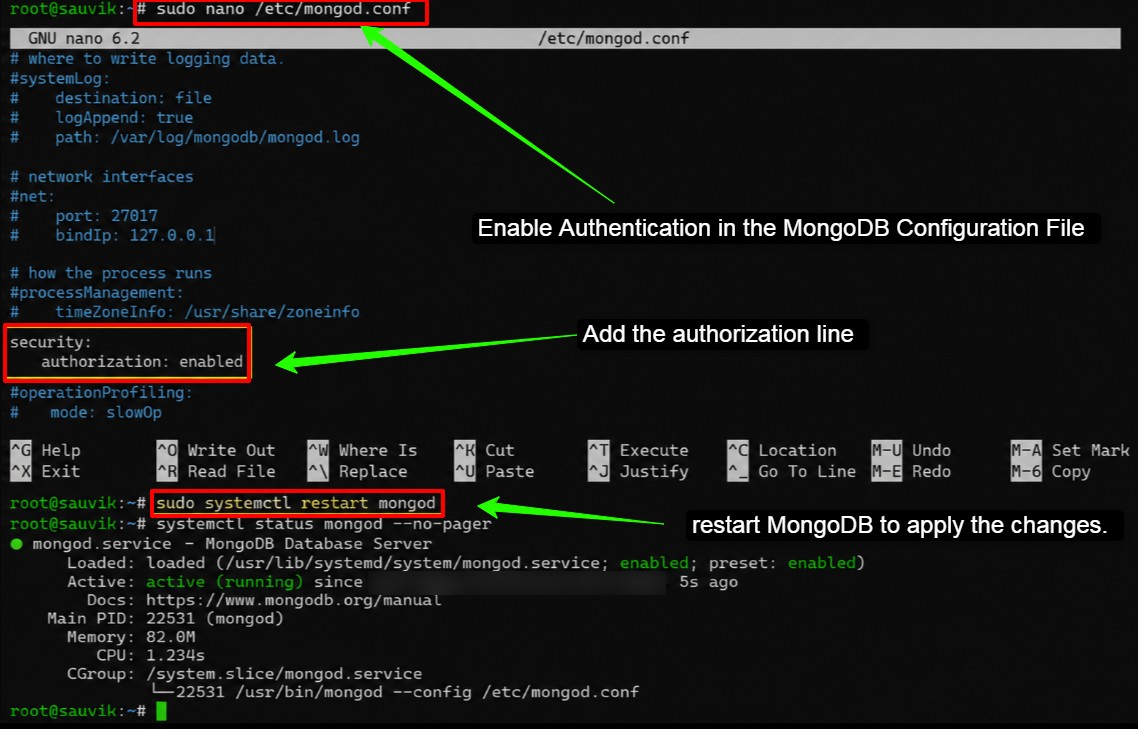
- Save the file by pressing Ctrl + X, then Y, then Enter. Now restart MongoDB to apply the changes.
sudo systemctl restart mongodFrom this point on, anyone connecting to MongoDB will need valid credentials.
Step 8: Configure the Firewall to Protect MongoDB
MongoDB listens on port 27017 by default.
You need to configure your VPS firewall to control who can access this port. By default, you should block all external access to port 27017 and only allow your specific application server or IP address.
- Enable UFW (Uncomplicated Firewall) if it is not already active.
sudo ufw enable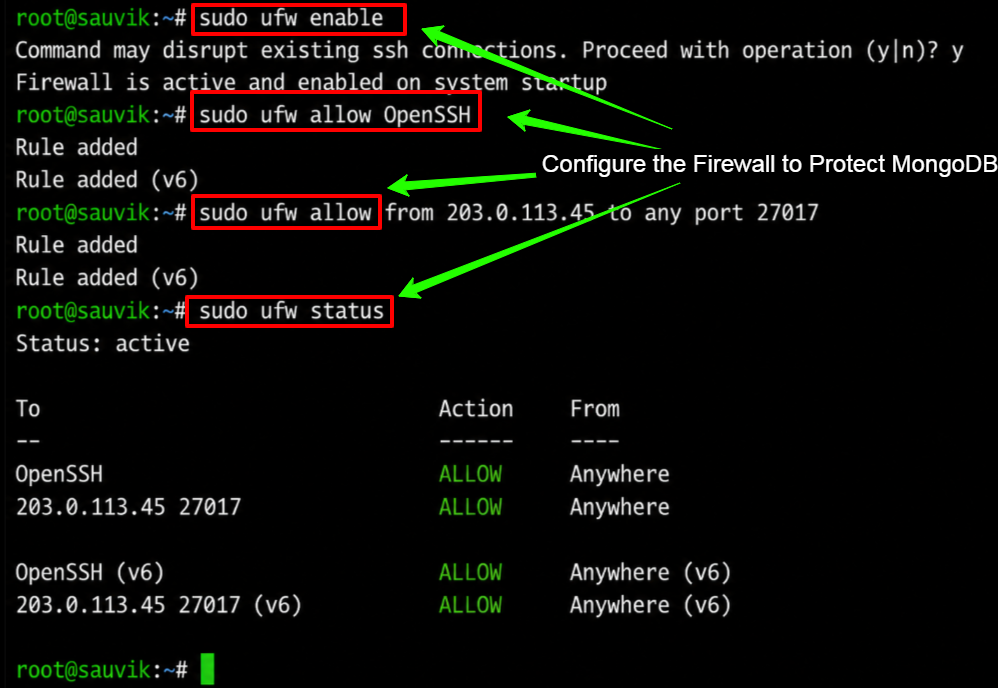
- Allow SSH so you do not get locked out of your server.
sudo ufw allow OpenSSH- To allow MongoDB access only from a specific trusted IP address, run this command. Replace YOUR_APP_SERVER_IP with the actual IP of your application server.
sudo ufw allow from YOUR_APP_SERVER_IP to any port 27017- Check the firewall status to confirm the rules are in place.
sudo ufw statusPlease Note
- Never open port 27017 to the entire internet (0.0.0.0/0) unless you have additional authentication layers in place.
- Exposing MongoDB directly to the public internet without IP restrictions is a serious security risk.
- Only allow access from trusted IPs.
Step 9: Prevent Automatic Package Updates for MongoDB
Unexpected MongoDB updates can break your running application or introduce incompatibilities.
It is a best practice to pin MongoDB packages so they do not get upgraded automatically through routine system updates.
echo "mongodb-org hold" | sudo dpkg --set-selectionsecho "mongodb-org-database hold" | sudo dpkg --set-selectionsecho "mongodb-org-server hold" | sudo dpkg --set-selectionsecho "mongodb-mongosh hold" | sudo dpkg --set-selections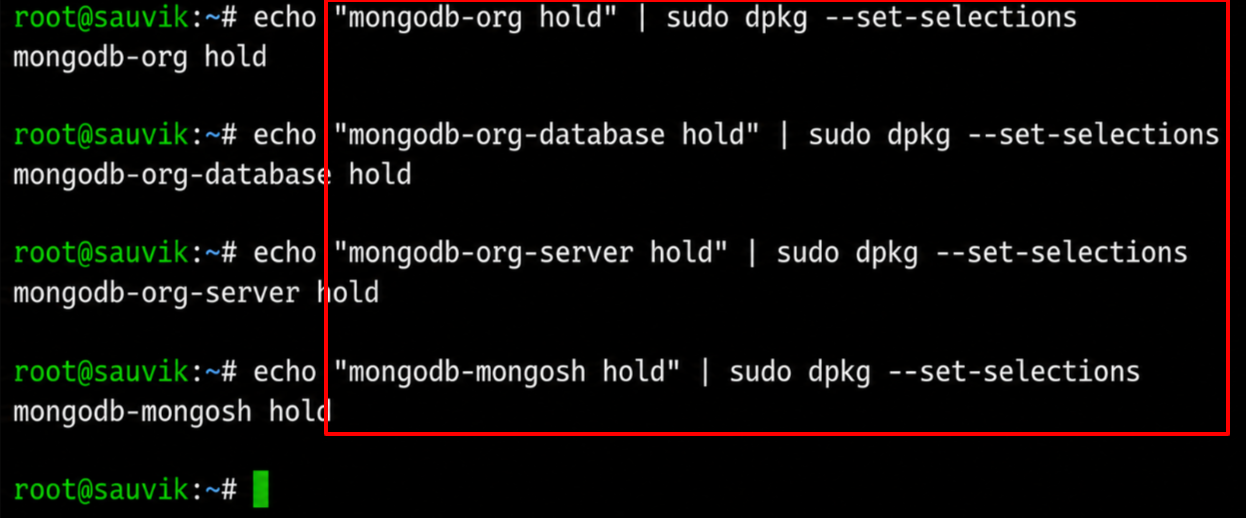
When you are ready to upgrade MongoDB, you can do so manually by removing the hold, upgrading, and re-applying the hold.
Step 10: Verify Your MongoDB Setup Is Working
This is the final check to confirm everything is in order.
- Connect to MongoDB using the admin user you created.
mongosh -u adminuser -p --authenticationDatabase admin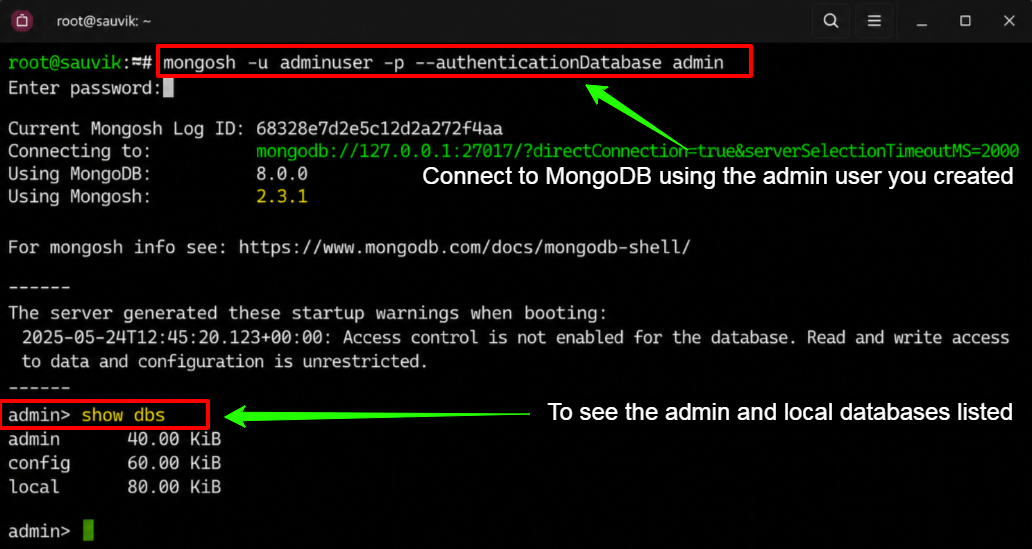
You will be prompted for the password >> Enter it and you should see the MongoDB shell prompt.
- Run the following command to list all databases.
show dbsYou should see the admin and local databases listed. This confirms MongoDB is installed, running, secured with authentication, and working correctly.
Your MongoDB setup on YouStable VPS is complete.
How to Create Your First MongoDB Database and User
Now that MongoDB is up and secured, you probably want to create a dedicated database for your application.
My team always recommends creating a separate database and user for each application rather than using the admin account for everything.
- Connect to MongoDB as the admin user >> Switch to your new database.
- MongoDB creates the database automatically the moment you insert your first document.
use myappdatabase- Now create a user specifically for this database with read and write access.
db.createUser({ user: "appuser", pwd: "AppUserPassword", roles: [ { role: "readWrite", db: "myappdatabase" } ] })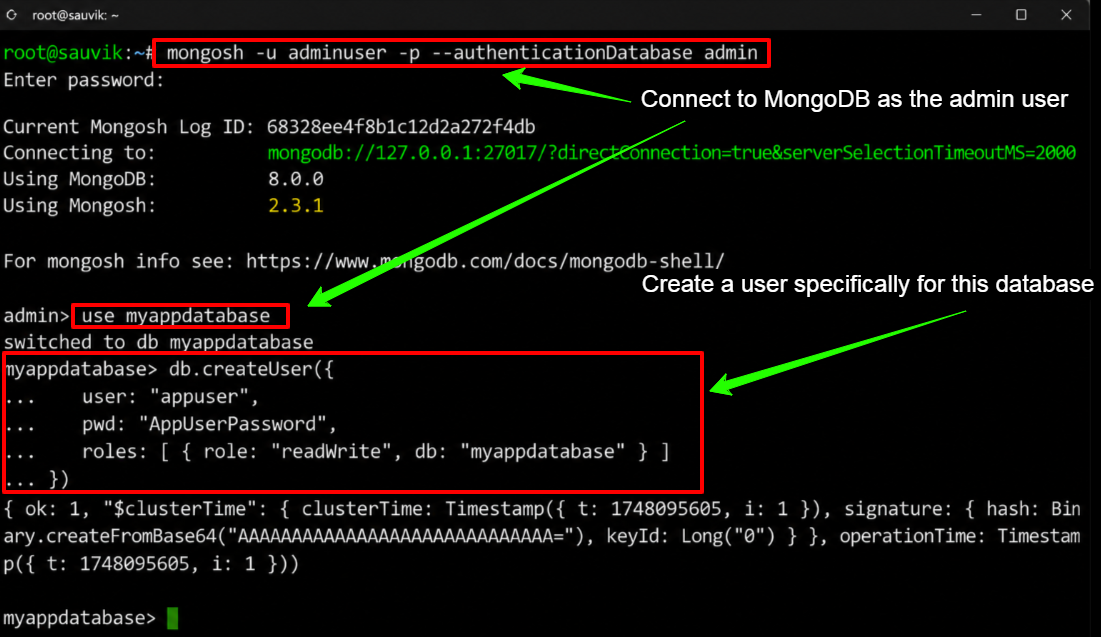
Your application should use this appuser account to connect to the database, not the admin account.
This follows the principle of least privilege and limits the damage if the application credentials are ever compromised.
How to Set Up MongoDB Backups on Your VPS
A MongoDB database without a backup strategy is a disaster waiting to happen.
My research team treats automated backups as a non-negotiable requirement for any production setup. Fortunately, MongoDB includes a built-in tool called mongodump that makes this simple.
- To create a full backup of all your databases >> Run the following command >> Replace adminuser and YourStrongPasswordHere with your actual credentials.
mongodump --username adminuser --password YourStrongPasswordHere --authenticationDatabase admin --out /var/backups/mongodb/$(date +%Y-%m-%d)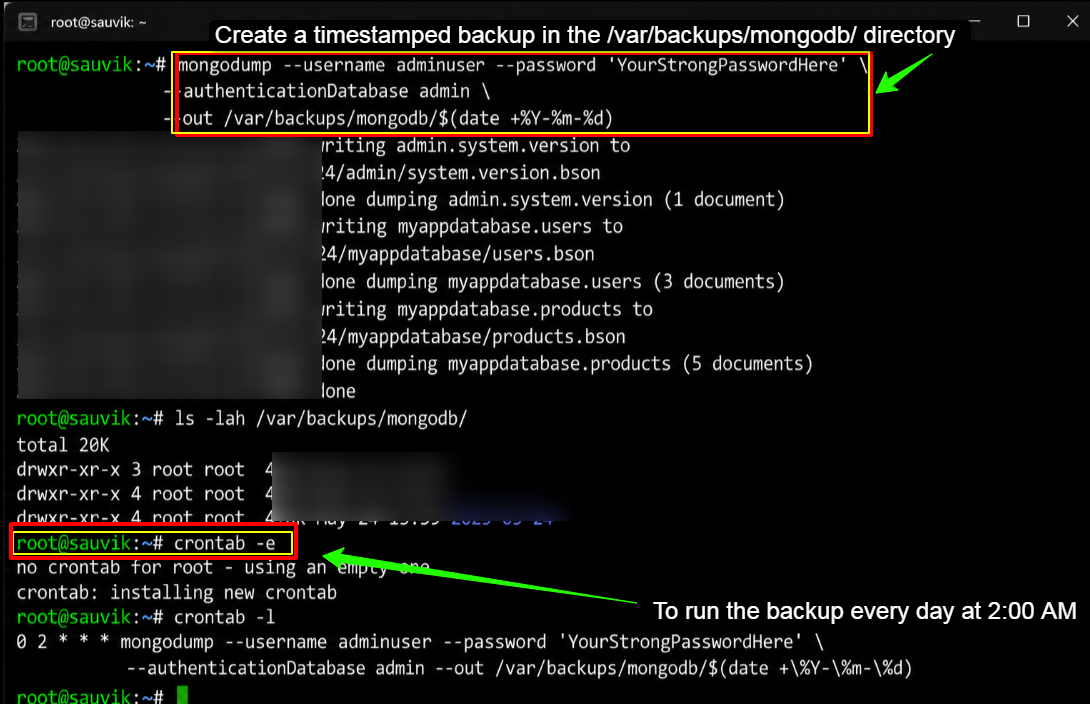
This creates a timestamped backup in the /var/backups/mongodb/ directory.
- To automate this >> Set up a cron job that runs this command daily.
crontab -e- Add the following line to run the backup every day at 2:00 AM.
0 2 * * * mongodump --username adminuser --password YourStrongPasswordHere --authenticationDatabase admin --out /var/backups/mongodb/$(date +\%Y-\%m-\%d)Please Note
Store your backups in a separate location from your VPS, such as an external storage service or a different server.
If your VPS has a hardware failure, a backup stored on the same server is useless.
Common MongoDB VPS Setup Issues and How to Fix Them
Even with careful setup, things sometimes go wrong. My team has documented the most common issues we have encountered during MongoDB VPS deployments so you can get back on track quickly.
MongoDB Service Fails to Start
If MongoDB does not start after installation, check the log file for specific error messages.
sudo cat /var/log/mongodb/mongod.log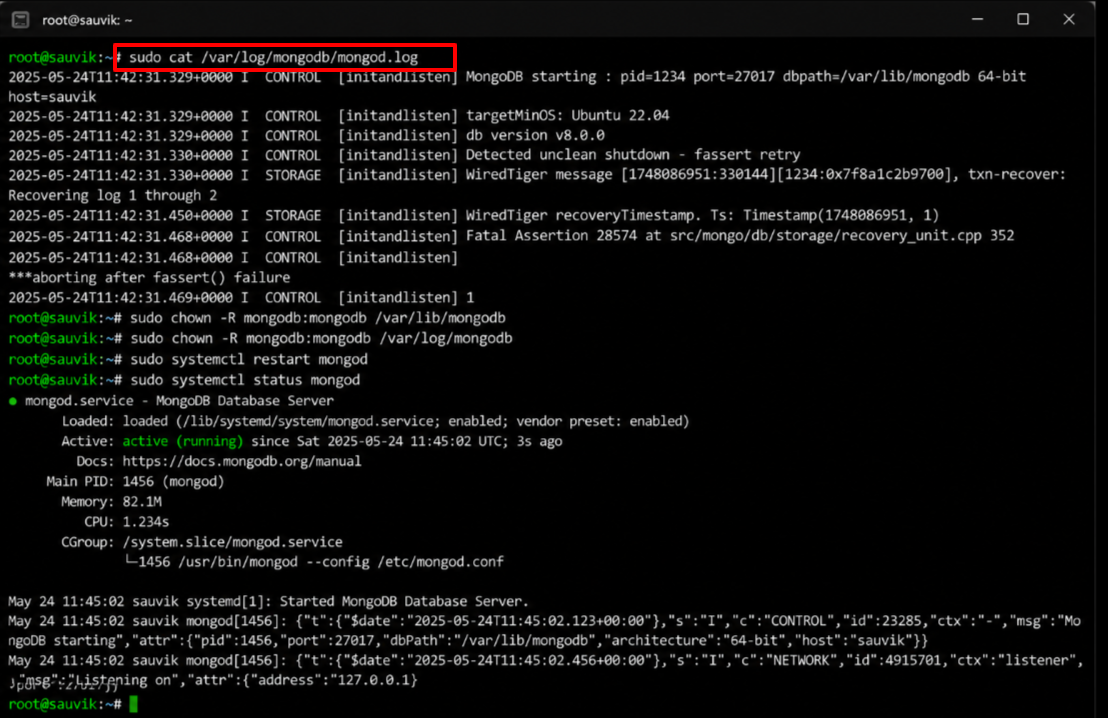
A common cause is incorrect ownership of the MongoDB data directory. Fix it with this command.
sudo chown -R mongodb:mongodb /var/lib/mongodbsudo chown -R mongodb:mongodb /var/log/mongodbsudo systemctl restart mongodConnection Refused Error on Port 27017
If you see a connection refused error when trying to connect, first verify MongoDB is actually running.
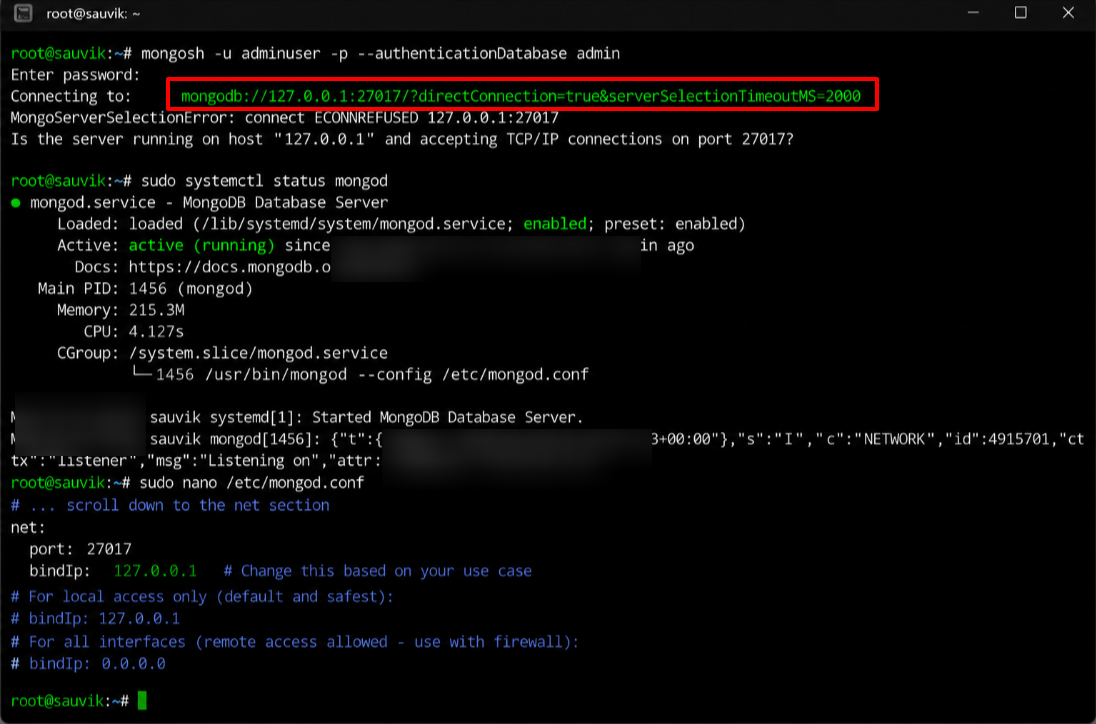
sudo systemctl status mongodIf it is running but you still cannot connect, check whether MongoDB is listening on the correct interface in your mongod.conf file.
Look for the net section and make sure the bindIp is set correctly for your use case.
Authentication Failed Error
If you get an authentication error, double check the username, password, and authentication database.
Always specify “–authenticationDatabase admin” when connecting as the admin user.
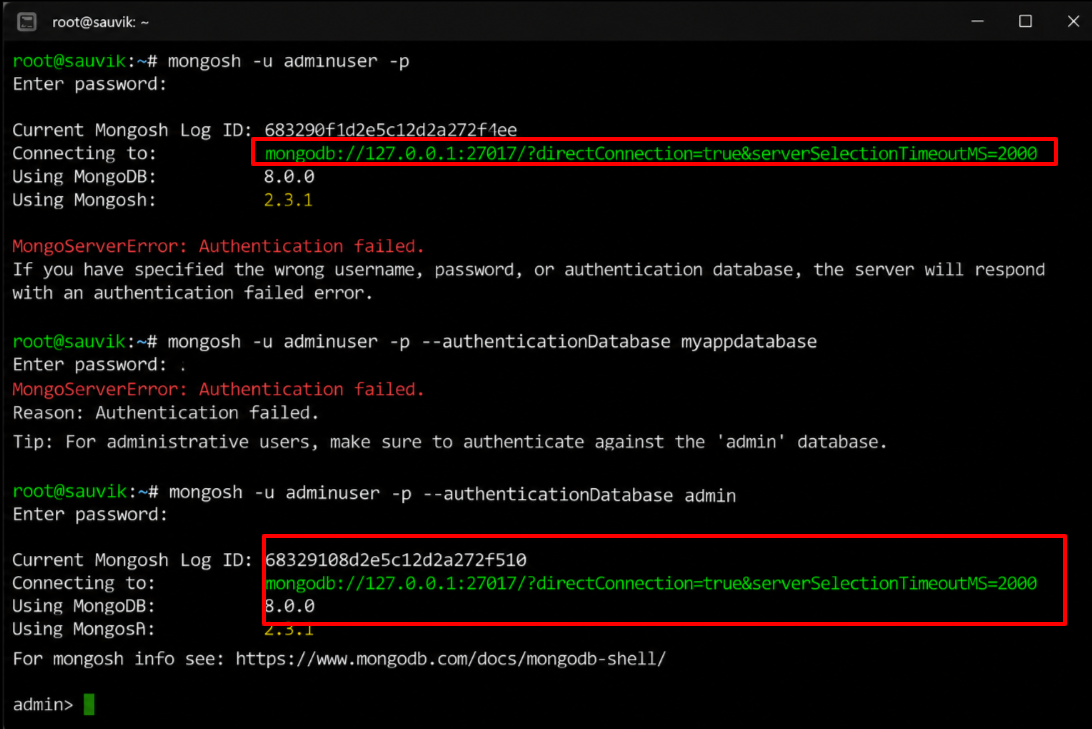
A wrong authentication database is one of the most common reasons authentication fails.
Also Read: How to Create MongoDB on Linux Server
FAQs
Do I need a specific amount of RAM to run MongoDB on a VPS?
Yes! You need 2GB RAM to run MongoDB on a VPS for development and testing workloads. For a production environment, 4 GB is the comfortable minimum and 8 GB or more is ideal for applications with significant traffic or large datasets.
Can I use MongoDB on Windows VPS instead of Ubuntu?
Yes, MongoDB supports Windows Server, but the Linux setup process is more straightforward, better documented, and generally delivers better performance. The commands in this guide are specific to Ubuntu.
How do I connect my Node.js application to MongoDB running on a VPS?
Use the official MongoDB Node.js driver. Your connection string will look like this >> mongodb://appuser:AppUserPassword@YOUR_VPS_IP:27017/myappdatabase >> Make sure you have added your application server’s IP to the UFW firewall rules as described in Step 8 of this guide.
Is MongoDB free to install on a VPS?
Yes. MongoDB Community Edition is completely free and open source. You only pay for the VPS itself, not for the database software.
How do I update MongoDB to a newer version on my VPS?
First, remove the hold you placed on the packages in Step 9. Then run sudo apt-get update followed by sudo apt-get install -y mongodb-org to get the latest version. Re-apply the hold after the upgrade. Always back up your data before updating.
What is the default port MongoDB uses and should I change it?
MongoDB uses port 27017 by default. Changing it adds a small layer of security through obscurity, but it is not a substitute for proper authentication and firewall rules.
How do I allow remote access to MongoDB on my VPS?
Open the mongod.conf file and under the net section, change the bindIp value from 127.0.0.1 to your VPS’s actual IP address or to 0.0.0.0 if you want to listen on all interfaces. Then update your UFW firewall to allow connections from trusted IPs on port 27017.
How do I check if MongoDB is already installed on my VPS?
Run the command mongod –version in your terminal. If you see a version number in the output, MongoDB is installed. If you get a command not found error, it is not installed yet and you can follow this guide from the beginning.
Final Thoughts on Setting Up MongoDB on a VPS
It is really technical to set up MongoDB on a VPS. It looks complicated at first but follows a very clear logical sequence.
By the time you reach this point in the guide, your MongoDB instance should be installed, authenticated, firewall-protected and backed up.
My team has gone through these exact steps on real servers, and each command in this guide has been verified to work on Ubuntu 22.04 and 24.04.
If you are just getting started and need a reliable VPS to run MongoDB on, YouStable offers the right combination of NVMe SSD performance, full root access, CyberPanel support, and affordable pricing to get you going.
For anyone working on a growing application that needs a solid database backend, MongoDB on a well-configured VPS is one of the best setups you can have
Take your time with the security steps, keep your backups automated and your MongoDB instance will serve you reliably for a long time.
| Expert Recommendation Always test your MongoDB setup in a staging environment before moving to production. Enable authentication from the start, restrict firewall access to trusted IPs only, and automate your backups. These three practices alone will save you from the majority of MongoDB-related problems in production environments. |