Setting up PostgreSQL on a VPS is one of those tasks that looks complex at first but becomes straightforward once you know the exact steps.
I have set it up dozens of times, and in this guide, I am walking you through every single step, nothing skipped, nothing assumed. Whether you are a developer building your first app or a sysadmin managing production servers, you will find everything you need right here.
I have also added proper screenshots for every step so you can follow along exactly the way I have done it. By the time you finish reading this, your PostgreSQL database will be live, secured, and ready to use on your VPS.
| Please Note: This guide uses Ubuntu 24.04 LTS as the operating system on the VPS. All commands are tested and up to date as of 2026. You will need root or sudo access to your VPS to follow these steps.Screenshots are included at every major step to help you verify your progress. |
What Is PostgreSQL and Why Should You Use It on a VPS?
PostgreSQL is one of the most powerful open-source relational database management systems in the world.
It has been around for over 35 years and is trusted by companies like Apple, Instagram, and Spotify to manage massive amounts of data reliably.
Unlike shared hosting environments where resources are limited and configurations are restricted, a VPS gives you full control over your PostgreSQL setup, your memory allocation, your security rules, and your performance tuning.
Why PostgreSQL Over Other Databases?
You might wonder why PostgreSQL instead of MySQL or MariaDB. Here is the honest answer: PostgreSQL handles complex queries better, supports advanced data types like JSON and arrays natively, and enforces data integrity more strictly.
If you are building anything beyond a simple blog, PostgreSQL is the database you want powering it.
- Full ACID compliance for safe and reliable transactions
- Native JSON support for flexible data structures
- Advanced indexing for faster query performance
- Active community and regular security updates
- Free and open source with no licensing costs
Why is a VPS the Right Thing to Setup PostgreSQL?
Running PostgreSQL on a VPS means you control everything. You choose how much RAM to allocate, which port to use, who can connect remotely, and how backups are scheduled.
| Shared hosting blocks most of this. | A VPS unlocks the full potential of PostgreSQL for your projects. |
How to Setup PostgreSQL on a VPS?
Just like a dad helps his baby girl walk, the same manner I am going to tell you step by step how to setup PostgreSQL on a VPS. I have not missed anything at all and the entire procedure mentioned below is 100% tested.
To make your setup process much easier, I’ve added screenshots of the terminal and also added the commands in the boxes so that if the screenshots aren’t clear, you can simply copy paste the commands and continue with the process.
Step 1: Order a VPS from YouStable
Before you can set up PostgreSQL, you need a VPS. I recommend YouStable for this.
YouStable offers reliable VPS hosting with SSD storage, full root access, and a clean Ubuntu installation, which is exactly what you need for this setup. The pricing is affordable and the servers spin up fast.
| Recommended VPS Provider Visit YouStable VPS Hosting: https://www.youstable.com/vps-hosting >> Choose a plan with at least 1 GB RAM and 10 GB SSD storage for a basic PostgreSQL setupFor production workloads, I recommend 2 GB RAM or more. |
Now, how to order your VPS on YouStable?
Follow these steps exactly and you will have your VPS ready in a few minutes.
- Go to YouStable VPS Hosting in your browser.
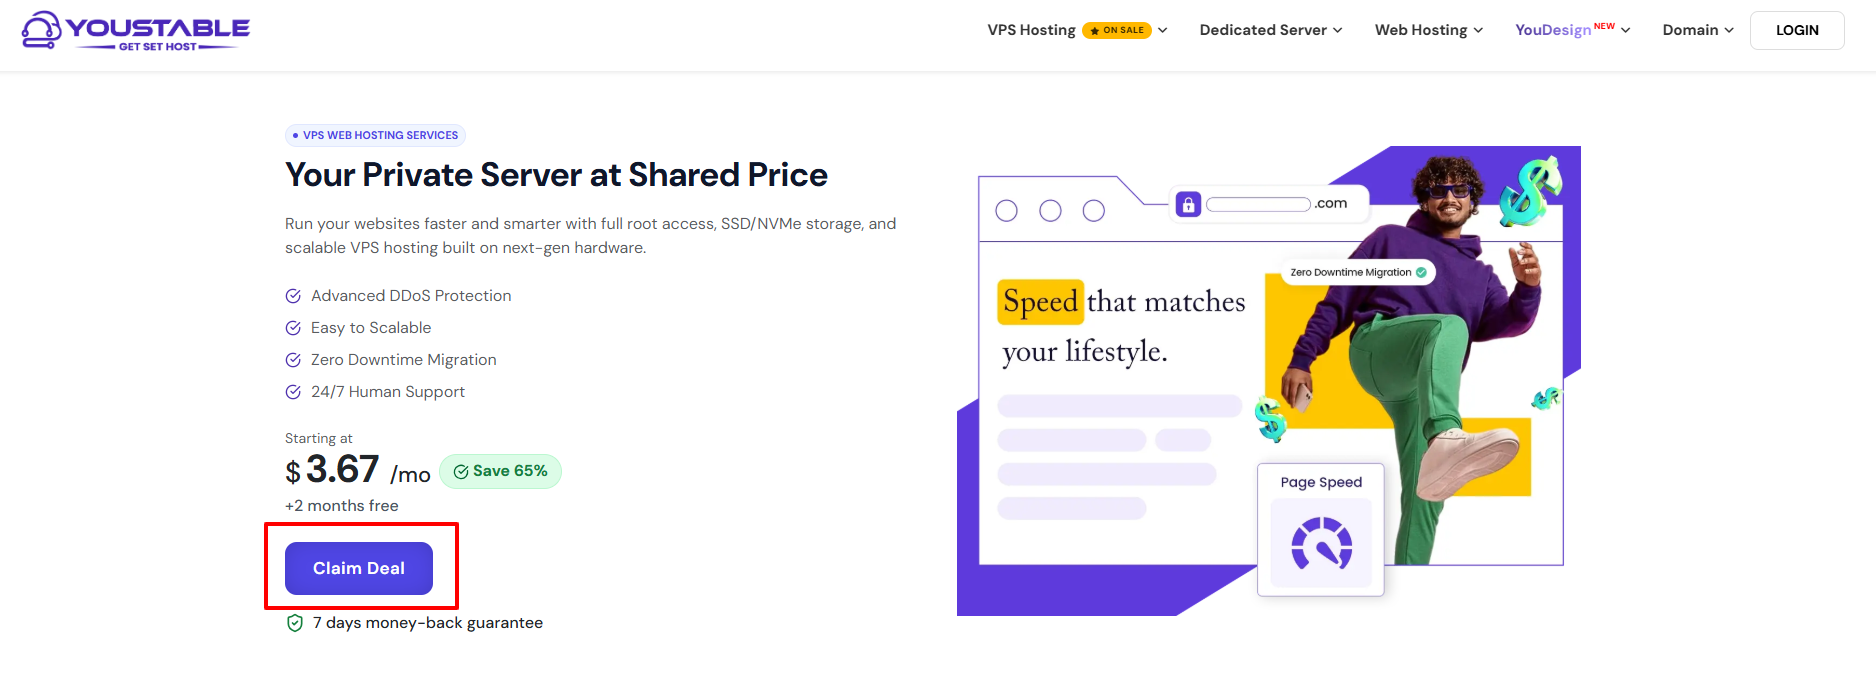
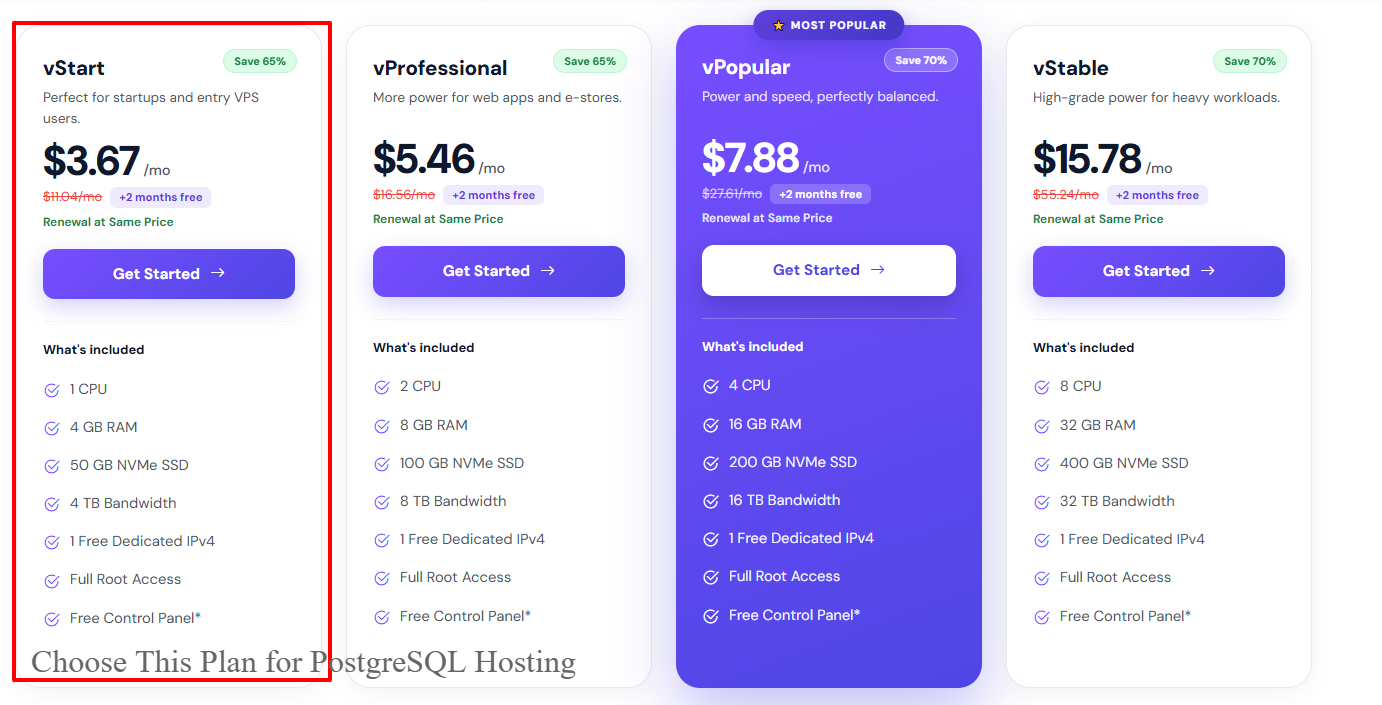
- Browse the available VPS plans. For PostgreSQL hosting, pick a plan with at least 1 GB RAM and Ubuntu 24.04 as the operating system >> Click the ‘Get Started’ button on the plan you want.
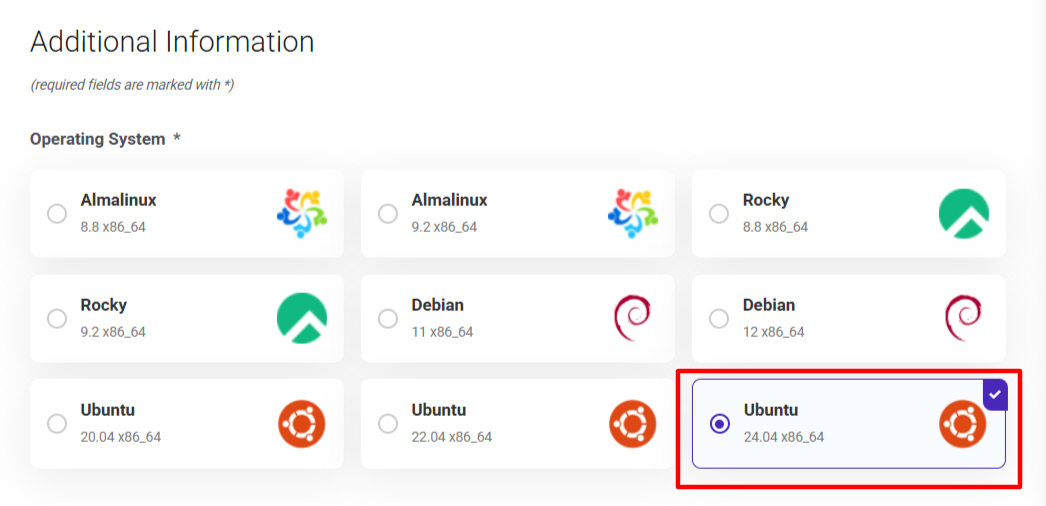
- On the configuration page, select ‘Ubuntu 24.04 LTS’ as your operating system from the dropdown.
- Choose your billing cycle >> Pick a bigger billing cycle to save more (Get Flat 65% OFF) >> Proceed to checkout.

- Create your YouStable account or log in if you already have one.
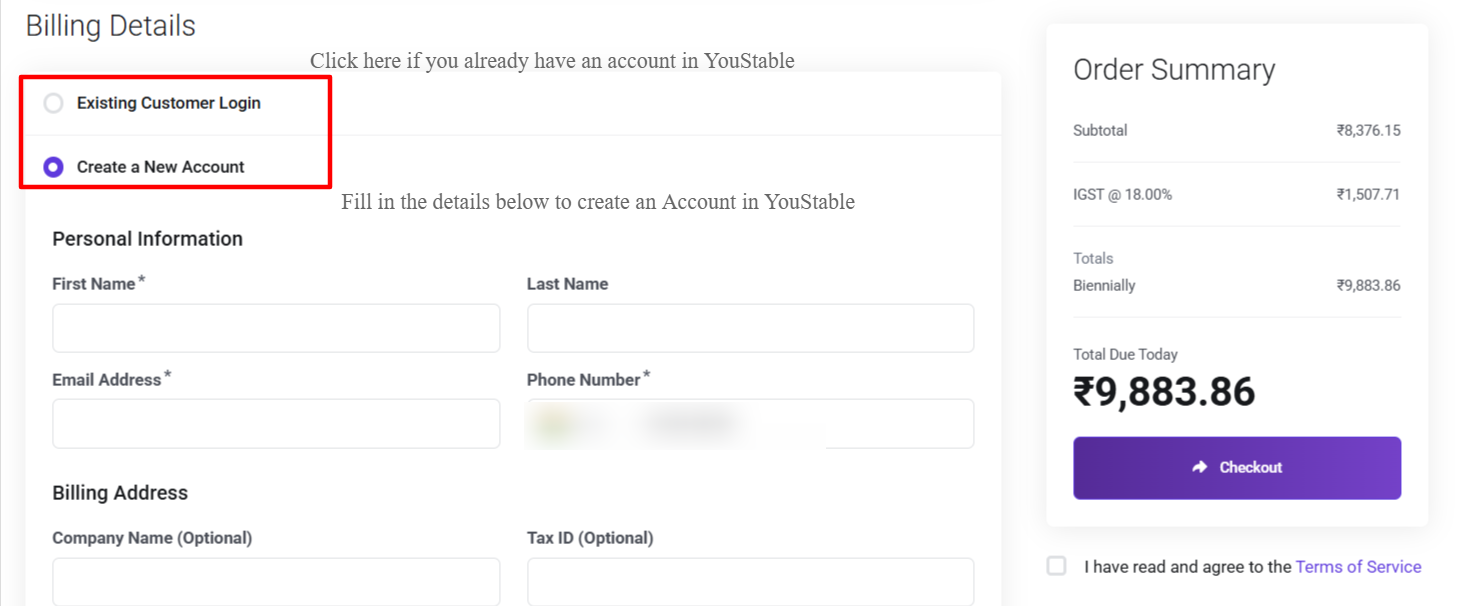
- Complete the payment. YouStable supports multiple payment options >> Once payment is done, your VPS will be provisioned within a few minutes.
- You will receive an email with your VPS IP address, root username, and root password. Save these.
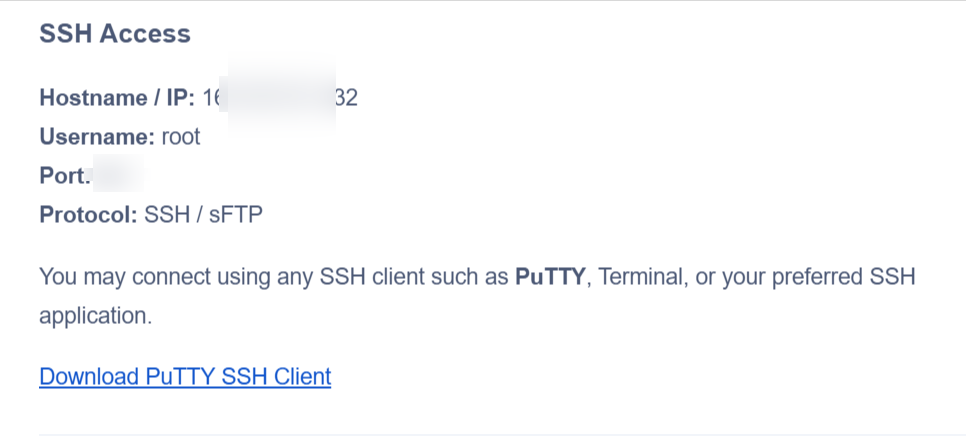
| After your VPS is provisioned, log into your YouStable dashboard and navigate to the VPS section. You will see your server listed with its IP address and status. Take note of this IP, you will need it throughout this guide. |
Step 2: Connect to Your VPS via SSH
Now that your VPS is ready, you need to connect to it. You do this through SSH, which is a secure way to access your server remotely from your computer. The connection gives you full command-line control over the server.
So, how to connect from Windows?
- On Windows, you can use a tool called PuTTY or the built-in Windows Terminal. I recommend the Windows Terminal since it comes pre-installed on Windows 10 and 11.
- Open your Windows Terminal or Command Prompt and run this command:
ssh root@YOUR_VPS_IP_ADDRESS- Replace YOUR_VPS_IP_ADDRESS with the actual IP address from your YouStable welcome email. When prompted, type yes to accept the connection, then enter your root password.
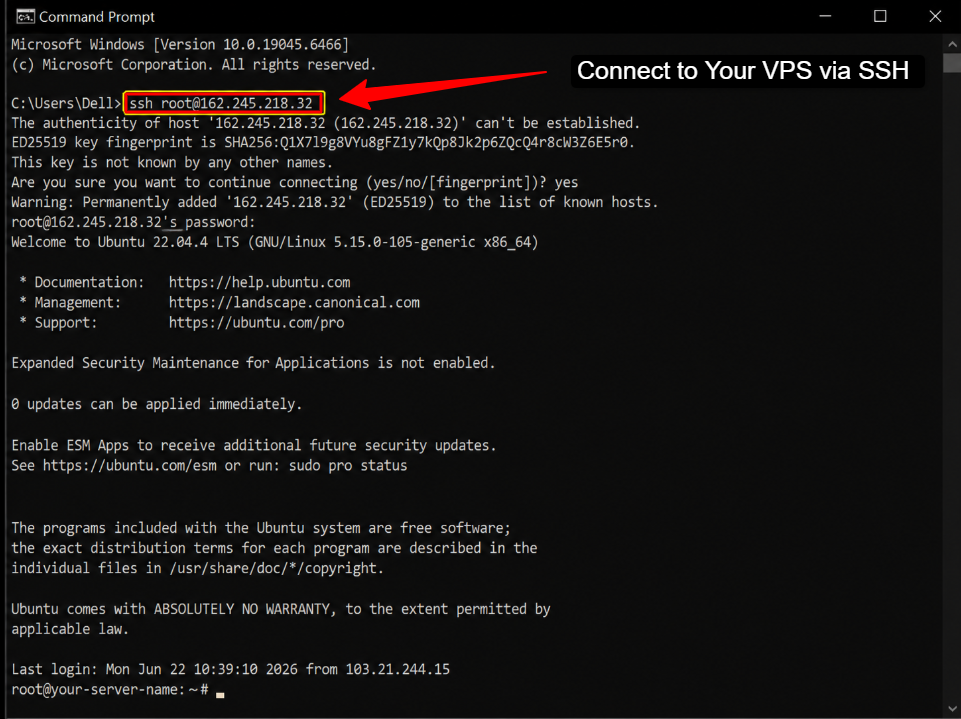
Once connected, you will see a terminal prompt that looks like: root@your-server-name:~#
This confirms you have root access to the VPS and are ready to begin the installation.
| Security Note Using root directly is fine for setup, but after setup, I recommend creating a non-root sudo user for daily use.I will show you how to do this in the security configuration section later in this guide. |
Step 3: Update Your VPS Before Installing Anything
Before you install PostgreSQL, update your server’s package list.
This makes sure you get the latest available version of every package and avoids dependency issues during installation. Skipping this step is one of the most common reasons people run into errors.
Run these two commands one after the other:
sudo apt updateThis command fetches the latest package information from Ubuntu’s servers.
sudo apt upgrade -yThis command upgrades all installed packages to their latest versions
The -y flag automatically confirms the upgrade without asking you each time. This process might take a few minutes depending on how many packages need updating.
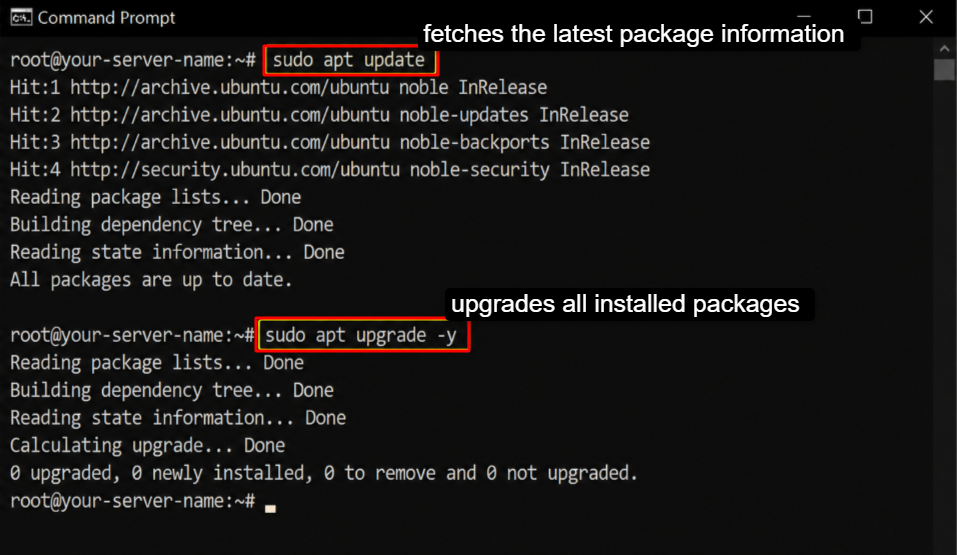
| You will see a long list of packages being updated scrolling through your terminal. Wait until you see the command prompt return. That means the upgrade is complete. |
Step 4: Install PostgreSQL on Your VPS
Now comes the main part.
You are going to install PostgreSQL using the official PostgreSQL APT repository.
I recommend this method over the default Ubuntu repository because it gives you the latest stable version of PostgreSQL with up-to-date security patches.
Add the Official PostgreSQL APT Repository
Run these commands in order to add the official PostgreSQL repository to your server:
sudo apt install -y curl ca-certificatessudo install -d /usr/share/postgresql-common/pgdgsudo curl -o /usr/share/postgresql-common/pgdg/apt.postgresql.org.asc --fail \https://www.postgresql.org/media/keys/ACCC4CF8.asc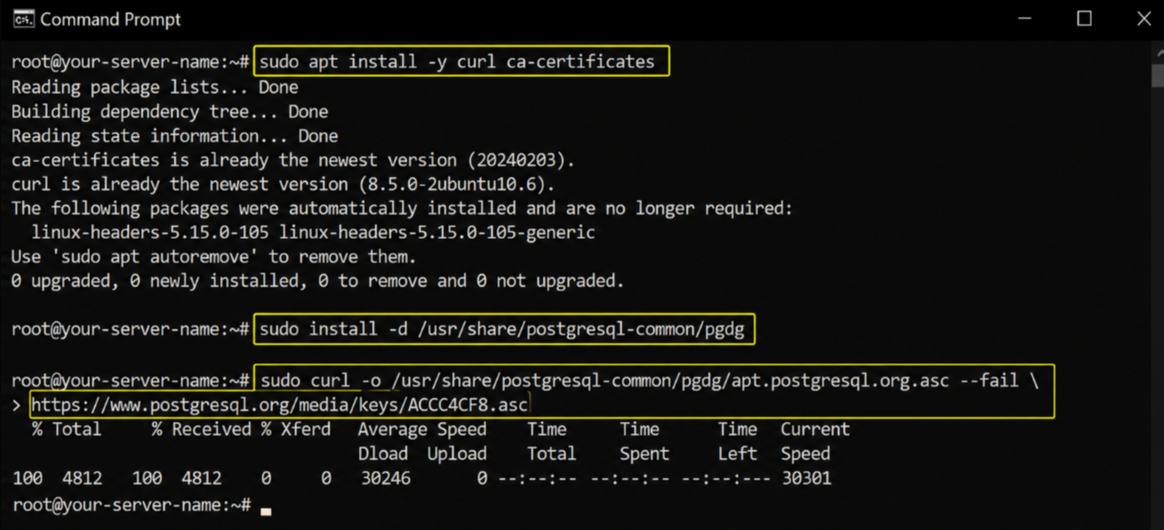
Now run the automated repository setup script:
sudo apt install -y postgresql-commonsudo /usr/share/postgresql-common/pgdg/apt.postgresql.org.shWhen this script runs, it will ask you to confirm adding the repository >> Press Enter to accept >> After it finishes, your server now has access to the official PostgreSQL packages.
Install PostgreSQL
Now install the latest stable version of PostgreSQL. As of 2026, PostgreSQL 17 is the current stable release:
sudo apt updatesudo apt install -y postgresqlPlease Note:
- Running ‘sudo apt install -y postgresql‘ installs the latest version available in the PGDG repository.
- If you want to install a specific version like PostgreSQL 17, you can run: sudo apt install -y postgresql-17
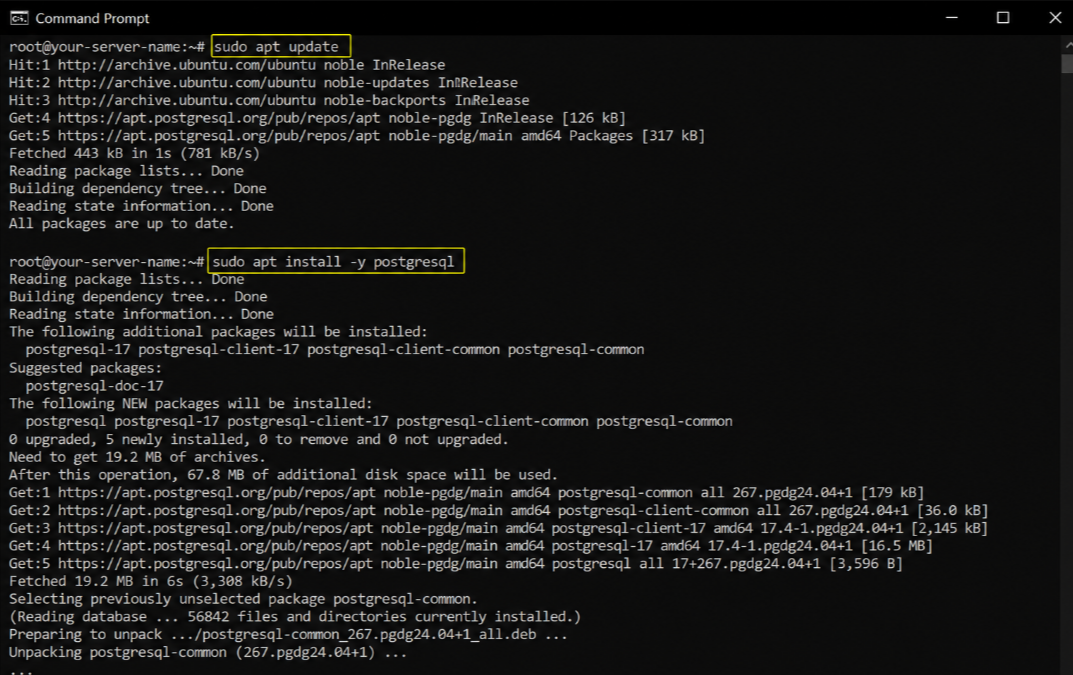
Both commands work fine for this guide.
- You will see PostgreSQL and its dependencies being downloaded and installed.
- The installation automatically starts the PostgreSQL service when done.
Step 5: Verify That PostgreSQL Is Running
After installation, PostgreSQL starts automatically. You need to verify that it is actually running before you move forward. A service that is installed but not running will cause confusing errors later.
Run this command to check the status:
sudo systemctl status postgresqlYou should see an output that shows ‘active (running)’ in green. That means PostgreSQL is up and accepting connections.
If you see ‘inactive’ or ‘failed’, run: sudo systemctl start postgresql
Then check the status again.
You can also confirm the PostgreSQL port is listening by running:
ss -tlnp | grep 5432You should see port 5432 listed, which is PostgreSQL’s default port. If you see it, the database is ready.
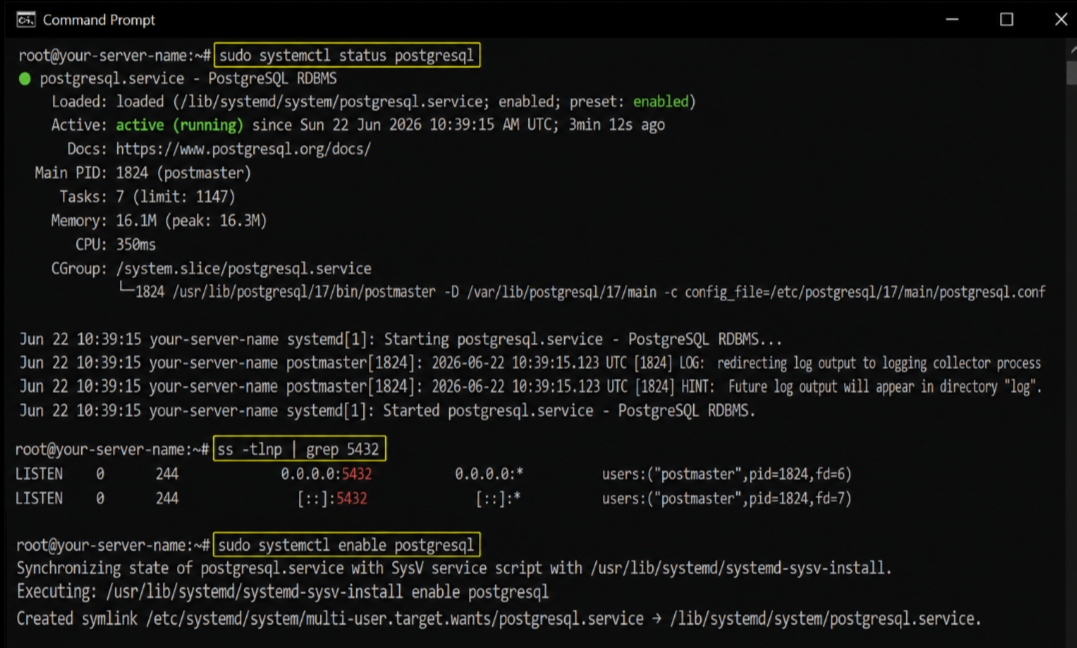
Enable PostgreSQL to Start Automatically on Reboot. By default, PostgreSQL should start on boot, but it is a good habit to make sure:
sudo systemctl enable postgresqlThis ensures PostgreSQL starts automatically every time your VPS reboots, so you never have to worry about it being down after a server restart.
Step 6: Access the PostgreSQL Command Line
PostgreSQL uses a special system user called ‘postgres’ that gets created automatically during installation. To access the PostgreSQL command line, you switch to this user first and then open the PostgreSQL shell.
Switch to the PostgreSQL User. And to do that, run this command:
sudo -i -u postgresYour terminal prompt will change.
You are now operating as the postgres system user. Notice how the prompt now shows postgres@ instead of root@.
Open the PostgreSQL Shell (psql) >> Now open the PostgreSQL interactive terminal by running:
psqlYou will see a prompt that looks like this:
postgres=#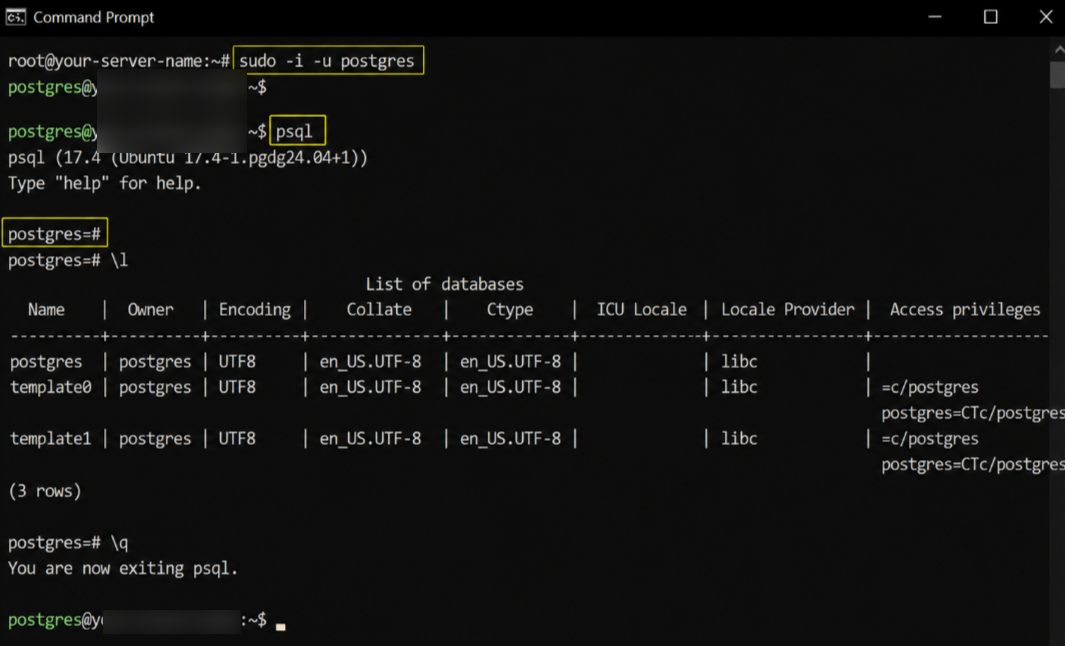
You are now inside PostgreSQL >> You can run database commands from here. To exit the shell at any time, type:
\qYour terminal should now show: postgres=#
This is the psql prompt. Everything you type here is a PostgreSQL command.
SQL commands end with a semicolon (;). psql commands start with a backslash (\).
Step 7: Create a New PostgreSQL Database and User
The default postgres superuser is fine for administration, but for your actual applications, you should always create a dedicated database and a dedicated user with limited permissions.
This is a clean way to organize your projects.
Create a New Database
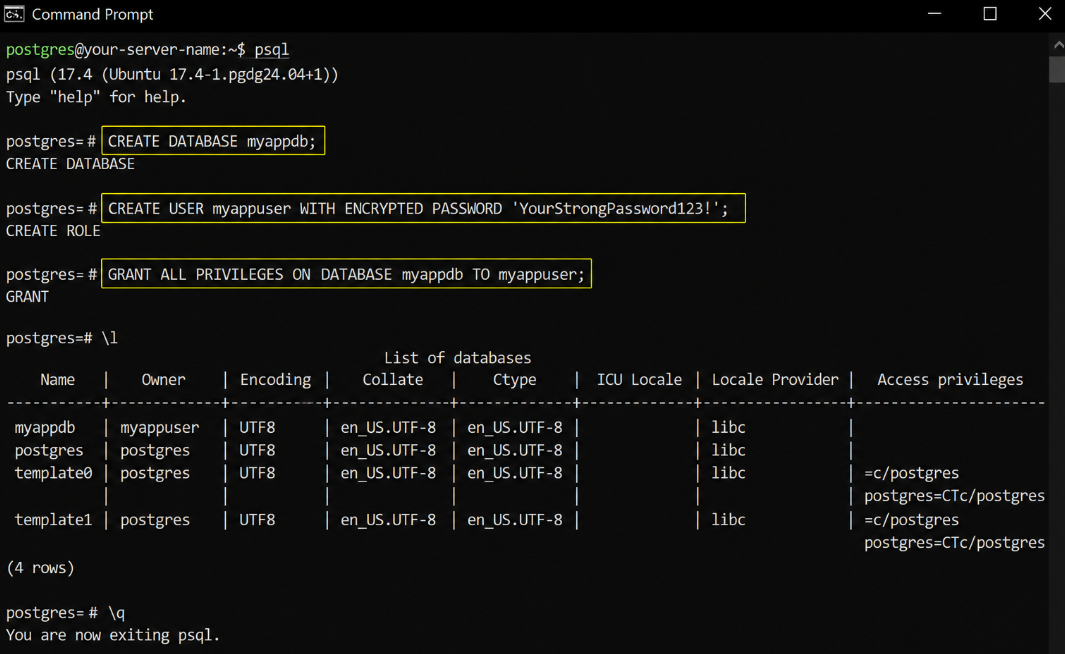
First, make sure you are inside the psql shell (you should see postgres=#). Then run:
CREATE DATABASE myappdb;Replace myappdb with whatever name you want for your database. You will see ‘CREATE DATABASE‘ in the output, which confirms it worked.
Create a New Database User
Now create a user that your application will use to connect to this database:
| CREATE USER myappuser WITH ENCRYPTED PASSWORD ‘YourStrongPassword123!’; |
Please Note:
- Replace ‘YourStrongPassword123!’ with a unique password.
- Use a mix of letters & special characters.
- Never use simple passwords like ‘123456’.
Grant Permissions to the New User
Give your new user full access to the new database:
| GRANT ALL PRIVILEGES ON DATABASE myappdb TO myappuser; |
Now your user myappuser has full control over myappdb. This user cannot access any other database unless you explicitly grant that permission.
Verify the Database Was Created
To see a list of all databases on the server, run \l
You should see myappdb in the list alongside the default postgres and template databases.
The \l command lists all databases with their owner and encoding. You should see myappdb listed with myappuser as owner after granting privileges.
Type \q to exit psql when done.
Step 8: Configure PostgreSQL for Remote Access
By default, PostgreSQL only accepts connections from the server itself (localhost).
If your application runs on a different server, or if you want to connect to the database using a tool like pgAdmin from your laptop, you need to configure PostgreSQL to allow remote connections.
Please follow these steps carefully.
Edit the PostgreSQL Configuration File
- First, exit the psql shell if you are still inside it by running \q.
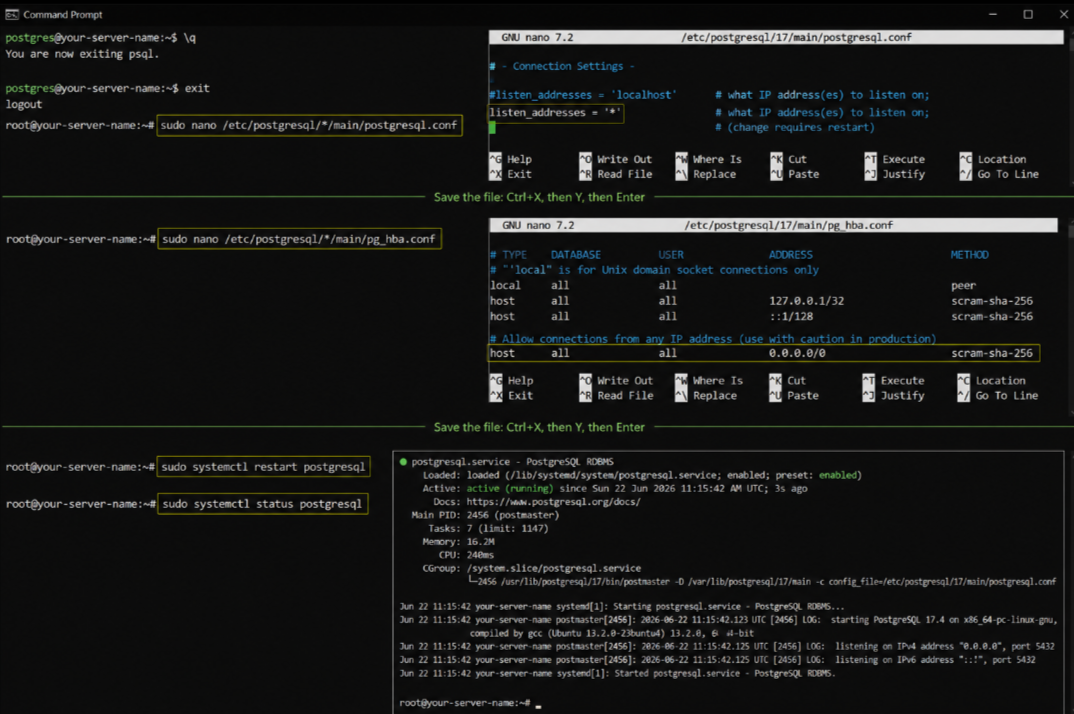
- Then go back to your root or sudo user >> Find the PostgreSQL configuration file and open it:
sudo nano /etc/postgresql/*/main/postgresql.conf- Inside this file, find the line that says:
#listen_addresses = 'localhost'- Change it to:
listen_addresses = '*'- The asterisk (*) tells PostgreSQL to listen on all available network interfaces >> Save the file by pressing Ctrl+X, then Y, then Enter.
Edit the Client Authentication Configuration
- Now open the pg_hba.conf file which controls who can connect and how:
sudo nano /etc/postgresql/*/main/pg_hba.conf- Scroll to the bottom of this file and add this line:
host all all 0.0.0.0/0 scram-sha-256Disclaimer
- The line above allows connections from ANY IP address. This is fine for initial setup and testing.
- For a production server, replace ‘0.0.0.0/0’ with your specific IP address.
- Allowing all IPs on a production server without a firewall is a security risk.
Restart PostgreSQL to Apply Changes
After editing both files, restart PostgreSQL for the changes to take effect:
sudo systemctl restart postgresqlThen verify it is still running:
sudo systemctl status postgresqlPlease note this too:
- After restart, the status should still show ‘active (running)’.
- If it shows an error, check your edits in postgresql.conf and pg_hba.conf for typos.
Step 9: Configure the Firewall to Allow PostgreSQL
Even with PostgreSQL configured to listen on all interfaces, your VPS firewall may still block incoming connections on port 5432. You need to open this port.
On Ubuntu, the default firewall is UFW (Uncomplicated Firewall).
Check If UFW Is Active
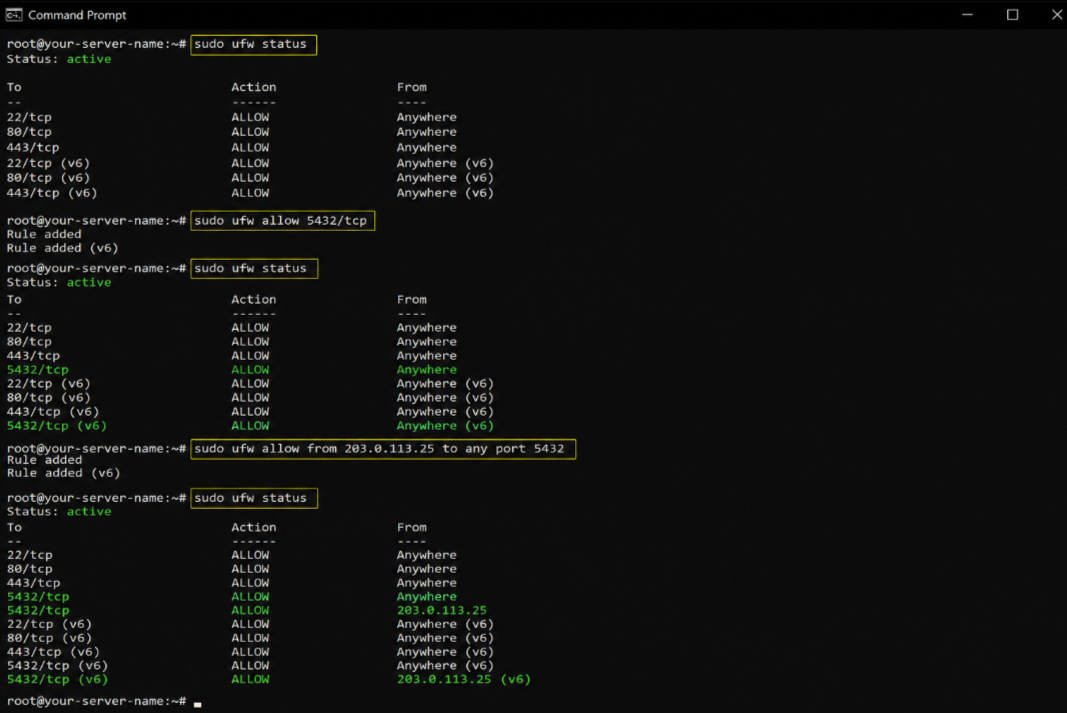
sudo ufw statusIf UFW is active and port 5432 is not listed, you need to add it. If UFW is inactive, you can skip to the next section, though I recommend enabling it at first.
Allow PostgreSQL Through the Firewall
Run this command to allow connections on PostgreSQL’s port:
sudo ufw allow 5432/tcpFor better security, allow connections only from a specific IP address:
sudo ufw allow from YOUR_IP_ADDRESS to any port 5432Replace YOUR_IP_ADDRESS with the IP of the machine you are connecting from.
Enable UFW If It Is Not Active
To enable UFW and ensure SSH access is not blocked:
sudo ufw allow OpenSSHsudo ufw enablePlease also make sure that:
- Always allow OpenSSH before enabling UFW.
- If you enable UFW without allowing SSH first, you will lock yourself out of the server.
- If that happens, use the VPS emergency console in your YouStable dashboard to regain access.
Step 10: Test the Remote Connection
Now test that you can connect to PostgreSQL from your local machine or another server. This confirms that everything is set up correctly.
Connect Using the psql Client
From your local machine (not the VPS), run:
psql -h YOUR_VPS_IP -U myappuser -d myappdbYou will be prompted for the password you set earlier >> Enter it and press Enter >> If you see the psql prompt, your remote connection is working.
Test Using a Sample Query
Once connected, run a quick test to make sure the database responds correctly:
SELECT version();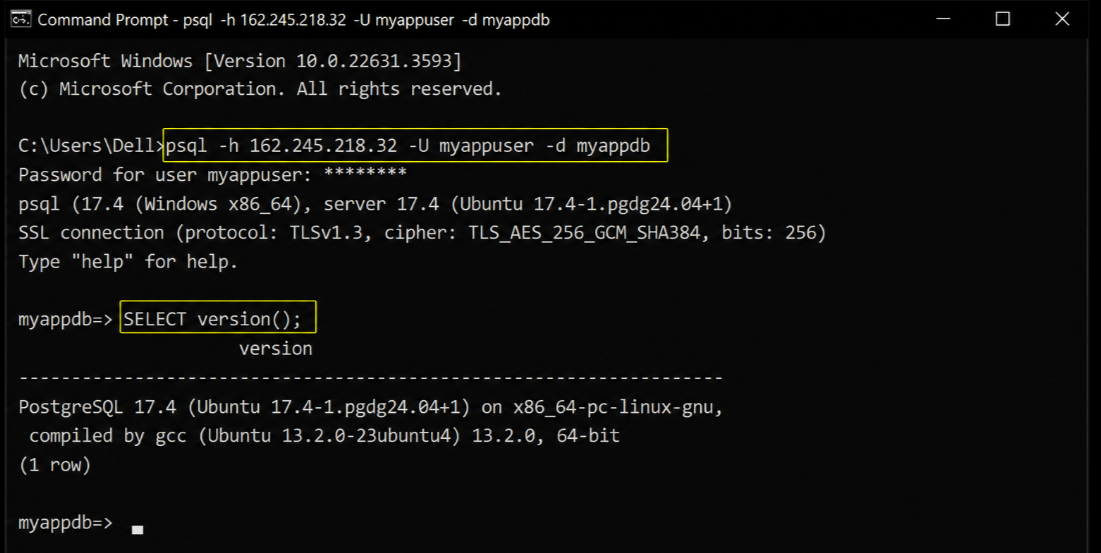
This returns the PostgreSQL version string, confirming the connection and the database are both working.
- You should see output like: PostgreSQL 17.x on x86_64-pc-linux-gnu…
- This confirms your remote connection is working and PostgreSQL is responding to queries.
Step 11: Secure Your PostgreSQL Installation
I have told in so many places that security is never optional.
A PostgreSQL database exposed to the internet without proper hardening is a serious risk. Here are the essential security steps you should take right after setting up PostgreSQL.
Set a Strong Password for the PostgreSQL Superuser
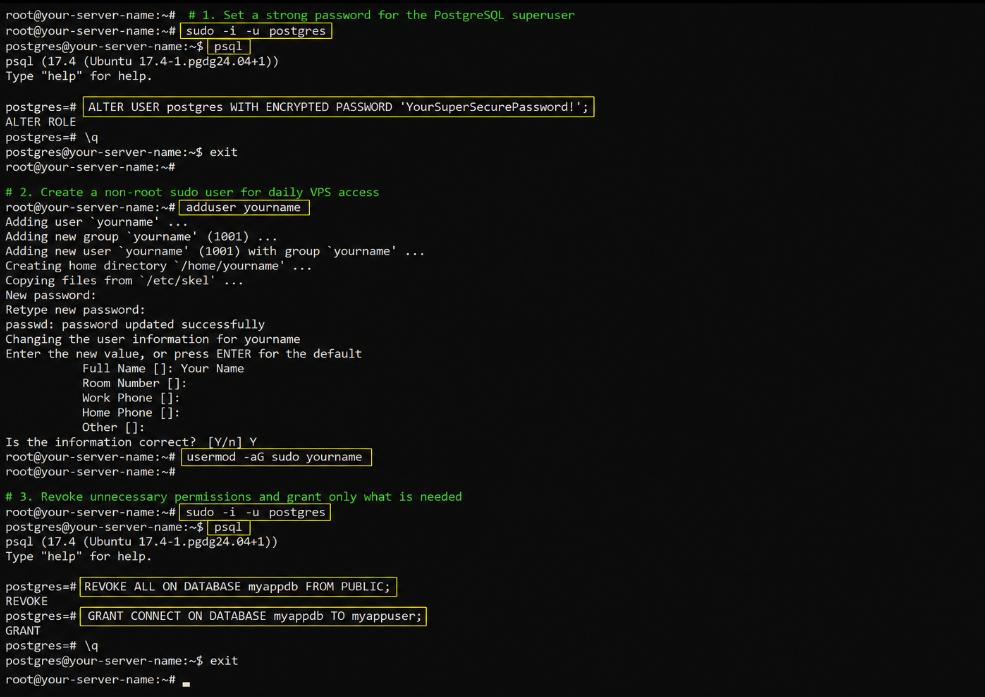
The default postgres superuser has no password set >> Fix this immediately >> Connect to psql:
sudo -i -u postgrespsqlThen set a password:
| ALTER USER postgres WITH ENCRYPTED PASSWORD ‘YourSuperSecurePassword!’; |
Create a Non-Root Sudo User for Daily VPS Access
Stop using root for everything. Create a regular user with sudo privileges:
adduser yournameusermod -aG sudo yournameFrom now on, log in as this user instead of root.
Revoke Unnecessary Permissions
If you want to restrict what your application user can do, remove permissions you do not need:
| REVOKE ALL ON DATABASE myappdb FROM PUBLIC;GRANT CONNECT ON DATABASE myappdb TO myappuser; |
Please Note
- The REVOKE ALL FROM PUBLIC command prevents other users from connecting to your database by default.
- Then the GRANT CONNECT command gives only your specific user access.
- This is a clean permission model for most applications.
Step 12: Basic PostgreSQL Commands You Will Use Every Day
Now that PostgreSQL is running and secured, here are the commands you will reach for most often. I have organized these so you can refer back to this section whenever you need a quick reminder.
Database Management Commands
| \l | List all databases |
| \c myappdb | Connect to a database |
| \dt | List all tables in current database |
| \du | List all users and roles |
| CREATE DATABASE newdb; | Create a new database |
| DROP DATABASE olddb; | Delete a database |
User Management Commands
- CREATE USER username WITH ENCRYPTED PASSWORD ‘password’;
- DROP USER username;
- GRANT ALL PRIVILEGES ON DATABASE dbname TO username;
- REVOKE ALL PRIVILEGES ON DATABASE dbname FROM username;
- ALTER USER username WITH PASSWORD ‘newpassword’;
Service Management Commands
| sudo systemctl start postgresql | Start the service |
| sudo systemctl stop postgresql | Stop the service |
| sudo systemctl restart postgresql | Restart the service |
| sudo systemctl status postgresql | Check service status |
| sudo systemctl reload postgresql | Reload configuration without restart |
Step 13: How to Backup and Restore a PostgreSQL Database
Never run a production database without a backup plan. PostgreSQL gives you a built-in tool called pg_dump for creating backups. Here is how to use it.
Create a Database Backup
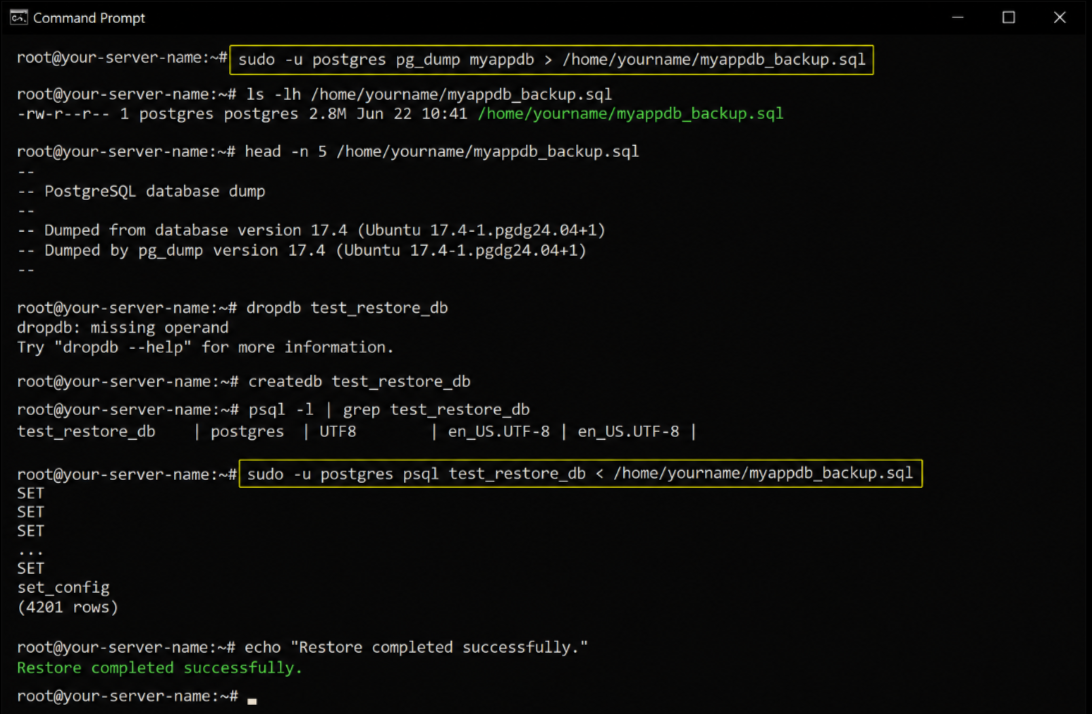
Run this command to create a full backup of your database:
sudo -u postgres pg_dump myappdb > /home/yourname/myappdb_backup.sqlThis creates a .sql file containing all the data and schema for myappdb. You can store this file locally, upload it to cloud storage, or automate it with a cron job.
Restore a Database from Backup
To restore the database from a backup file:
sudo -u postgres psql myappdb < /home/yourname/myappdb_backup.sqlPlease Note
- The database you are restoring into must already exist before running the restore command.
- If it does not exist, create it first: CREATE DATABASE myappdb;
- For automated backups, set up a cron job that runs pg_dump every night and saves to a secure location.
Troubleshooting Common PostgreSQL Issues
Even with perfect setup steps, things sometimes go sideways. Here are the most common issues and how to fix them fast.
Error: Connection Refused on Port 5432
This usually means PostgreSQL is not running or is not listening on the expected port. Check the service status:
sudo systemctl status postgresqlThen check if port 5432 is open:
ss -tlnp | grep 5432If the port is not listed, check your postgresql.conf file and make sure listen_addresses = ‘*’ is set and saved correctly.
Error: FATAL: password authentication failed
You entered the wrong password. Reset it by connecting locally as postgres:
| sudo -i -u postgrespsqlALTER USER myappuser WITH ENCRYPTED PASSWORD ‘NewPassword123!’; |
Error: FATAL: no pg_hba.conf entry for host
Your pg_hba.conf does not have an entry for the IP address you are connecting from. Open the file and add the correct entry:
sudo nano /etc/postgresql/*/main/pg_hba.confAdd a line for your IP or use 0.0.0.0/0 for testing, then restart PostgreSQL.
PostgreSQL Service Fails to Start
Check the logs for the exact error:
sudo journalctl -u postgresql --no-pager | tail -20Read the last 20 lines of the log. The error message will tell you exactly what is wrong, whether it is a config file typo, a port conflict, or a permissions issue.
My Verdict For This Guide
If you follow each and every command, follow all my instructions word to word, then in that case, you’ll have a fully working PostgreSQL database running on your VPS.
You:
- installed it from the official repository,
- configured remote access,
- set up the firewall,
- created a dedicated database and user,
- secured the installation,
- and learned how to back up your data.
I have personally verified and tested every step in this guide
The most important thing I want you to take away from this guide is that PostgreSQL on a VPS is not complicated once you follow the right steps. Your database is now production-ready. If you run into any issues, the troubleshooting section has you covered for the most common problems.
Always keep your VPS and PostgreSQL updated.
Run sudo apt update and sudo apt upgrade regularly to make sure you have the latest security patches. A well-maintained server is a secure server.
Start with YouStable for your VPS and you will have a solid foundation from the very first day.