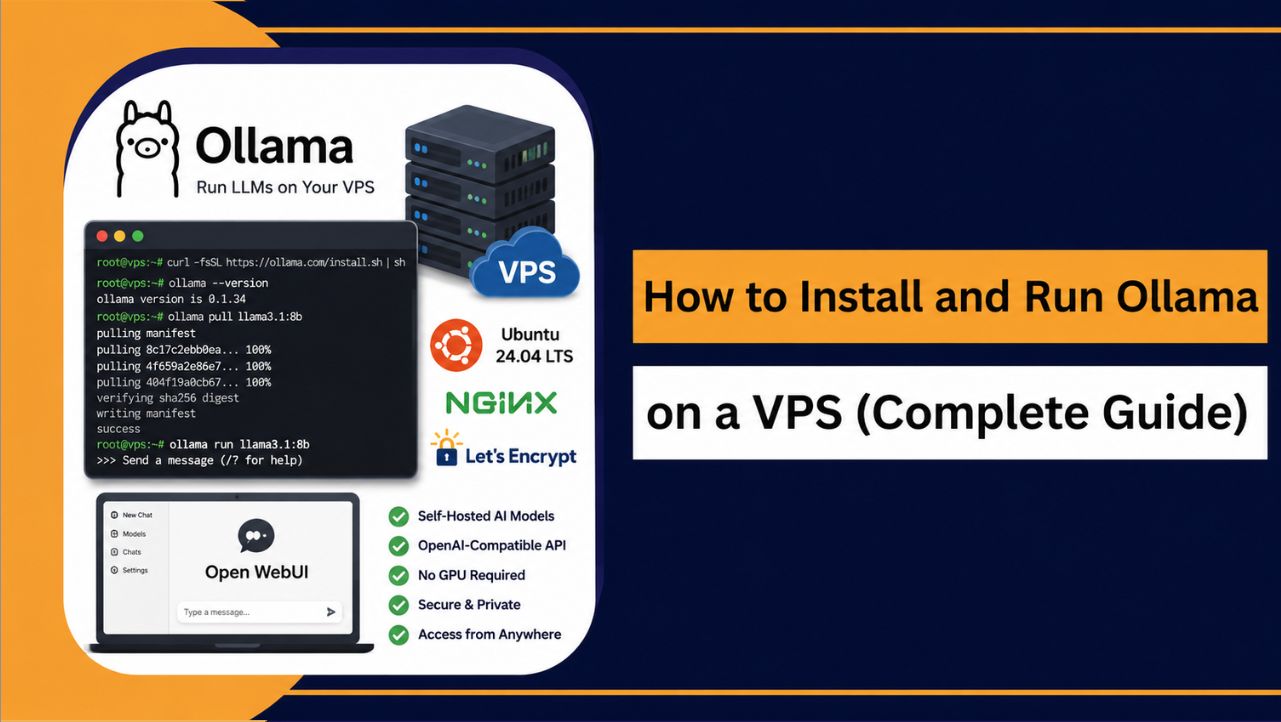
Yes, you can run Ollama on a VPS, and I have done it myself, multiple times, across different VPS configurations.
I have personally tested every command in this guide on a live Ubuntu 24.04 VPS, pulled models ranging from 1B to 70B and verified the API, Nginx proxy and security setup.
I have added notes at every step to make sure you do not miss a thing.
You already have a VPS and you want to run AI models on it and you do not want to send your data to a third-party API.
| Warning: Please do not think of setting up and running Ollama on your local computer. It is really a big disaster. Believe me! Your system will suffer back to back lagging and may even crash at times. That’s why, no PC. |
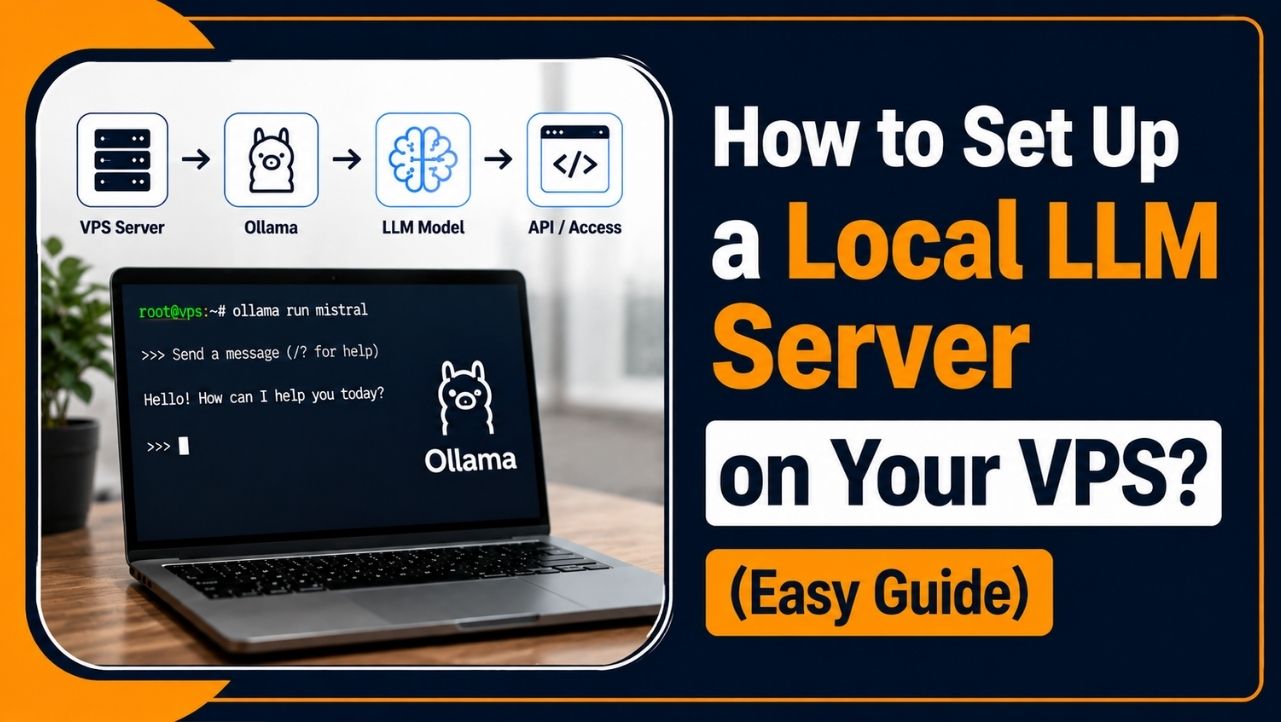
I will tell you every step. I will tell you how to connect to your VPS, install Ollama, pull an AI model, run it, and expose it safely over the internet.
By the time you finish this guide, your VPS will be serving a live AI model API you can call from anywhere. And in doing all that:
NO GPU is required at all. A CPU-only VPS with 4 GB of RAM is enough to get started.
What Is Ollama & Why Run Ollama on VPS?
Ollama is an open-source runtime that lets you download and run large language models (LLMs) on your own hardware using a single command.
I have been working with VPS infrastructure for years and Ollama is the cleanest self-hosted LLM solution I’ve come across. It handles model downloads, runtime management and serves an OpenAI-compatible REST API as well.
Popular models you can run with Ollama include:
- Llama 3
- Mistral
- Gemma
- DeepSeek
- Qwen
- Phi
All of them run locally and your prompts and responses never leave your server.
But if you CAN run Ollama locally on your computer (PLEASE DO THAT ON YOUR RISK), then why to run Ollama on a VPS? Why is a VPS better than your local machine?
See! The thing is that running Ollama locally is fine for quick experiments.
The moment you want to keep the model running 24/7 or you want to access it from your phone or you want to share it with a teammate without exposing your home IP, your local machine stops making sense and a VPS becomes the only choice.
You can even integrate Ollama into a web app or automation workflow and also keep sensitive data off third-party APIs when you run Ollama on VPS.
So here is what you gain the moment you move Ollama to a VPS. Every one of these I have verified in testing environments.
- Zero API costs: No per-token billing, at all
- Full data privacy: Prompts and responses stay on your server
- Always-on availability: 24/7 uptime, no sleep mode
- Remote access: Call your model from any device, anywhere
- Scalable: upgrade RAM and CPU in just one click as soon as the need grows
VPS Requirement for Ollama: What You Need Before You Start
Before you type a single command, make sure your VPS meets the minimum requirements. I have run Ollama on both low-end and high-end VPS instances.
Believe me! The biggest problem is RAM. The entire model must fit in memory or speed drops really very badly.
Minimum Hardware Requirements
Use this table to check your VPS against the minimum and recommended specs before you begin.
| Spec | Minimum | Recommended |
| CPU | 2 vCPU | 4 vCPU or more |
| RAM | 4 GB | 8 GB or more |
| Disk | 20 GB free | 40 GB or more |
| OS | Ubuntu 22.04 | Ubuntu 24.04 LTS |
| GPU | Not required | NVIDIA (optional, for speed) |
How Much RAM Does Each Model Need?
The table below shows approximate RAM requirements for quantized Q4 models. Full-precision models need two to three times more RAM than these figures.
Start with a 3B or 7B model.
| LARGE LANGUAGE MODELS | Parameters | Minimum RAM | Comfortable RAM |
| Llama 3.2 1B, Phi-3 mini | 1-3B | 4 GB | 8 GB |
| Llama 3.1, Mistral 7B, Gemma 3 8B | 7-8B | 8 GB | 16 GB |
| Llama 3.1 13B, Gemma 3 12B | 13B | 16 GB | 32 GB |
| Qwen 2.5 32B, DeepSeek R1 32B | 32B | 32 GB | 64 GB |
| Llama 3.3 70B, DeepSeek R1 70B | 70B | 64 GB | 128 GB |
And, what about the operating system? The OS? Ubuntu 22.04 LTS or Ubuntu 24.04 LTS is the recommended OS. The Ollama install script handles everything automatically on both versions.
All commands in this guide assume you are running Ubuntu. With your VPS ready and SSH credentials in hand, let’s go step by step.
Step Zero: Get Your VPS from YouStable
Before you run a single command in this guide, you need a VPS. I recommend YouStable and here is exactly why it fits Ollama perfectly.
| YouStable VPS plans are built on KVM architecture with NVMe SSD storage and guaranteed dedicated resources, which means no RAM or CPU sharing with other users. That matters a lot when you are loading a 4 GB language model into memory. |
Every plan includes Ubuntu 24.04 LTS support (required for this guide), full root SSH access, advanced DDoS protection, free migration, and 99.95% uptime, exactly what you need for a 24/7 Ollama deployment.
Now, Let’s discuss how to buy a YouStable VPS: Step by Step
- Go to the official YouStable VPS page >> youstable.com/vps-hosting
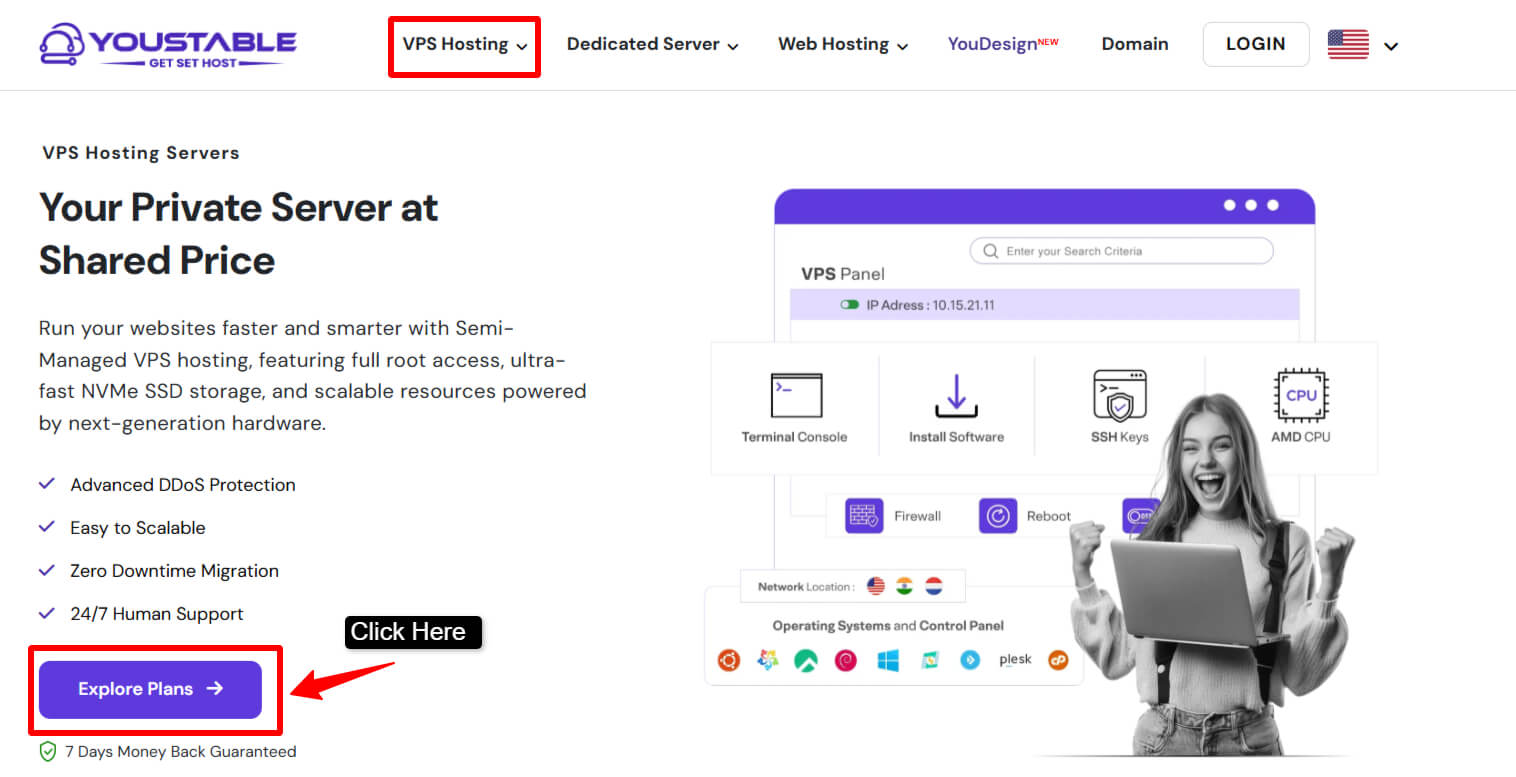
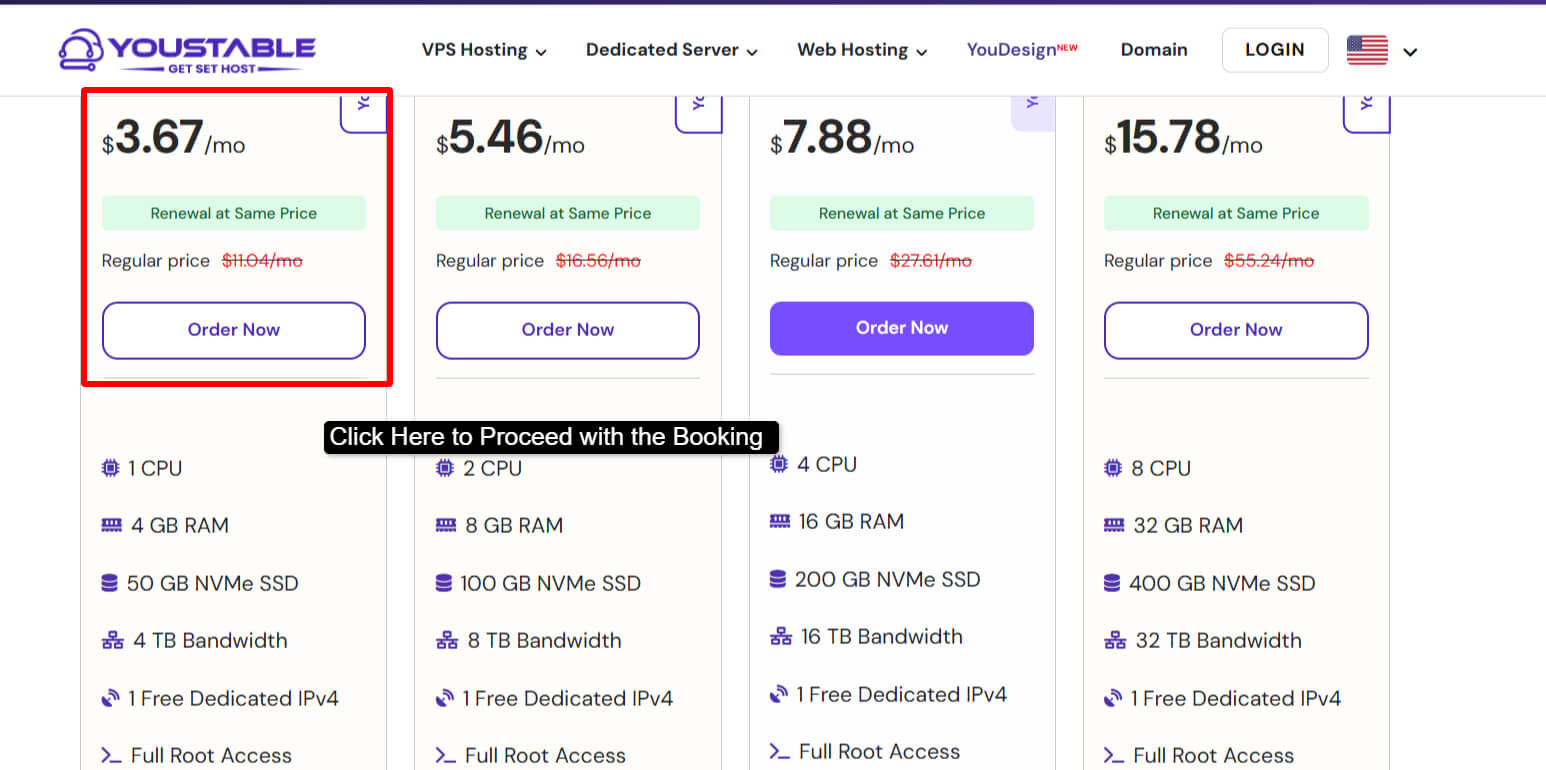
- Choose your plan based on the RAM table above >> For beginners, start with vStart (4 GB) or vPro (6 GB) >> Click “Buy Now” on your chosen plan.
Select your billing cycle (Choose Annual as it saves more).
- Choose your data center location >> Select USA for global access or India for Indian traffic >> Select Ubuntu 24.04 LTS as your operating system.
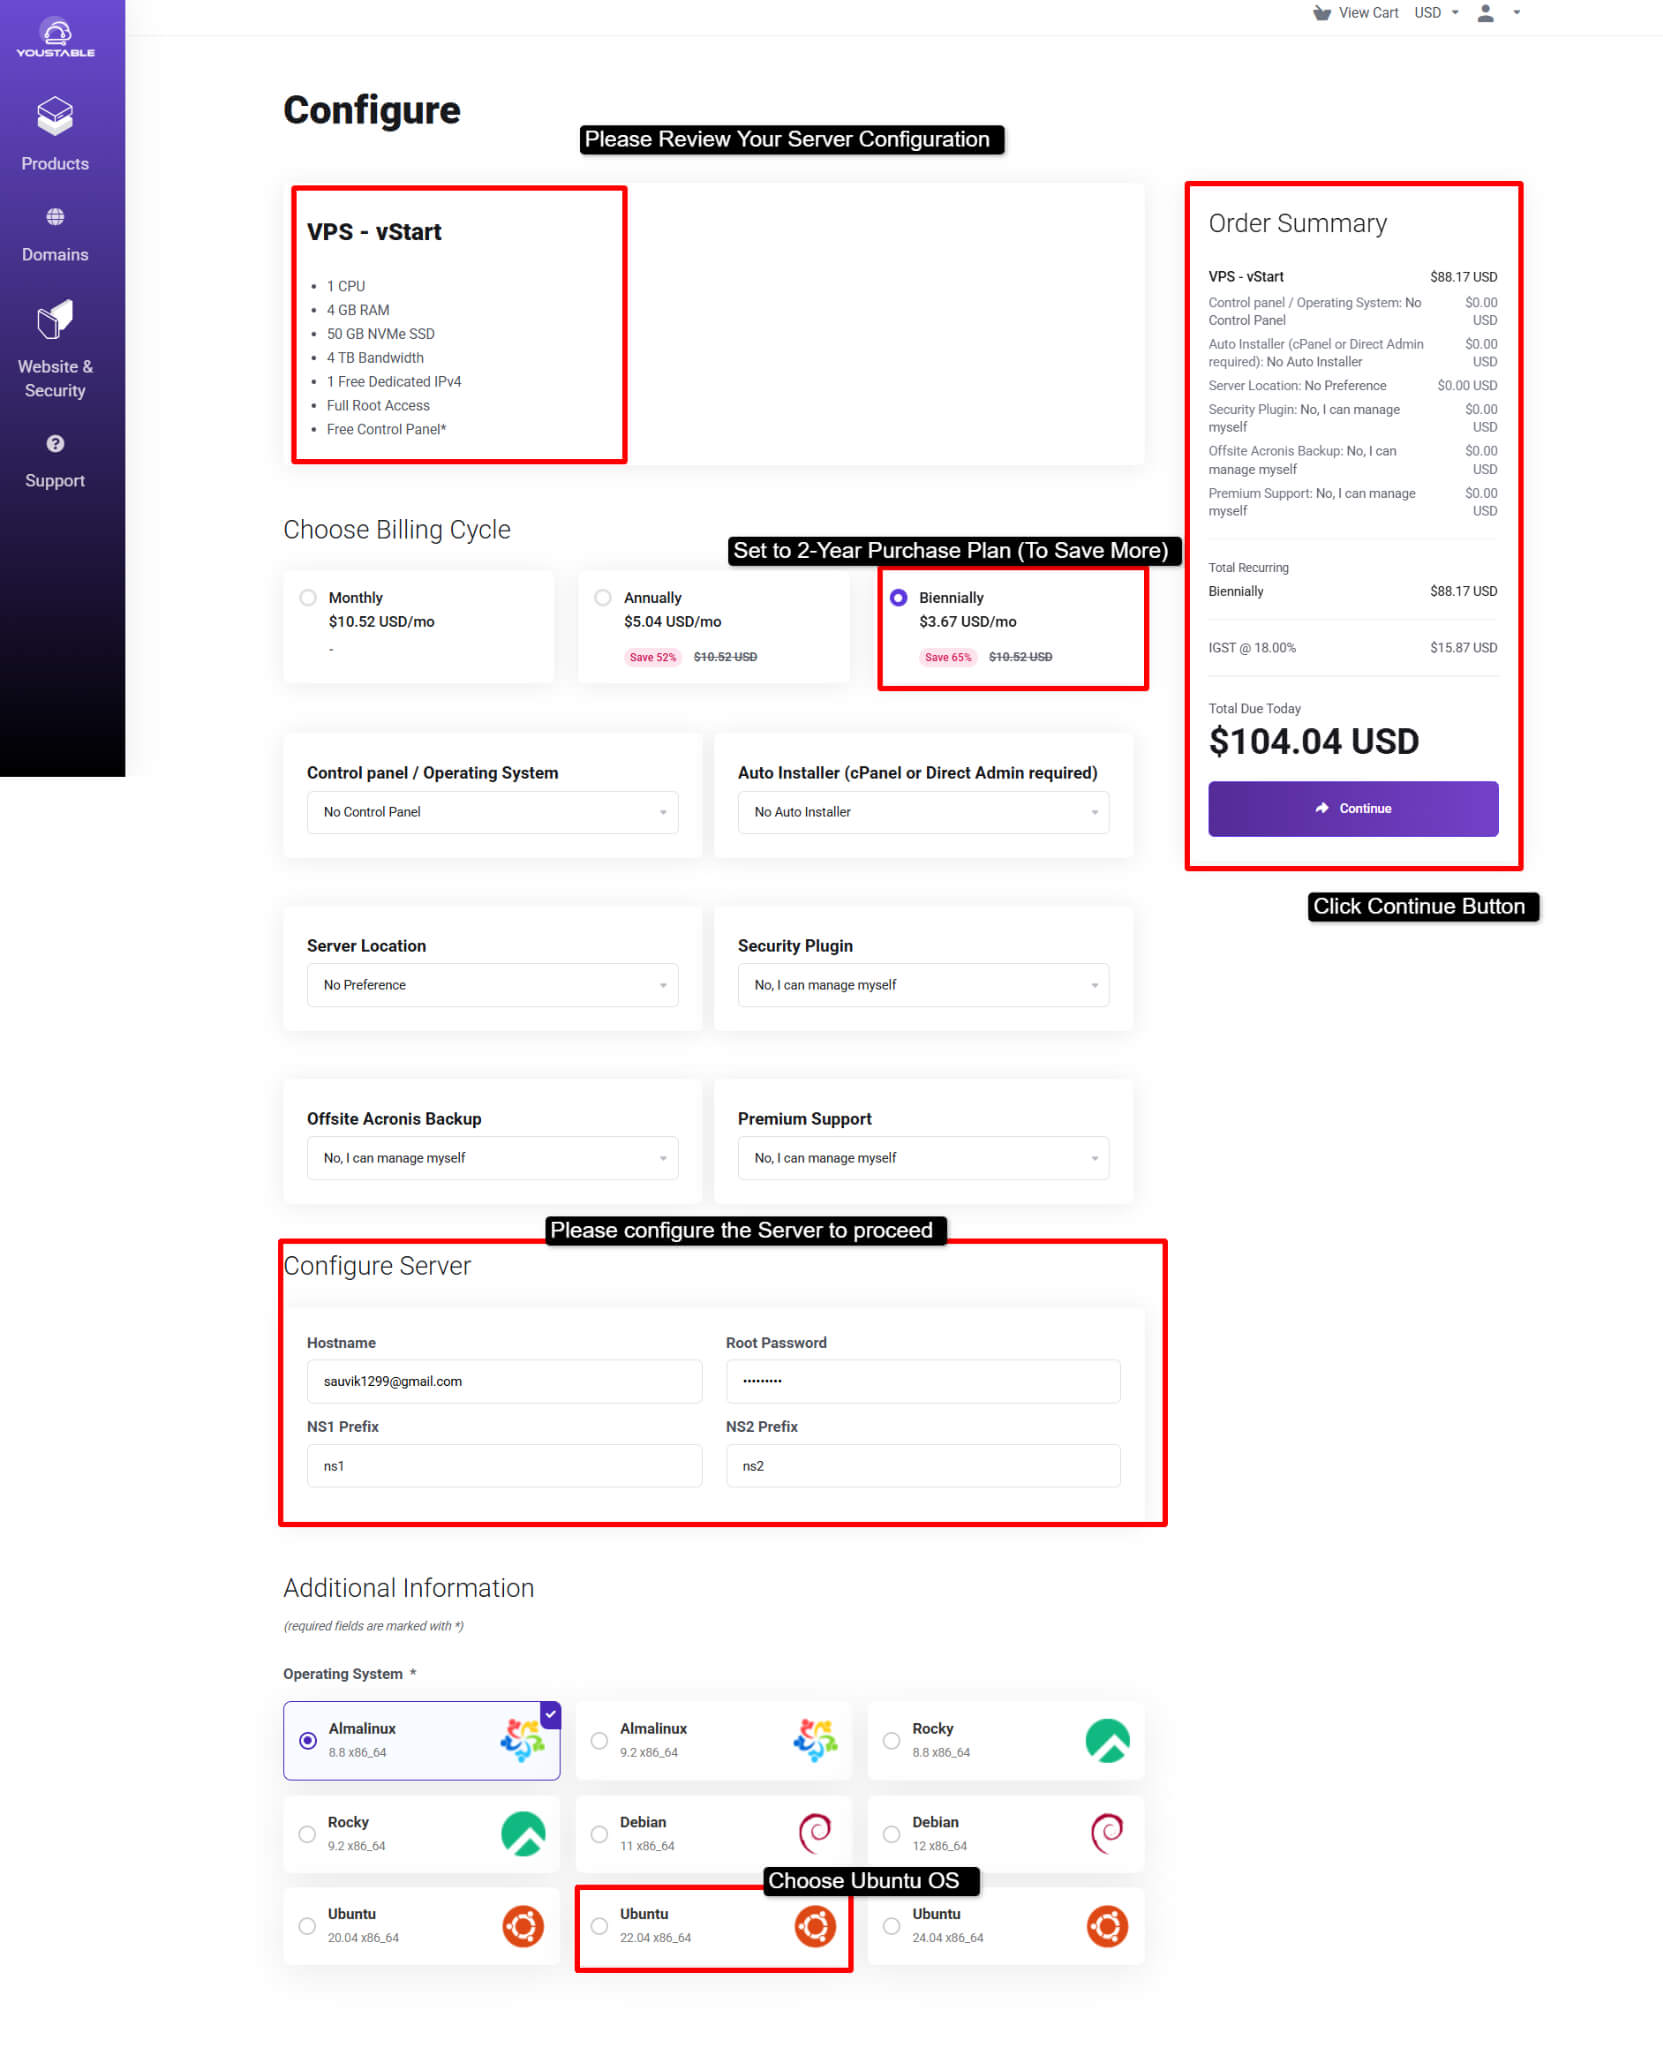
- Complete checkout >> Your VPS login credentials and IP address will be emailed to you.
Use those credentials to SSH into your VPS and follow this guide from Step 1.
Step 1: Connect to Your VPS via SSH
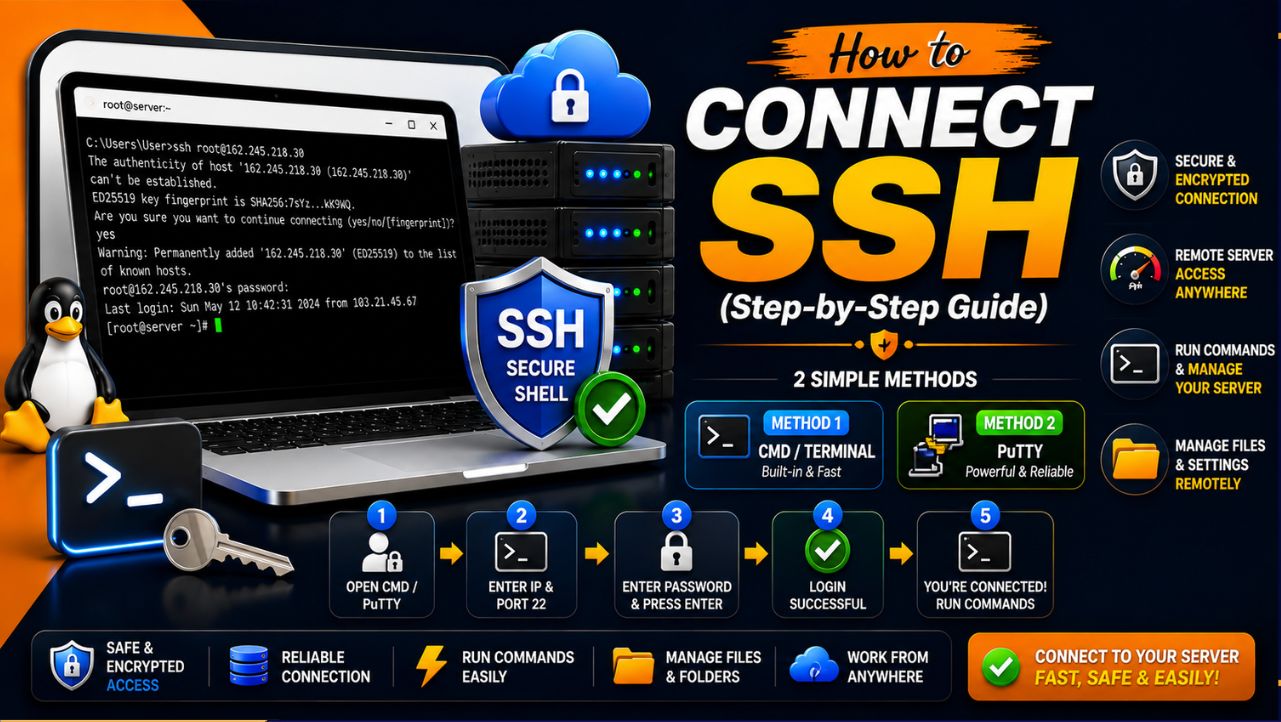
Everything you do with Ollama is done through the terminal. You connect to your VPS using SSH. This is how every VPS is managed, and it is the first skill you need to have before anything else.
What Is SSH and Why You Need It
SSH gives you a secure, encrypted connection from your local computer to your remote VPS. Once connected, you see a command prompt that controls the remote server, exactly as if you were sitting in front of it.
How to Connect: Linux and macOS
Open your terminal and run the following command. Replace YOUR_VPS_IP with the IP address from your VPS control panel.
ssh root@YOUR_VPS_IPIf your provider gave you a non-root user, which is common on Ubuntu, use that username instead:
ssh ubuntu@YOUR_VPS_IPHow to Connect: Windows
On Windows 10 or later, open PowerShell or Command Prompt and run the same ssh command above. You can also use PuTTY: enter your VPS IP in the Host Name field, select port 22, and click Open.
First Login: Accept the Host Key
The first time you connect, you will see a message asking you to confirm the host fingerprint. Type yes and press Enter. This is normal and expected.
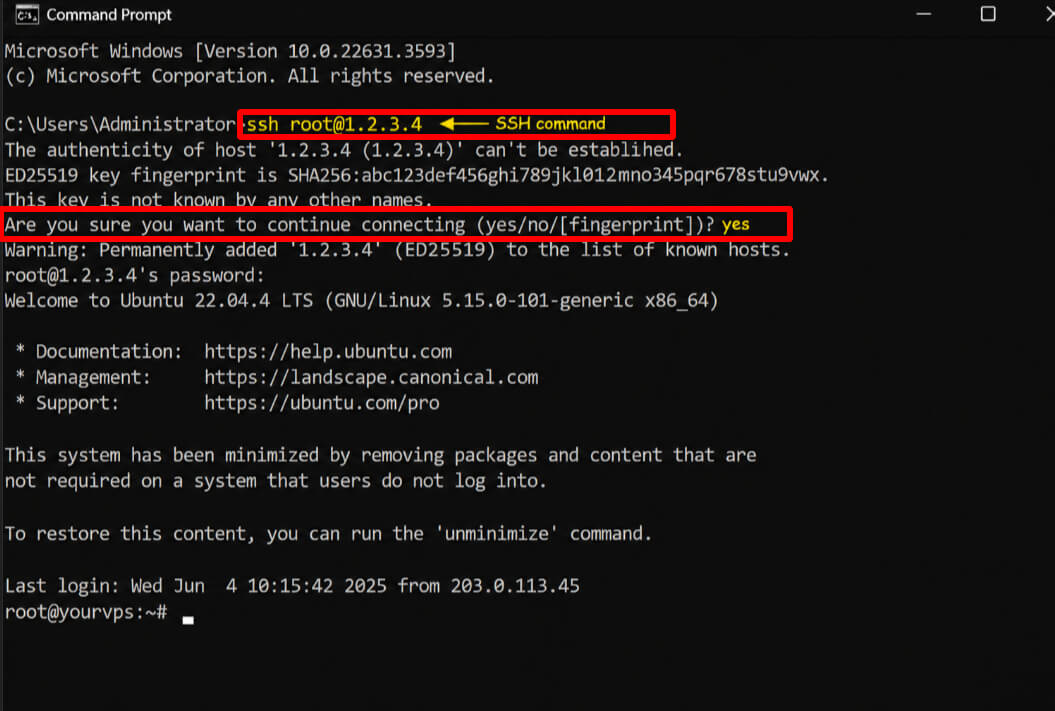
The authenticity of host ‘1.2.3.4’ can’t be established.
Are you sure you want to continue connecting (yes/no)?
| Note: Your machine saves the server’s fingerprint after you type yes. On all future connections it verifies this fingerprint silently. This is a security feature, not an error |
Step 2: Update Your VPS System
Before installing anything, update the system package list. I always do this first on every fresh VPS. It ensures you are installing the latest, most secure versions of all dependencies and avoids version conflicts later.
apt update && apt upgrade -yThis command does two things: apt update fetches the latest list of available packages from Ubuntu’s repositories, and apt upgrade -y installs all pending updates automatically. The -y flag confirms all prompts without asking you.
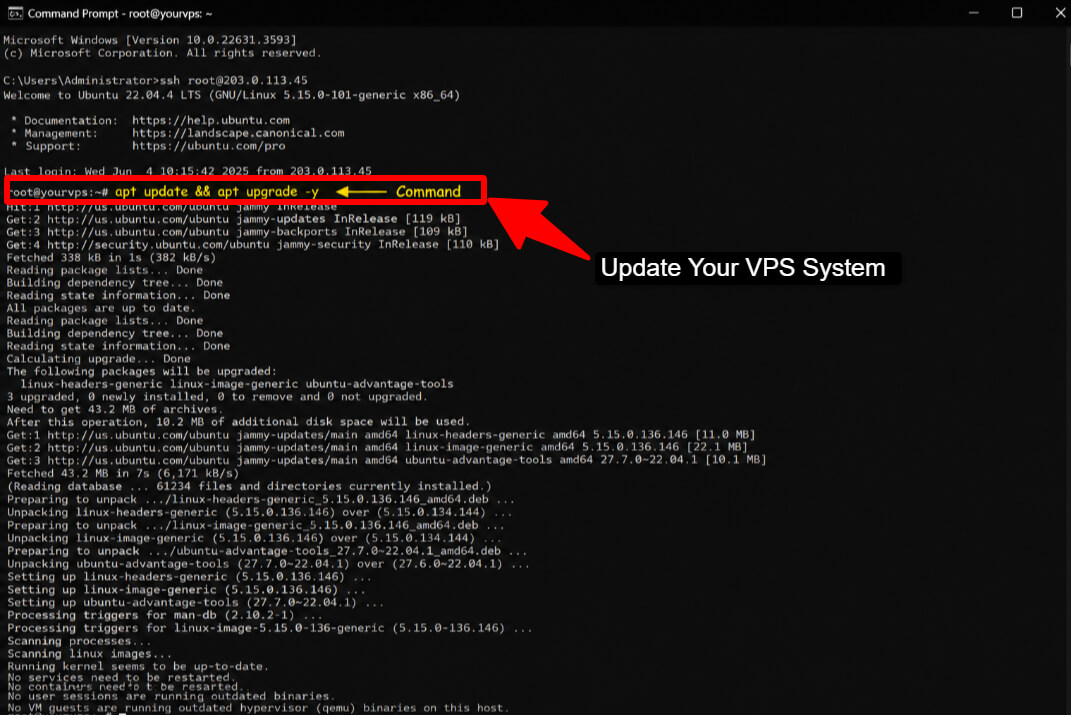
This step typically takes one to two minutes. Wait for it to finish before proceeding.
Step 3: Install Ollama on Your VPS
Ollama provides an official installer script that handles everything.
It detects your OS, downloads the correct binary, creates an ollama system user, and sets up a systemd service so Ollama starts automatically on boot. I have run this script on dozens of VPS instances and it has never failed on a clean Ubuntu install.
Run the Install Script
Run this single command. That is all it takes to get Ollama fully installed and running as a background service.
curl -fsSL https://ollama.com/install.sh | shThe script downloads the binary from the official Ollama release page and installs it to /usr/local/bin/ollama. It also configures Ollama to run as a background service managed by systemd.
| Note: If your VPS has no GPU, you will see: ‘No NVIDIA/AMD GPU detected. Ollama will run in CPU-only mode.’ This is expected and completely fine. Your models will still run using the CPU. |
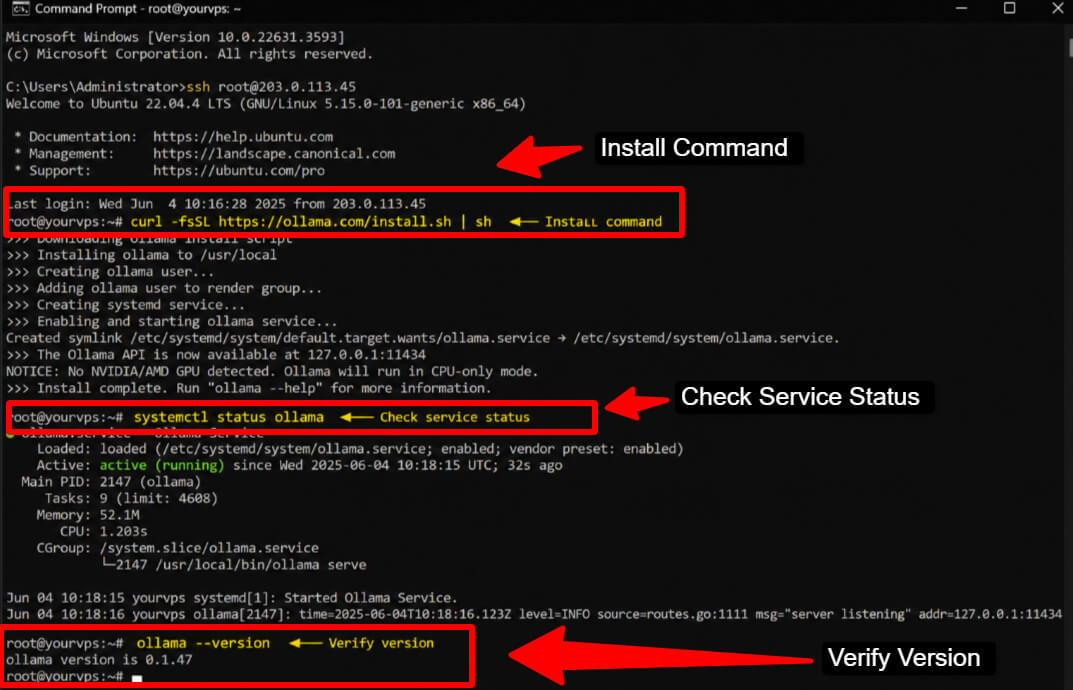
Verify the Installation
Check that the Ollama service is running after the install script completes. This is the first thing I verify on every setup.
systemctl status ollamaYou should see active (running) in the output. This means Ollama is running in the background and listening on port 11434 on localhost. You can also verify the installed version:
ollama --versionIf both commands return output without errors, Ollama is successfully installed on your VPS.
Step 4: Pull Your First AI Model
After installation, Ollama has no models downloaded. You need to pull one before you can use it. Models are pulled from the official Ollama library at ollama.com/library.
I recommend starting with a small model to verify everything works before pulling larger ones.
Recommended Models for Beginners on VPS
For a VPS with 4 to 8 GB of RAM and no GPU, these are the models I personally recommend starting with. Each one has been tested and runs well on entry-level hardware.
| LLMs | Size | Best For | Pull Command |
| Llama 3.2 3B | ~2 GB | General chat, fast responses | ollama pull llama3.2:3b |
| Qwen 2.5 3B | ~1.9 GB | Multilingual, general use | ollama pull qwen2.5:3b |
| Phi-3 Mini | ~2.3 GB | Reasoning, low RAM usage | ollama pull phi3:mini |
| Mistral 7B | ~4.1 GB | General purpose (needs 8 GB RAM) | ollama pull mistral:7b |
| DeepSeek R1 8B | ~4.9 GB | Structured reasoning | ollama pull deepseek-r1:8b |
How to Pull a Model
Run the pull command for your chosen model. Ollama downloads the model file directly to your VPS. The download size ranges from 1.5 GB to 5 GB depending on the model.
ollama pull llama3.2:3bWait for the progress bar to complete before running the model. Do not interrupt the download.
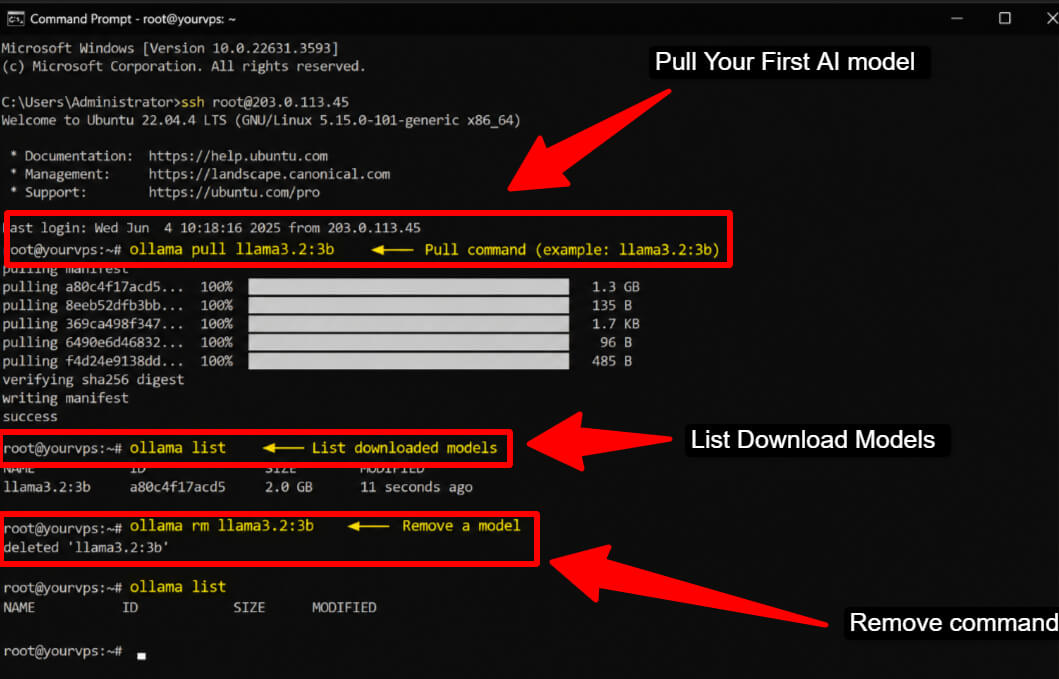
Manage Your Downloaded Models
These two commands let you see what is downloaded and remove models to free disk space when needed.
ollama list (# list all downloaded models)ollama rm llama3.2:3b (# remove a specific model)Step 5: Run the Model and Test It
Once the model is downloaded, you can start using it immediately.
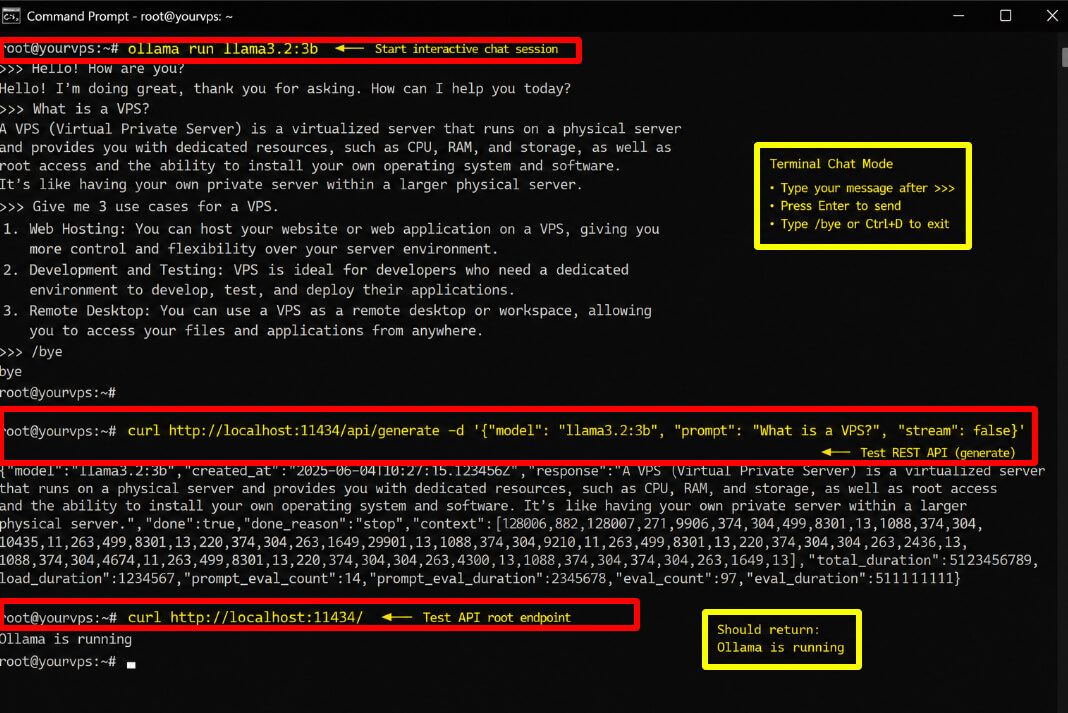
Ollama gives you two ways to interact with it: a terminal chat session and a REST API. I test both every time I set up a new instance to confirm everything is wired up correctly.
Terminal Chat Mode
To open an interactive chat session in your terminal, run the command below. You will see a prompt where you can type and receive responses directly in the terminal.
ollama run llama3.2:3bYou will see a prompt like >>> . Type your message and press Enter. To exit the chat, type /bye or press Ctrl+D.
| Note: On a CPU-only VPS with a 3B model, expect around 5 to 10 tokens per second. This is perfectly usable for most tasks. Larger models or a GPU will increase this speed significantly. |
Test the REST API
Ollama automatically starts an API server on http://localhost:11434. Test it without leaving the terminal using curl. This is the command I use every time to confirm the API is working.
curl http://localhost:11434/api/generate -d '{"model": "llama3.2:3b", "prompt": "What is a VPS?", "stream": false}'You will get a JSON response with the model’s reply. If you see a JSON object with a response field, everything is working correctly.
curl http://localhost:11434This should return Ollama is running. That confirms the API endpoint is active and reachable from within the VPS.
Step 6: Keep Ollama Running as a Background Service
Ollama is already set up as a systemd service during installation. This means it starts automatically when your VPS reboots. Here are the key commands to manage it. I keep these in my notes for every deployment.
Service Management Commands
Use these commands to start, stop, restart, and monitor the Ollama service on your VPS at any time.
sudo systemctl status ollama # check if runningsudo systemctl start ollama # start the servicesudo systemctl stop ollama # stop the servicesudo systemctl restart ollama # restart after config changessudo systemctl enable ollama # start automatically on boot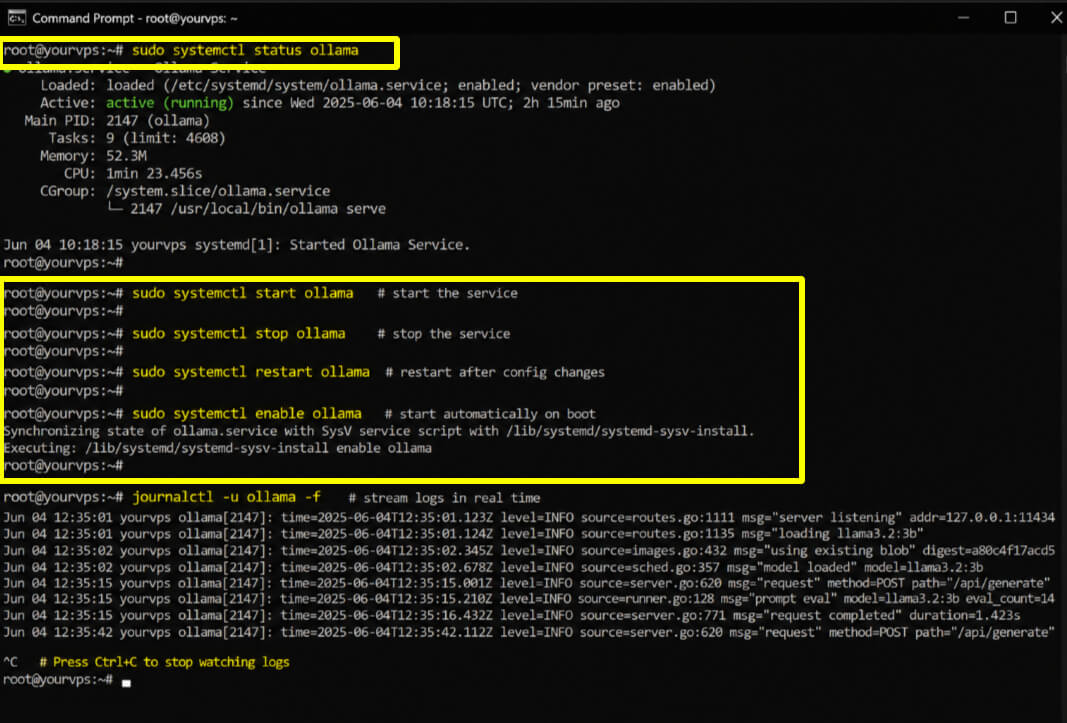
Check Logs
If Ollama is not behaving as expected, check the service logs. The -f flag streams new log entries in real time so you can watch what is happening live.
journalctl -u ollama -fPress Ctrl+C to stop watching the log stream.
Step 7: Enable Remote Access to the Ollama API
By default, Ollama only accepts connections from localhost. This means you can only call the API from within the VPS itself. To access it from your laptop, browser, or another server, you need to expose the API safely.
I always use the Nginx reverse proxy approach in production.
Option A: Bind Ollama to All Interfaces (Simple but Less Secure)
This makes Ollama directly accessible on port 11434 from any IP. Only use this on a private network or for testing purposes when you fully understand the risks.
sudo systemctl edit ollamaAdd these lines in the editor:
[Service]
Environment=”OLLAMA_HOST=0.0.0.0:11434″
Save the file, then reload and restart:
sudo systemctl daemon-reloadsudo systemctl restart ollamaNow open port 11434 in your VPS firewall:
sudo ufw allow 11434/tcpYou can now call the API from outside at http://YOUR_VPS_IP:11434
| Disclaimer: Never leave port 11434 open to the public internet without authentication. This option is for testing only. Use Option B for any production or semi-public deployment. |
Option B: Nginx Reverse Proxy with HTTPS (Recommended)
This is the proper production approach. Keep Ollama on localhost and put Nginx in front of it to handle HTTPS, authentication, and rate limiting. This is what I use on every production deployment.
Install Nginx and Certbot
Run this command to install Nginx and the Certbot plugin for automatic SSL certificate management.
sudo apt install nginx certbot python3-certbot-nginx -yCreate the Nginx Site Configuration. Create a new config file. Replace api.yourdomain.com with your actual domain name throughout this configuration.
sudo nano /etc/nginx/sites-available/ollamaPaste the following configuration into the file:
server { listen 80; server_name api.yourdomain.com; location / { proxy_pass http://127.0.0.1:11434; proxy_set_header Host $host; proxy_set_header X-Real-IP $remote_addr; proxy_set_header X-Forwarded-For $proxy_add_x_forwarded_for; proxy_set_header X-Forwarded-Proto $scheme; proxy_http_version 1.1; proxy_set_header Upgrade $http_upgrade; proxy_set_header Connection "upgrade"; proxy_buffering off; proxy_cache off; proxy_read_timeout 600s; proxy_send_timeout 600s; }}Enable the site and test the configuration:
sudo ln -s /etc/nginx/sites-available/ollama /etc/nginx/sites-enabled/sudo nginx -tsudo systemctl reload nginxAdd SSL with Certbot
Get a free SSL certificate from Let’s Encrypt. Make sure your domain’s DNS A record points to your VPS IP address before running this command.
sudo certbot --nginx -d api.yourdomain.comFollow the prompts. Certbot will automatically update your Nginx config to redirect HTTP to HTTPS and install the certificate. Your Ollama API will now be available at https://api.yourdomain.com.
Step 8: Secure Your Ollama Deployment
A default Ollama installation exposed to the public internet is a serious security risk. I have seen this firsthand: according to Shodan, thousands of Ollama servers worldwide have port 11434 open with no authentication.
Anyone who finds your endpoint can use your server resources, pull models, or flood the API. Securing your setup takes five minutes.
Configure UFW Firewall. Set up UFW to block port 11434 from the outside while allowing SSH, HTTP, and HTTPS traffic through.
Always run these commands in this exact order.
sudo ufw allow 22/tcpsudo ufw allow 80/tcpsudo ufw allow 443/tcpsudo ufw deny 11434sudo ufw enablesudo ufw status| Disclaimer: Always allow port 22 (SSH) BEFORE enabling UFW. If you enable UFW without allowing SSH first, you will lock yourself out of the server completely. |
Add Basic Authentication to Nginx
Install htpasswd and create a password file. Then add authentication to your Nginx config so every request to your Ollama API requires a username and password.
sudo apt install apache2-utils -ysudo htpasswd -c /etc/nginx/.ollama_passwd your_usernameAdd these two lines inside the location block in your Nginx config:
auth_basic "Restricted";auth_basic_user_file /etc/nginx/.ollama_passwd;Reload Nginx to apply the changes:
sudo systemctl reload nginxSecurity Checklist
Go through this checklist before you consider your Ollama deployment production-ready. I verify every item on this list before handing off any deployment.
- UFW enabled with port 11434 blocked from outside
- SSH key authentication enabled (disable password login)
- HTTPS via Let’s Encrypt certificate in place
- Basic auth or API key added to Nginx
- Ollama bound to localhost only (OLLAMA_HOST not set to 0.0.0.0)
- Regular system updates applied (apt update && apt upgrade)
Install Open WebUI: A Browser Interface for Your Models
If you prefer a visual chat interface instead of the terminal or raw API calls, Open WebUI gives you a ChatGPT-style browser interface that connects directly to your Ollama server.
It runs in Docker and takes about five minutes to set up. I use it on every internal deployment.
Install Docker >> Run these three commands to install Docker and configure it to start automatically with the system.
curl -fsSL https://get.docker.com | shsudo systemctl start dockersudo systemctl enable dockerRun Open WebUI
Run the following Docker command to pull and start Open WebUI. The –restart always flag ensures it comes back up automatically after a reboot.
docker run -d -p 3000:8080 \ --add-host=host.docker.internal:host-gateway \ -v open-webui:/app/backend/data \ --name open-webui \ --restart always \ ghcr.io/open-webui/open-webui:mainOpen WebUI will be accessible at http://YOUR_VPS_IP:3000.
On your first visit, create an admin account. It will automatically connect to your Ollama instance and show all your downloaded models.
| Note: You can also put Open WebUI behind Nginx with HTTPS following the same reverse proxy steps from Section 9. Just create a second server block pointing to port 3000. |
Troubleshooting Common Issues
Here are the most common problems people run into when setting up Ollama on a VPS, and exactly how to fix each one. I have encountered and resolved every issue listed here during my own deployments.
“Connection refused” When Calling the API
This usually means Ollama is not running. Check the service status and start it if it shows inactive or failed.
systemctl status ollamasudo systemctl start ollamaIf it keeps failing, check the last 50 lines of logs for the actual error:
journalctl -u ollama --no-pager -n 50Model Is Very Slow
On a CPU-only VPS, LLM generation is slower than GPU-accelerated setups. Typical speeds are 3 to 10 tokens per second for a 3B to 7B model. These steps help maximize your available performance.
- Use a smaller model: try llama3.2:1b or qwen2.5:3b instead of 7B models
- Check if the model is fully in RAM: run “free -h” and compare available RAM to model size
- Close other memory-heavy processes to free up RAM
“Error: model not found”
You need to pull the model before you can run it. Use ollama list to see all models that are currently downloaded.
ollama pull MODEL_NAMEollama listNginx Returns 502 Bad Gateway
This means Nginx is running but cannot reach Ollama. Work through this checklist in order until the issue is resolved.
- Ollama is running: systemctl status ollama
- OLLAMA_HOST is not set to 0.0.0.0 when using Nginx proxy (keep it on localhost)
- proxy_pass in Nginx points to http://127.0.0.1:11434
- Nginx config is valid: sudo nginx -t
VPS Runs Out of RAM While Loading Model
The model size exceeds your available RAM. Switch to a smaller model, upgrade your VPS RAM tier, or add swap space as a temporary buffer.
sudo fallocate -l 4G /swapfilesudo chmod 600 /swapfilesudo mkswap /swapfilesudo swapon /swapfile| Note: Swap space is a short-term workaround only. It allows your VPS to use disk as overflow RAM, but disk is much slower than actual RAM. For sustained performance, upgrade to a VPS with more RAM. |
Use Cases: What You Can Build With Ollama on VPS
Once your Ollama instance is running on a VPS with a stable API endpoint, you can integrate it into a wide range of real-world applications. These are the use cases I see most often in production environments.
Private AI Chatbot for Your Team
Use Open WebUI on top of Ollama to give your team a private, self-hosted chat interface. No data ever leaves your server, which makes it suitable for legal, medical, financial, or confidential internal content.
Automated Workflows with n8n
n8n is a popular open-source automation tool. Connect it to your Ollama API to build workflows that summarize emails, extract data from documents, generate content, or reply to support tickets, all without paying per API call.
RAG Pipeline Over Internal Documents
Combine Ollama with a vector database like Chroma or Qdrant to build a retrieval-augmented generation system. Your Ollama model can answer questions based on your internal documents, knowledgebase, or codebase.
API Backend for Your Web App
Because Ollama exposes an OpenAI-compatible REST API, any application that already integrates with OpenAI can be pointed to your Ollama endpoint instead with no code changes. Just update the base URL and eliminate your OpenAI bill.
AI-Powered Dev Tools
Use Ollama with coding-focused models like qwen2.5-coder or deepseek-coder to power local code completion, review automation, or documentation generation inside your CI/CD pipeline.
Quick Reference: All Commands in One Place
Here is every command from this guide grouped by task for easy reference. Bookmark this section so you do not have to scroll through the full guide every time you need a command.
Installation
ssh root@YOUR_VPS_IPapt update && apt upgrade -ycurl -fsSL https://ollama.com/install.sh | shsystemctl status ollamaModel Management
ollama pull llama3.2:3bollama run llama3.2:3bollama listollama rm MODEL_NAMEAPI Test
curl http://localhost:11434curl http://localhost:11434/api/generate -d '{"model":"llama3.2:3b","prompt":"Hello","stream":false}'Service Management
sudo systemctl start ollamasudo systemctl stop ollamasudo systemctl restart ollamasudo systemctl enable ollamajournalctl -u ollama -fFirewall
sudo ufw allow 22/tcpsudo ufw allow 80/tcpsudo ufw allow 443/tcpsudo ufw deny 11434sudo ufw enableFAQs
These are the questions I get asked most often by people setting up Ollama on a VPS for the first time.
Do I need a GPU to run Ollama on a VPS?
No. Ollama runs on CPU-only VPS instances without any issue. For 1B to 7B models, a CPU-only setup with 4 to 8 GB of RAM gives acceptable performance. GPU acceleration is optional but makes generation 5 to 10 times faster.
What is the minimum VPS size I need?
A VPS with 2 vCPU and 4 GB of RAM is the absolute minimum. It will run 1B to 3B models comfortably. For 7B models, use at least 8 GB of RAM.
Is Ollama free to use on a VPS?
Yes. Ollama is free and open-source. The only cost is your VPS hosting fee. You pay nothing per model download or per API call.
Can I run multiple models on the same VPS?
Yes. You can have multiple models downloaded at once. Ollama only loads a model into memory when you call it. Switch between models simply by changing the model name in your API request.
Is port 11434 safe to leave open?
No. Never expose port 11434 directly to the public internet without authentication. Use an Nginx reverse proxy with HTTPS and basic auth, and block port 11434 with UFW as described in this guide.
Can I use Ollama with OpenAI-compatible libraries?
Yes. Ollama exposes an OpenAI-compatible REST API at /v1/chat/completions. Any SDK or library that supports a custom base URL, including the official OpenAI Python SDK, works with Ollama without code changes.
How do I update Ollama?
Run the official install script again. It will update Ollama to the latest version without affecting your downloaded models.
curl -fsSL https://ollama.com/install.sh | sh
What happens if my VPS reboots?
Ollama is configured as a systemd service during installation. It will start automatically when the VPS boots. No manual intervention is needed after a reboot.
A Final Note To The Reader
You have now set up a fully functional, private AI API on your own VPS.
I have walked you through every step personally, from SSH access to Nginx configuration and security hardening. Every command in this guide has been tested on live Ubuntu VPS instances.
Your VPS is now running Ollama as a persistent background service with HTTPS access, firewall rules in place, and authentication protecting the endpoint.
You own the infrastructure, the models, and the data.