
To upgrade a VPS without downtime, prepare a parallel environment, sync data continuously, lower DNS TTL, and shift traffic via a floating IP, load balancer, or reverse proxy.
If your host supports live migration or hot add scaling, use it. Always snapshot, test the new setup, perform a controlled cutover, monitor, and keep a rollback ready.
Upgrades usually mean brief interruptions but not if you plan well. In this guide, I’ll show you how to upgrade VPS without downtime using safe, repeatable methods (blue green cutovers, live migration, or hot‑add scaling).
I’ll also share real world steps, commands, and checklists I use when moving production workloads.
What “no downtime” really means?
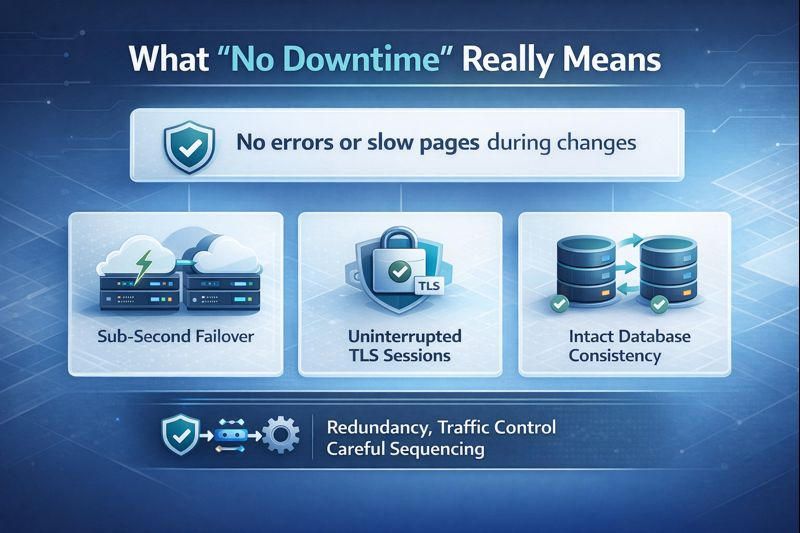
No downtime means your users never see errors or slow pages during the change. In practice, it targets near‑zero impact: sub‑second failover, uninterrupted TLS sessions, and intact database consistency. You’ll optimize for RTO (time to recover) and RPO (data loss). Achieving this requires redundancy, traffic control, and careful sequencing.
Pre‑upgrade checklist (don’t skip)
- Define scope: CPU/RAM increase, disk expansion, OS upgrade, or host migration.
- Check provider capabilities: snapshots, live migration, hot-add CPU/RAM, load balancer, floating IPs, private networking.
- Audit stack: web server, app runtime (PHP/Node/Java), DB engine and version, caches, queues, cron jobs, firewall rules.
- Backups: enable automated backups and take a point-in-time snapshot. Test a restore.
- Capacity plan: measure peak CPU, memory, disk I/O, network throughput; size the new plan accordingly.
- Lower DNS TTL to 60–300 seconds at least a few hours before cutover.
- Inventory secrets and config: environment variables, .env files, SSL/TLS certs, SSH keys.
- Observability: set up logs, metrics, alerts, and uptime monitoring on both old and new nodes.
- Security parity: replicate firewall rules, security groups, fail2ban, and OS hardening on the target.
- Rollback plan: document how to revert instantly (reassign IP, flip traffic, or restore snapshot).
Choose your path to zero downtime
Path A: In‑place scaling (hot‑add or quick reboot)
- When to use: same server, just more CPU/RAM/disk; provider supports live resize or a brief reboot is acceptable.
- Pros: simplest, no data move, fastest.
- Cons: may require a reboot; disk resizing often needs filesystem operations; risk if something breaks in place.
Path B: Blue‑green upgrade (new VPS and seamless cutover)
- When to use: strict no-downtime, OS upgrades, new regions, or big plan jumps.
- Pros: safest, full testing before switch, instant rollback.
- Cons: temporary double cost; more steps (sync, replica, cutover).
Path C: Managed live migration
- When to use: your provider supports live migration at the hypervisor level (KVM) or has a managed zero‑downtime migration service.
- Pros: minimal interruption, provider handles heavy lifting.
- Cons: availability varies; may not cover all workloads; schedule with support.
Zero downtime blue‑green VPS upgrade – (Step‑by‑step)
This is the most reliable approach to upgrade a VPS without downtime. You create a new, bigger VPS (green), sync traffic and data from the old VPS (blue), test thoroughly, then switch traffic in seconds.
- Lower DNS TTL to 60–300s for your apex/root and subdomains. Do this a few hours before cutover.
- Provision the new VPS: pick the larger plan (more vCPUs, RAM, NVMe SSD). Use the same OS and major app versions for compatibility.
- Harden and mirror base config: users, SSH keys, firewall rules, swap, locales, time sync (chrony), packages, and kernel.
- Install your stack: Nginx/Apache, PHP-FPM or Node.js/PM2, Java, Redis, message queues, and language runtimes matching the blue node.
- Copy application code and assets using rsync. Repeat later to catch deltas.
- Seed the database to the new node: use native replication (MySQL/PostgreSQL) for continuous sync, or a managed replica.
- Configure a load balancer or reverse proxy. Options: provider load balancer, Nginx/HAProxy, or a floating IP you can swing instantly.
- Point the load balancer to the blue node first; add the green node in “drain” mode for testing (not receiving user traffic yet).
- Run integration tests on the green node: health endpoints, login flows, checkout, file uploads, cron jobs, and background workers.
- Freeze writes briefly or use replication to avoid divergence. For write-heavy apps, keep replication running until cutover.
- Perform final rsync for web assets and any persistent storage (images, user uploads, media).
- Switch traffic: remove the blue node from the backend pool and send 100% to green, or move the floating IP to green. If only DNS is available, update A/AAAA records (low TTL makes it near‑instant).
- Monitor closely for 30–60 minutes: error rates, latency, 5xx logs, DB replication state, and system metrics.
- Keep the old node on standby until you’re confident. If issues appear, roll back by flipping traffic back to blue.
- Decommission the old node only after backups and a final verification.
Useful commands for the cutover
# Check DNS TTL and current IP
dig +nocmd example.com A +noall +answer
dig +nocmd www.example.com A +noall +answer

# One-time rsync (repeat just before cutover)
rsync -azP --delete -e "ssh -i ~/.ssh/id_rsa" /var/www/ user@NEW_VPS:/var/www/

# MySQL initial dump (if not using replica)
mysqldump --single-transaction --routines --triggers --events -u root -p dbname | \
  ssh user@NEW_VPS "mysql -u root -p dbname"

# Simple Nginx reverse proxy (temporary)
# /etc/nginx/conf.d/upgrade-proxy.conf
upstream app_backend {
  server OLD_VPS_IP max_fails=3 fail_timeout=10s;
  server NEW_VPS_IP backup;  # add/remove when ready
}
server {
  listen 80;
  server_name example.com;
  location / {
    proxy_pass http://app_backend;
    proxy_set_header Host $host;
    proxy_set_header X-Forwarded-For $proxy_add_x_forwarded_for;
  }
}
Tip: If your provider offers a floating IP or anycast load balancer, use it to switch traffic instantly without waiting for DNS propagation.
Setting up live DB sync (MySQL example)
For true zero downtime, avoid a write freeze by streaming changes to the new node before the cutover. Here’s a minimal MySQL approach.
# On source (blue), get a consistent dump and binlog position
mysqldump --single-transaction --master-data=2 -u root -p dbname > dump.sql

# Transfer and import on target (green)
scp dump.sql user@GREEN:/tmp/
ssh user@GREEN "mysql -u root -p dbname < /tmp/dump.sql"

# On target, configure replication
# Replace SOURCE_HOST, LOG_FILE, LOG_POS with values from dump.sql's MASTER DATA
mysql -u root -p -e "
CHANGE REPLICATION SOURCE TO
  SOURCE_HOST='SOURCE_HOST',
  SOURCE_USER='repl',
  SOURCE_PASSWORD='strongpass',
  SOURCE_LOG_FILE='mysql-bin.000123',
  SOURCE_LOG_POS=456789;
START REPLICA;
SHOW REPLICA STATUS\G"
At cutover, stop writes on blue, let replica catch up (Seconds_Behind_Source = 0), point traffic to green, then promote green to primary.
Safest in‑place VPS upgrade (with near‑zero impact)
- 1. Snapshot the VM and ensure recent off‑site backups.
- 2. Drain traffic using a load balancer, or enable a temporary proxy to shift users away.
- 3. Perform the plan upgrade in your control panel (CPU/RAM/disk). For KVM, CPU/RAM hot add may apply; disk expansion usually requires OS steps.
- 4. Expand the partition and filesystem (ext4/xfs) online if supported; otherwise schedule a brief maintenance window.
- 5. Re-enable traffic and monitor. If anything breaks, restore snapshot or roll back the plan.
# Identify the new disk/partition and resize (examples)
lsblk

# For ext4 on LVM
lvextend -r -l +100%FREE /dev/vg0/root
# or if partitioned and already extended:
resize2fs /dev/vg0/root

# For XFS
xfs_growfs /
Note: Kernel upgrades and some hypervisor changes can require a reboot. Use connection draining to keep user impact near zero.
Testing and verification checklist
- Application health: curl /health, load homepage, login, checkout, uploads.
- Performance: compare P95 latency, CPU steal time, I/O wait, and network throughput.
- Logs: watch Nginx/Apache, app logs, and kernel messages (dmesg) for errors.
- DB state: verify replication stopped/removed correctly; read/write on the new primary only.
- Background jobs: confirm cron, queues, and workers run once (avoid double processing).
- SSL/TLS: confirm certificates and HSTS are intact; test HTTP/2/3.
- Monitoring: ensure alerts, dashboards, and uptime checks point to the new node.
Rollback plan you can execute in seconds
Blue‑green rollback
- Flip the load balancer or floating IP back to blue.
- If using DNS, restore the previous A/AAAA records (low TTL speeds recovery).
- Investigate on green while production remains stable on blue.
In‑place rollback
- Revert to snapshot in the control panel.
- Restore off‑site backups if snapshot isn’t viable.
- Document the failure point to prevent recurrence.
Tips to avoid hidden downtime
- Shorten connection lifetimes: lower keepalive and cache TTLs before cutover.
- Use health checks with fail-fast behavior on load balancers.
- Graceful reloads: systemctl reload nginx; zero-downtime Node.js with PM2 cluster mode.
- Session strategy: use sticky sessions or centralized session stores (Redis) to avoid logouts during cutover.
- File consistency: store user uploads on shared storage or sync frequently; avoid writes during final rsync.
- Staging rehearsal: dry run the exact steps on a staging domain to validate commands and timing.
How YouStable can help (soft recommendation)
If you want a guided path, YouStable’s cloud VPS plans are designed for smooth scaling. You get snapshot backups, high‑performance NVMe storage, and options like load balancers and floating IPs that make blue‑green cutovers fast. Our migration team can assist with replicas, DNS, and testing so your upgrade feels invisible to users.
Common pitfalls during a VPS upgrade
- Forgetting to lower DNS TTL, causing a long propagation delay.
- Expanding disk but not the filesystem, leaving space unused.
- Double-running cron jobs on both servers after cutover.
- Mismatched PHP extensions or Node versions breaking builds.
- Ignoring DB replication lag and promoting a stale replica.
- No clear rollback; minutes matter when something misbehaves.
FAQ’s
Can I upgrade CPU and RAM on a VPS without rebooting?
Sometimes. On KVM-based VPS, many providers support hot-add CPU and RAM, but not always. Disk changes usually require filesystem actions and may need a reboot. To guarantee zero downtime, use a blue‑green approach with a quick cutover instead of in‑place resizing.
What’s the fastest way to switch traffic during an upgrade?
A floating IP or provider load balancer is fastest—traffic moves instantly. If those aren’t available, reduce DNS TTL to 60–300 seconds before the upgrade and swap A/AAAA records at cutover time. A reverse proxy (Nginx/HAProxy) can also route traffic to the new node immediately.
How do I keep my database synced with zero downtime?
Use native replication: MySQL asynchronous or semi-sync, or PostgreSQL streaming replication. Seed the new node, start replication, then at cutover stop writes briefly, allow it to catch up, promote the replica, and flip traffic. Managed databases with read replicas make this even easier.
Do I need a load balancer for a zero‑downtime VPS upgrade?
It’s not mandatory but highly recommended. A load balancer or floating IP enables instant failover and controlled shifts (blue‑green or canary). Without it, you rely on DNS only, which works with short TTLs but offers less control during the transition.
What’s the safest upgrade path for WordPress sites?
Use a new VPS (green), sync files and the database, enable object caching (Redis), and test on a staging domain. Lower TTL, switch traffic via a load balancer or floating IP, then purge caches/CDN. For high-traffic stores, set up database replication to avoid write freezes during cutover.


