Setting up a Node.js application for production is very different from running a simple local project on your computer. Once real users, API requests, and live traffic start reaching your application, server stability, security, uptime, and performance become much more important.
A poorly configured Node.js server can quickly face crashes, slow response times, memory issues, downtime, and security risks under regular traffic loads. That is why developers commonly use Linux VPS hosting with PM2, Nginx, SSL certificates, and firewall protection for production deployments.
This guide explains how to configure a secure and optimized Node.js production server on a Linux VPS step by step. You will learn server setup, Node.js installation, reverse proxy configuration, HTTPS security, PM2 management, firewall protection, and production optimization practices properly.
What Is a Node.js Production Server Setup?
A Node.js production server setup refers to configuring a Linux based environment where Node.js applications can run securely and efficiently for real users on the internet.
Unlike local development environments, production servers focus heavily on performance optimization, security, scalability, process management, and uptime reliability.
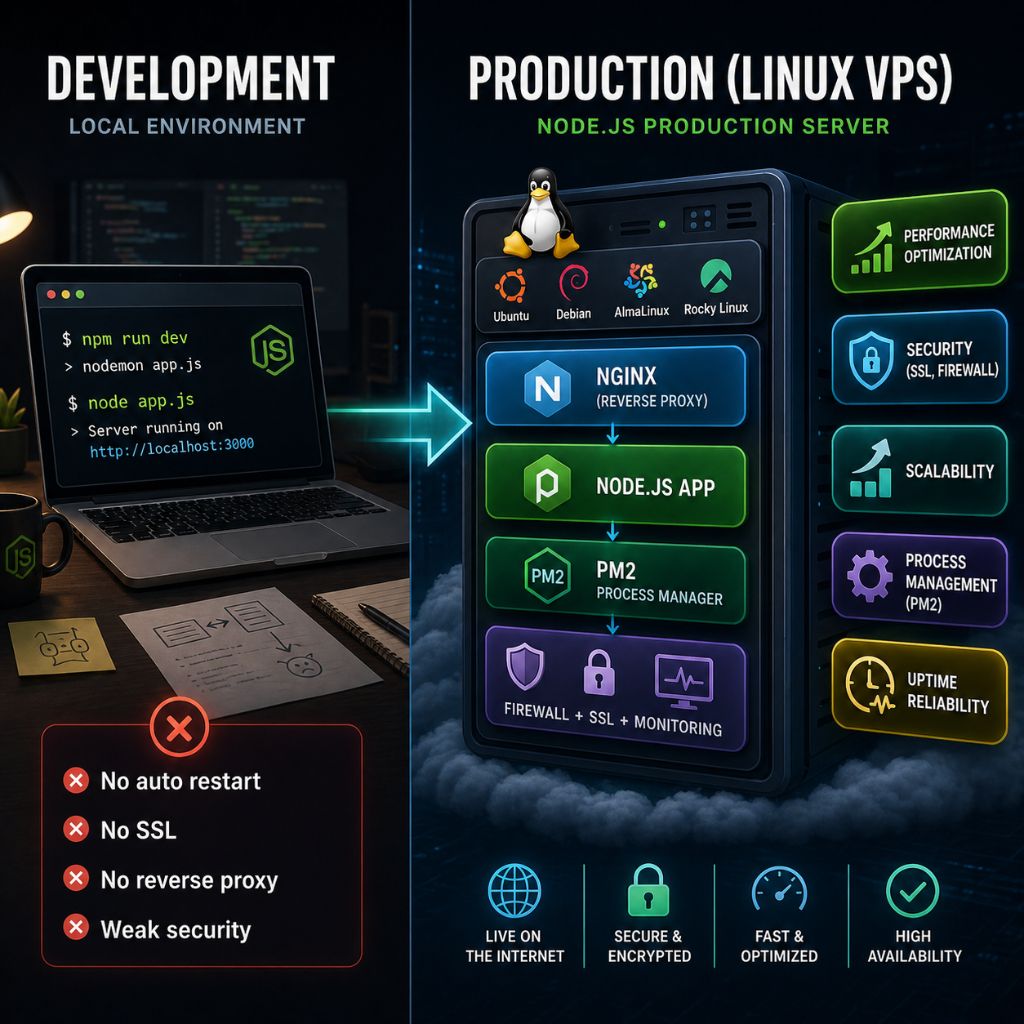
Difference Between Development and Production Environment
In development mode, developers mainly focus on writing and testing code. Applications are often started locally using commands like:
npm run devor:
node app.jsThis setup works for development, but it is not suitable for production because:
- Applications can crash without automatic restart
- No reverse proxy exists
- SSL encryption is missing
- Logs are unmanaged
- Traffic handling is limited
- Security protections are weak
Production environments solve these problems by adding:
- PM2 process management
- Nginx reverse proxy
- HTTPS SSL certificates
- Firewall rules
- Monitoring systems
- Automatic startup services
A production server is designed to stay online continuously while handling real traffic safely and efficiently.
Why Production Optimization Matters for Node.js Applications
Node.js is lightweight and event driven, which makes it excellent for APIs and scalable web applications. However, poor server configuration can still create serious issues such as:
- High CPU usage
- Memory leaks
- Application crashes
- Downtime
- Slow response times
- Security vulnerabilities
Production optimization helps improve:
| Optimization Area | Benefit |
| Reverse Proxy | Better request handling |
| PM2 Process Manager | Automatic restart protection |
| SSL Security | Secure encrypted traffic |
| Firewall Configuration | Reduced attack surface |
| Performance Tuning | Faster application speed |
| Monitoring | Easier troubleshooting |
Without proper optimization, even moderate traffic can destabilize a Node.js application.
Benefits of Hosting Node.js on a Linux VPS
Linux VPS hosting is one of the most preferred environments for Node.js applications because it offers better flexibility, dedicated resources, stronger security controls, and full server level customization for production deployments.
Main advantages include:
| Feature | Benefit |
| Full Root Access | Complete server control |
| Dedicated Resources | Better stability and uptime |
| Linux Compatibility | Excellent Node.js support |
| Scalability | Easy resource upgrades |
| Security Controls | Firewall and SSH management |
| Performance | Faster response handling |
If you are planning to deploy a Node.js application on a VPS, Linux VPS plans for Node.js hosting can provide root access, SSD storage, scalable resources, and Linux compatibility suitable for production environments.
Popular Linux distributions for Node.js production hosting include:
- Ubuntu Server
- Debian
- AlmaLinux
- Rocky Linux
Ubuntu 24.04 LTS is currently one of the most commonly used operating systems for Node.js VPS hosting because of its long term stability, package compatibility, and strong community support.
Requirements Before Starting
Before deploying a Node.js application on a Linux VPS, you should prepare the required server resources, access credentials, networking setup, and essential tools for a stable production environment.
1. Linux VPS With Root Access
A Linux VPS with root SSH access, dedicated resources, stable internet connectivity, and a public IP address is necessary for proper Node.js production deployment.
If you are looking for a reliable VPS environment for Node.js hosting, you can choose YouStable Linux VPS Hosting because it provides root access, scalable resources, SSD storage, and Linux compatibility suitable for production applications.
You need:
- Linux VPS server
- Root SSH access
- Public IP address
- Stable internet connection
- Dedicated server resources
| Application Size | Recommended RAM | Recommended CPU |
| Small Node.js App | 1 GB | 1 Core |
| Medium Web Application | 2 GB | 2 Cores |
| Large Production Application | 4 GB+ | 4+ Cores |
2. Supported Linux Distribution
Ubuntu, Debian, AlmaLinux, and Rocky Linux are commonly recommended Linux distributions because they provide excellent stability, package support, and compatibility for Node.js hosting.
| Distribution | Best For | Stability Level |
| Ubuntu LTS | Beginners and general hosting | Very High |
| Debian | Stable production environments | Very High |
| AlmaLinux | Enterprise workloads | High |
| Rocky Linux | Modern CentOS replacement | High |
3. Domain Name and DNS Access
A registered domain name with DNS management access helps connect your Node.js application professionally using custom domains instead of direct server IP addresses.
You can register and manage domains through YouStable Domain Registration for easier DNS management and VPS integration during deployment.
You need:
- Registered domain name
- DNS management access
- Ability to create A records
- Subdomain management access
| Record Type | Host | Value |
| A | @ | VPS_IP_ADDRESS |
| A | www | VPS_IP_ADDRESS |
4. SSH Client for Server Access
SSH clients like PuTTY, Windows Terminal, or Linux Terminal allow secure remote access for managing server files, services, configurations, and application deployments.
| Operating System | Recommended SSH Tool |
| Windows | PuTTY or Windows Terminal |
| macOS | Terminal |
| Linux | Terminal |
Example SSH connection command:
ssh root@your_server_ip5. Basic Node.js and Linux Knowledge
Basic understanding of Linux commands, Node.js applications, NPM packages, file permissions, and server management helps simplify the production deployment process significantly.
Helpful knowledge areas:
- Linux commands
- File permissions
- Node.js applications
- NPM package management
- Server directories
- Basic networking
| Command | Purpose |
| ls | List files |
| cd | Change directory |
| mkdir | Create folder |
| nano | Edit files |
| systemctl | Manage services |
Step-by-Step Node.js Production Server Setup on Linux VPS
This step-by-step setup process helps configure a secure, optimized, and production ready Node.js environment on a Linux VPS using modern deployment and server management practices.
Step 1: Connect to Linux VPS Using SSH
SSH provides secure remote access for managing Linux servers, installing packages, configuring services, deploying applications, and monitoring the production environment remotely.
Access VPS From Windows
Open PowerShell or PuTTY and connect to your Linux VPS using the SSH command below.
ssh root@your_server_ipExample:
ssh root@192.168.1.10Access VPS From macOS and Linux
Use the built in Terminal application on macOS or Linux systems to securely connect with your VPS server remotely.
ssh root@your_server_ipVerify Server Access
Check server information, memory usage, and available storage to confirm the Linux VPS is functioning correctly after successful SSH login.
uname -a
free -m
df -h
Step 2: Update Linux Server Packages
Updating Linux packages improves security, compatibility, performance, and overall server stability before installing Node.js and production related dependencies.
Update Package Repository
Refresh the package repository to download the latest package information available for your Linux distribution.
apt updateUpgrade Existing Packages
Upgrade outdated server packages and security patches to maintain a secure and stable production environment.
apt upgrade -yInstall Essential Server Utilities
Install commonly required utilities used for deployment, monitoring, downloading files, and managing Linux servers efficiently.
apt install curl wget git unzip ufw nano -yUseful tools installed:
| Tool | Purpose |
| curl | Download files and repositories |
| git | Clone project repositories |
| ufw | Configure firewall rules |
| nano | Edit server configuration files |
Step 3: Install Node.js on Linux VPS
Installing the latest stable Node.js LTS version improves compatibility, security updates, and long term production application stability.
Check Latest Stable Node.js Version
Node.js provides Current and LTS releases, but LTS versions are usually recommended for production hosting environments.
| Release Type | Recommended Usage |
| Current | Testing latest features |
| LTS | Production applications |
Install Node.js Using Official Repository
Add the official NodeSource repository and install Node.js using your Linux package manager.
curl -fsSL https://deb.nodesource.com/setup_lts.x | bash -
apt install nodejs -y
Verify Node.js and NPM Installation
Verify that Node.js and NPM were installed successfully on your Linux VPS server.
node -v
npm -v
Example output:
v22.x.x
10.x.x
Step 4: Create a Node.js Application on VPS
Creating a Node.js application directory properly helps organize files, dependencies, configuration settings, and production deployment workflows efficiently.
Create Application Directory
Create a dedicated project directory for storing your Node.js application files and dependencies.
mkdir myapp
cd myapp
Initialize Node.js Project
Initialize the Node.js project and automatically generate the package.json configuration file.
npm init -yInstall Required Dependencies
Install Express.js framework for handling routes, requests, and server functionality within the Node.js application.
npm install expressCreate a Basic Server File
Create the main Node.js server file and configure a simple Express.js application for testing deployment.
nano server.jsExample application:
const express = require('express');
const app = express();
app.get('/', (req, res) => {
 res.send('Node.js Production Server Running');
});
app.listen(3000, () => {
 console.log('Server running on port 3000');
});
Run Node.js Application
Start the Node.js application manually and verify it loads correctly using your server IP address.
node server.jsOpen:
http://your_server_ip:3000Step 5: Install PM2 for Production Process Management
PM2 helps manage Node.js applications efficiently by handling automatic restarts, monitoring, process management, and startup automation on production servers.
What Is PM2?
PM2 is a production process manager that keeps Node.js applications online continuously and automatically restarts crashed server processes.
Main PM2 benefits:
- Automatic restart
- Process monitoring
- Startup automation
- Log management
Install PM2 Globally
Install PM2 globally using NPM so it can manage Node.js applications system wide.
npm install pm2 -gStart Node.js App Using PM2
Run the Node.js application through PM2 to enable production level process management features.
pm2 start server.js --name myappEnable PM2 Auto Startup
Enable automatic application startup whenever the Linux VPS server reboots or restarts unexpectedly.
pm2 startup
pm2 save
Monitor Running Applications
Use PM2 monitoring commands to view active applications, logs, and real-time server resource usage information.
pm2 list
pm2 logs
pm2 monit
Step 6: Configure Nginx Reverse Proxy
Nginx works as a reverse proxy that improves security, HTTPS handling, traffic management, and overall Node.js production server performance.
Install Nginx on Linux VPS
Install Nginx web server and enable automatic startup for production use.
apt install nginx -y
systemctl start nginx
systemctl enable nginx
Create Nginx Configuration File
Create a custom Nginx server block configuration for forwarding requests to the Node.js application.
nano /etc/nginx/sites-available/myappAdd configuration:
server {
  listen 80;
  server_name yourdomain.com;
  location / {
      proxy_pass http://localhost:3000;
      proxy_http_version 1.1;
      proxy_set_header Upgrade $http_upgrade;
      proxy_set_header Connection 'upgrade';
      proxy_set_header Host $host;
  }
}
Connect Nginx With Node.js App
Enable the Nginx configuration file and connect it with the active Node.js application server.
ln -s /etc/nginx/sites-available/myapp /etc/nginx/sites-enabled/Restart and Verify Nginx Configuration
Verify the Nginx syntax configuration and restart the web server safely after applying changes.
nginx -t
systemctl restart nginx
Step 7: Connect Domain to Node.js Application
Connecting a domain name helps users access your Node.js application professionally through a secure and branded web address.
Point Domain DNS to VPS IP
Create an A record inside your DNS management panel pointing the domain to your VPS server IP.
| Type | Host | Value |
| A | @ | VPS_IP_ADDRESS |
Verify DNS Propagation
Check whether the domain DNS changes have successfully propagated across global DNS servers.
ping yourdomain.comTest Domain Connection
Open your domain inside a browser to verify that the Node.js application loads correctly through the domain.
http://yourdomain.comStep 8: Enable HTTPS SSL Certificate
HTTPS encryption protects user data, improves website trust, and helps secure Node.js applications running on production servers.
Install Let’s Encrypt SSL
Install Certbot and generate a free SSL certificate using Let’s Encrypt for your domain.
apt install certbot python3-certbot-nginx -y
certbot --nginx -d yourdomain.com
Configure HTTPS Redirection
Certbot usually configures automatic HTTP to HTTPS redirection during SSL certificate installation and setup.
Enable Automatic SSL Renewal
Test automatic SSL renewal to ensure certificates continue renewing before expiration automatically.
certbot renew --dry-runConfigure Firewall and Secure the VPS
Firewall rules and SSH hardening help protect Linux VPS servers from unauthorized access attempts and common network attacks.
Enable UFW Firewall
Enable the Uncomplicated Firewall service to manage Linux VPS network access rules securely.
ufw enableAllow Required Server Ports
Allow required network ports for SSH access, HTTP traffic, and HTTPS encrypted communication.
ufw allow OpenSSH
ufw allow 80
ufw allow 443
Secure SSH Access
Modify SSH server settings to improve VPS security and reduce brute force login attacks significantly.
nano /etc/ssh/sshd_configRecommended settings:
PermitRootLogin no
PasswordAuthentication no
Restart SSH:
systemctl restart sshDisable Unnecessary Services
List running Linux services and disable unused applications to reduce security vulnerabilities and unnecessary resource consumption.
systemctl list-units --type=serviceRun Node.js App in Production Mode
Production mode improves Node.js performance, reduces unnecessary debugging features, and optimizes the application for live traffic handling.
Set NODE_ENV to Production
Start the Node.js application in production mode using the NODE_ENV environment variable.
NODE_ENV=production pm2 start server.jsOptimize Application Performance
Performance optimization techniques help improve server response times, resource efficiency, and overall production application stability.
Useful optimizations:
- Compression middleware
- Database optimization
- Application caching
- Reduced logging
- Cluster mode
Restart Application Safely
Restart or reload Node.js applications safely without interrupting production traffic or causing unnecessary downtime.
pm2 restart myapp
pm2 reload myapp
Step 11: Test the Production Server Setup
Testing the production environment helps verify application stability, HTTPS security, server accessibility, and overall deployment functionality properly.
Verify Website Accessibility
Confirm the Node.js application loads correctly using both the domain name and HTTPS secure connection.
Checklist:
- Domain working
- HTTPS enabled
- SSL lock icon visible
Check PM2 Logs
Review PM2 application logs to identify runtime issues, crashes, and deployment-related errors quickly.
pm2 logsTest HTTPS and Reverse Proxy
Verify that Nginx forwards traffic correctly and HTTPS encryption functions properly for incoming requests.
Checklist:
- Reverse proxy working
- HTTPS active
- HTTP redirects enabled
Confirm Server Stability
Monitor Linux VPS resource usage to identify high CPU, memory, or performance-related server bottlenecks.
htopor:
topCommon Node.js VPS Setup Errors and Fixes
While configuring a Node.js production server on a Linux VPS, some common errors may appear during deployment, server configuration, SSL setup, or application management processes.
Port Already in Use Error
This error usually appears when another process is already using the same Node.js application port on the Linux VPS server.
Find running process:
lsof -i :3000Kill process:
kill -9 PIDCommon causes:
- Multiple Node.js instances
- Old background processes
- Incorrect PM2 restarts
- Application crash loops
Nginx 502 Bad Gateway Error
A 502 Bad Gateway error usually means Nginx cannot communicate properly with the Node.js application running on the backend server.
Common causes:
- Node.js application stopped
- Incorrect proxy port
- Invalid Nginx configuration
- Firewall restrictions
- PM2 process failure
Fix commands:
pm2 restart all
systemctl restart nginx
Helpful troubleshooting areas:
| Check | Purpose |
| PM2 Status | Verify application running |
| Nginx Config | Check proxy settings |
| Port Number | Confirm correct application port |
| Firewall Rules | Ensure required ports are open |
PM2 Application Crash Issues
PM2 application crashes usually happen because of configuration problems, missing dependencies, coding errors, or server resource limitations.
Check logs:
pm2 logsCommon reasons include:
- Missing environment variables
- Syntax errors
- Database connection failures
- Insufficient RAM
- Missing NPM packages
Useful PM2 monitoring commands:
pm2 list
pm2 monit
SSL Certificate Problems
SSL issues may occur because of expired certificates, incorrect domain records, firewall restrictions, or failed Let’s Encrypt validation requests.
Renew SSL certificate:
certbot renewCommon SSL problems:
- Expired certificates
- DNS misconfiguration
- Invalid domain pointing
- HTTPS redirect loops
- Blocked port 80 or 443
SSL verification checklist:
- Domain points correctly to VPS
- Port 80 and 443 are open
- Nginx configuration is valid
- HTTPS redirect works properly
Permission Denied Errors
Permission errors usually happen when Linux file ownership or directory permissions are configured incorrectly for the Node.js application.
Correct file ownership:
chown -R $USER:$USER /var/www/myappCommon permission issues:
- Incorrect file ownership
- Restricted directory access
- Missing execute permissions
- Root only file access
Helpful permission commands:
| Command | Purpose |
| chown | Change ownership |
| chmod | Modify permissions |
| ls -l | Check file permissions |
Proper permission management improves both server security and application stability.
Best Practices for Node.js Production Hosting
Following production hosting best practices helps improve Node.js application security, uptime, server stability, resource management, and long term performance on Linux VPS environments.
Keep Server Packages Updated
Regular Linux package updates help improve server security, software compatibility, bug fixes, and overall production environment stability significantly.
Regular updates improve:
- Security
- Compatibility
- Stability
- Performance
- Bug fixes
Useful update commands:
apt update
apt upgrade -y
Best practice:
- Apply security updates regularly
- Remove outdated packages
- Restart critical services after updates
Monitor CPU and RAM Usage
Monitoring server resources helps detect high CPU usage, memory leaks, traffic spikes, and application performance bottlenecks before serious downtime occurs.
Useful monitoring tools:
- PM2 Monitor
- htop
- Netdata
- top
- glances
Helpful monitoring commands:
htop
pm2 monit| Tool | Purpose |
| PM2 Monitor | Node.js process monitoring |
| htop | Real time resource monitoring |
| Netdata | Advanced server analytics |
| top | Basic Linux process monitoring |
Backup Server and Application Files
Regular backups help protect Node.js applications, databases, and server configurations from accidental deletion, corruption, or hardware failures.
Always maintain:
- Database backups
- Application backups
- Configuration backups
- SSL certificate backups
- Nginx configuration backups
Common backup areas:
| Backup Type | Importance |
| Database Backup | Prevent data loss |
| Application Files | Restore project quickly |
| Nginx Config | Recover reverse proxy setup |
| SSL Certificates | Restore HTTPS quickly |
Recommended backup locations:
- Remote storage
- Cloud storage
- External backup server
Use Strong Authentication Methods
Strong authentication methods help secure Linux VPS servers against unauthorized access attempts, brute force attacks, and credential theft risks.
Recommended security methods:
- SSH keys
- Multi factor authentication
- Disabled password login
- Custom SSH ports
- Fail2Ban protection
Helpful SSH security settings:
PermitRootLogin no
PasswordAuthentication no
Security benefits:
- Reduced brute force attacks
- Better login protection
- Improved server security posture
Monitor Server Logs Regularly
Server logs help identify application crashes, failed login attempts, security warnings, traffic issues, and performance related problems quickly.
Important logs include:
| Service | Log Location |
| Nginx | /var/log/nginx/ |
| PM2 | pm2 logs |
| System Logs | /var/log/syslog |
| Authentication Logs | /var/log/auth.log |
Useful log commands:
pm2 logs
tail -f /var/log/nginx/error.log
Regular log monitoring helps:
- Detect security threats
- Troubleshoot server errors
- Improve application stability
- Monitor unusual activity
- Analyze production issues faster
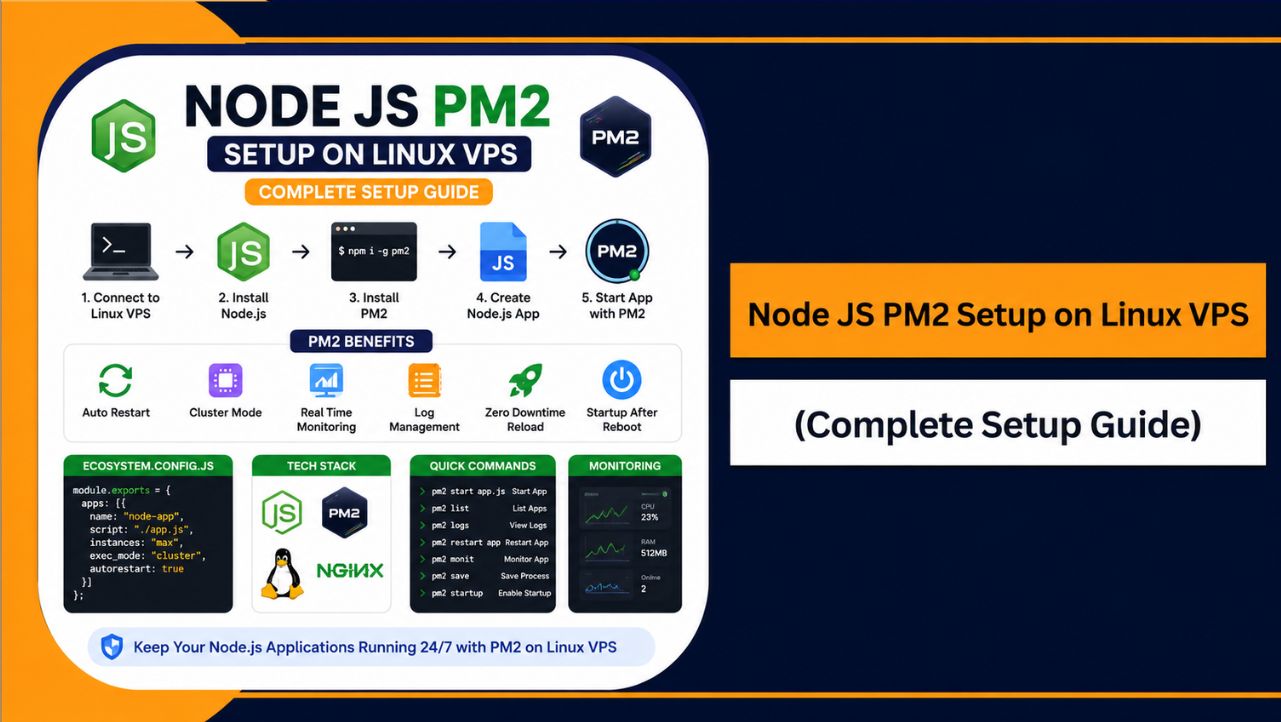
Also Read: Node JS PM2 Setup on Linux VPS
FAQs
Can I Host Node.js Applications on a Linux VPS?
Yes, Linux VPS hosting is one of the best environments for Node.js applications because it provides dedicated resources, scalability, root access, better performance, and complete server level control for production deployments.
Benefits include:
• Dedicated resources
• Full root access
• Better scalability
• Improved security
• Custom server configuration
Why Is PM2 Important for Node.js Production?
PM2 helps keep Node.js applications online continuously by automatically restarting crashed processes, managing logs, monitoring applications, and enabling automatic startup after server reboots.
Main PM2 features:
• Automatic restart
• Process monitoring
• Startup automation
• Log management
• Zero downtime reloads
Useful PM2 command: pm2 start server.js
Which Linux Distribution Is Best for Node.js Hosting?
Ubuntu LTS is commonly recommended for Node.js hosting because it offers long term stability, excellent package compatibility, strong community support, and beginner friendly server management features.
Popular Linux distributions:
• Ubuntu LTS
• Debian
• AlmaLinux
• Rocky Linux
Is Nginx Better for Node.js Reverse Proxy?
Yes, Nginx is widely preferred for Node.js production hosting because it efficiently handles reverse proxying, HTTPS traffic, SSL termination, load balancing, and static file delivery.
Nginx advantages:
• Better traffic handling
• HTTPS support
• Reverse proxy functionality
• Static file optimization
• Load balancing support
How Much RAM Is Required for Node.js Hosting?
Small Node.js applications can run on 1 GB RAM VPS servers, but most production applications perform better with at least 2 GB RAM or higher depending on traffic, database usage, and background processes.
RAM usage depends on:
• Concurrent users
• Database operations
• Real time features
• API traffic
• Background workers
Conclusion
A properly configured Node.js production server on a Linux VPS helps create a secure, stable, and high-performance environment for modern applications. Production optimization, HTTPS security, PM2 process management, and reverse proxy configuration all play an important role in maintaining reliable application uptime.
With the right Linux VPS setup, Node.js applications become easier to manage, monitor, secure, and scale as traffic increases. Combining PM2, Nginx, firewall protection, SSL certificates, and regular monitoring helps create a production environment suitable for APIs, SaaS platforms, dashboards, and real world web applications.