These days, most of the things you want or want to work with are available on the internet, which is why most people look for either as their need. You can access and identify a specific website due to its domain name.
A domain name is the website’s official name, which must be registered for someone to own it. And when it comes to the domain name, another term, Domain name server or DNS, comes along.
A domain name server is something that translates domain names or hostnames into Internet Protocol addresses. As you have used the internet for many things, you must also have encountered the error which says “DNS Server Not Responding“, which is pretty standard and easy to get rid of.
So let us now get onto the process of how to fix the “DNS Server Not Responding“ error.
What Does “DNS Server Not Responding“ Mean?
As we told you, in brief, the domain name server is the directory responsible for translating the domain names or the hostnames to internet protocol addresses. So to fix the “DNS Server Not Responding“ error, it would be better if you knew what it is.
“DNS Server Not Responding“ means that the connection which had to be made by the domain name server with the browser has failed, or the server you are trying to reach does not exist or is unavailable.
This “DNS Server Not Responding“ error is easy to fix as this problem usually lies on the user level, so you do not have to dig deeper to resolve this. And in this article, we will show you eleven ways to fix the “DNS Server Not Responding“ error.
How to Fix DNS Server Not Responding Error
We may now get to business and try to resolve the “DNS Server Not Responding“ error in some of the easiest ways possible. Both experts and beginners can perform these methods, so do not hesitate or fear trying them. Also, it would be best if you kept a backup of your data.
1. Troubleshoot Network Problems
You may start by trying to diagnose your network to resolve the “DNS Server Not Responding“ error. This method will help you determine where the problem lies, and you will be able to do it quickly, so stay relaxed.
Run Windows Network Diagnostics
To run a network diagnostic on Windows 10, you may follow the below steps:
- Press Windows Key + R and type Control Panel in the Run window.
- Select Network and Internet.
- In Network and Internet, select Network and Sharing Center.
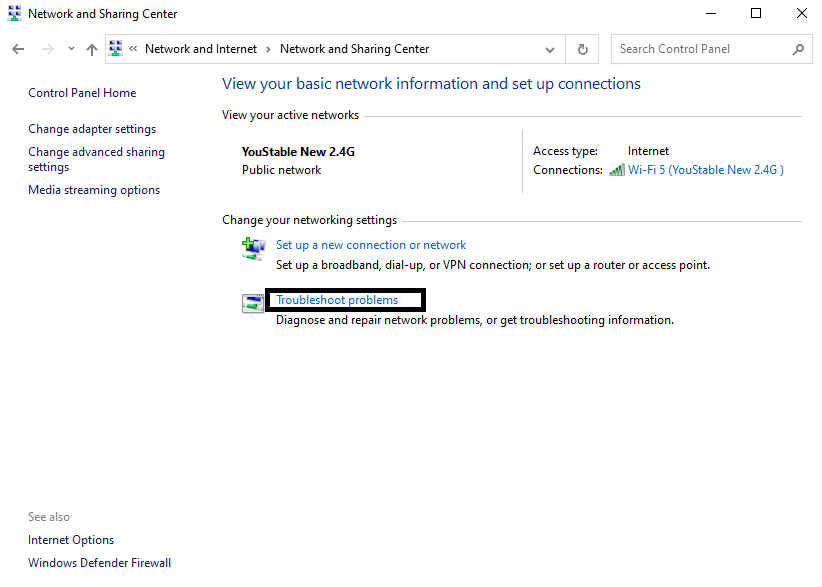
- Choose Troubleshoot problems under Change your network.
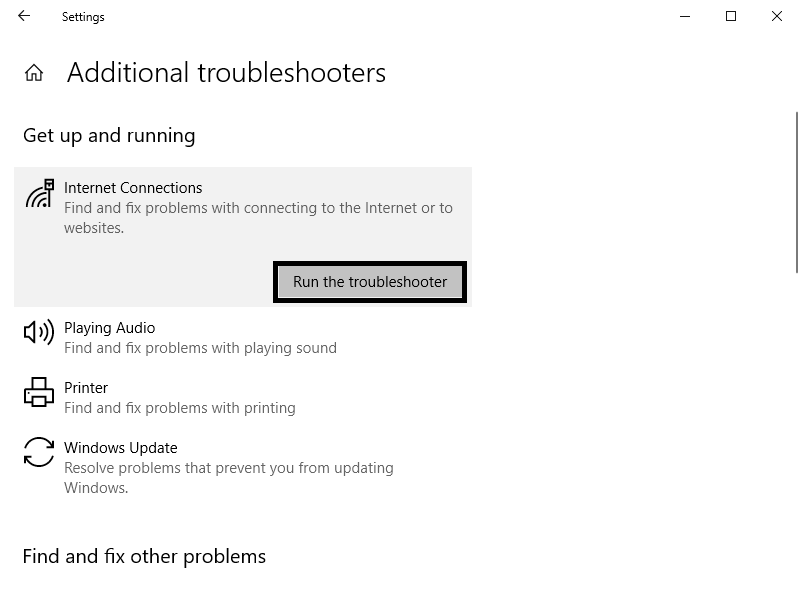
- Select Additional troubleshooters, then Internet Connections, and then Run the troubleshooter.
- If an error is detected, the troubleshooter will inform you, and you will have to follow the suggested process.
Configure Wireless Diagnostic With Mac:
- Close all apps and connect to the network you’re facing the problem with.
- Hold the Option key, choose Wi-Fi status on the menu bar, and select Open Wireless Diagnostics.
- Follow the instructions on the screen.
- Once the scanning is complete, select Info in the Summary to know more about each entry.
2. Connect With a Different Device
The next thing you can do is connect the home network to a different device and try to access the website. This will tell you if your home network or device has a problem.
If you can now access the website with a different device and the same home network, the problem lies with your old appliance, which you used to access at first.
If you are still unable to access the website, there is a probability something is wrong with the home network or the router. To test this, you may try to connect with mobile data and try to access the website. And if this trial fails, then the problem is with the router.
3. Switch to Another Web Browser
Another way you can get rid of this “DNS Server Not Responding“ error is by switching to another browser. For example, you currently use Chrome to move to Firefox or another browser.
If this method works and you can access the website, you may update your browser to the latest version. And if you still see the error, your browser might not be the issue.
How do I move to another Browser?
- We assume that you are using Chrome, so to move from Chrome to Firefox, you may start installing Firefox on your device.
- Once you are done with that, click on the Library icon and select Bookmarks; now, click on Show all Bookmarks.
- Click on “Import Data from Another Browser…”
- In the “Import Settings and Data” box, choose “Chrome.”
- While moving, you will be asked which account and what data you want to shift. You will have to click on Continue, and then you are done once the moving is complete.
4. Restart PC in Safe Mode
If your operating system is not working correctly, it could cause the “DNS Server Not Responding” error. So you may now try to restart your PC in safe mode. This will take your operating system to a version that can limit the files and resources used for running your device.
How Do I Start My PC in Safe Mode?
To restart your computer in safe mode on Windows:
- Go to the Start menu, click on the Power button, press the Shift key, and click on Restart.
- In Choose an option, select Troubleshoot and then Advanced options.
- Select the Startup Settings in the Advanced options, and then click Restart.
- Press F5 to select the Safe Mode with Networking option.
To restart your computer in safe mode on Mac:
- Go to the Apple menu, then Shut Down. Wait for a few seconds after your device shuts down.
- Start your Mac and press and hold Shift until you see the login screen.
If everything goes well through this method, the third-party software you use is the root of the “DNS Server Not Responding” error. So try to find out which one and delete it.
Also Read: How to Fix the ERR_CONNECTION_TIMED_OUT Error
5. Restart Modem or Router
The cause behind the “DNS Server Not Responding” error could be the router or modem you are using. So here, you may try to restart your modem or router to clear the cache to resolve the issue.
How Do I Restart My Router?
- To restart your router, you must press and hold the Power button for a few seconds. And for a modem, you may unplug it from the power source.
- Wait for about 30 seconds or a minute, do the same on the router, and plug in the modem to its power source.
6. Deactivate Antivirus and Firewall
Firewalls and antivirus are for detecting problem-causing data and keeping your data safe and away from it.
But sometimes, it may come between you from accessing some website. In such cases, temporarily turning them off would help. But make sure you keep a backup of your data first.
How Do I Temporarily Disable My Antivirus Software and Firewall?
On Windows:
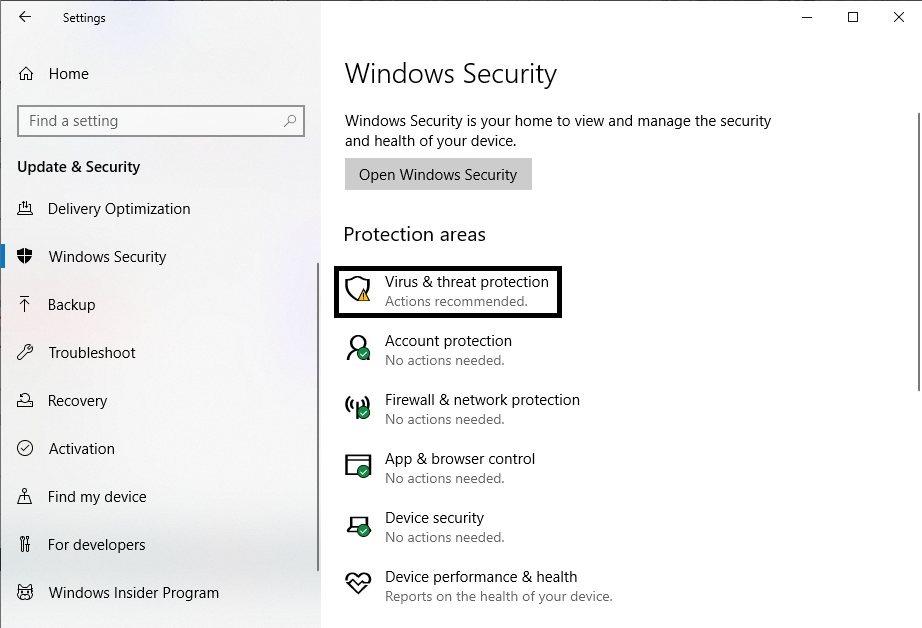
- Go to the Start menu and click on Settings, then Update & Security, then Windows Security, and then Virus & threat protection.
On Mac:
- Go to System Preferences, then Security & Privacy, and then Firewall.
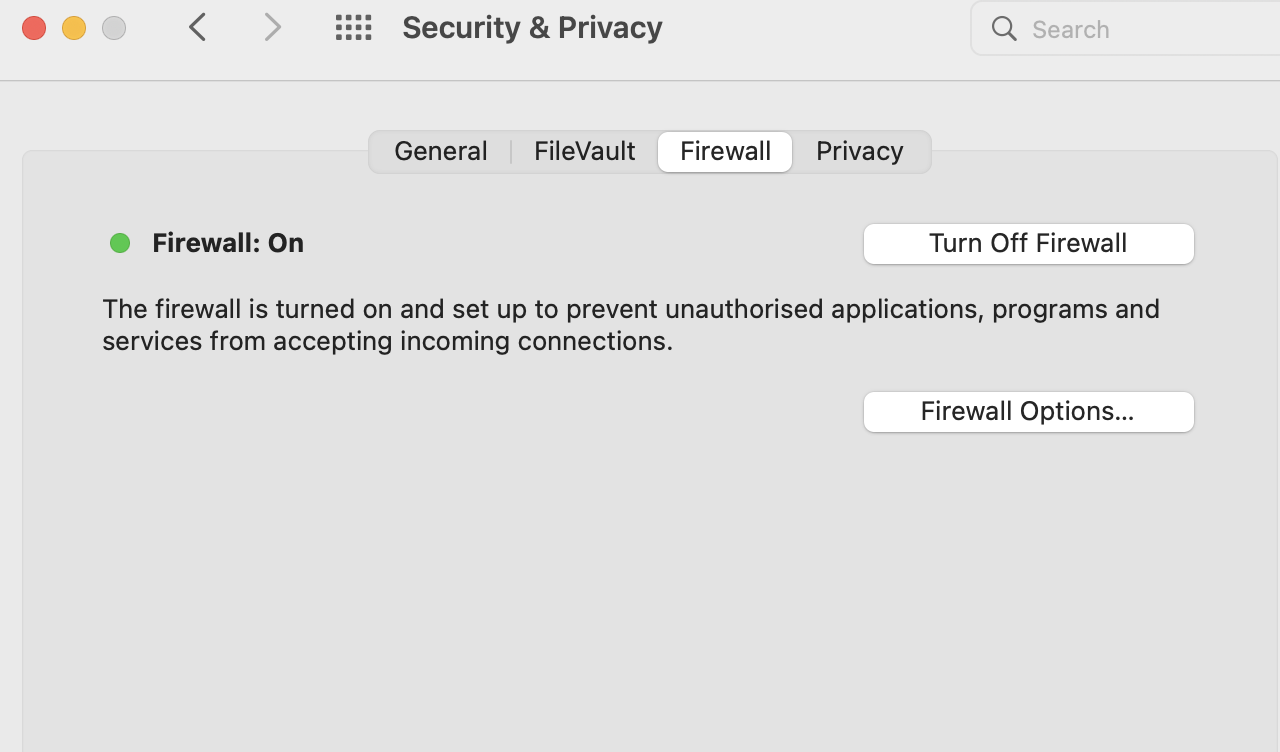
- Once you have got your hands on the settings, disable them temporarily but not for very long as it can be unsafe for your data.
After completion of disabling the Firewall and antivirus, you may try to re-access the website. If it does not work, follow the next method.
Disable Other Connections
You may now try to resolve the “DNS Server Not Responding” error by disabling all the other or unused connections.
How Do I Disable Secondary Connections in Mac & Windows?
On Windows:
- Go to the Control Panel, Network and Internet, and Network and Sharing Center.
- Click on Change adapter settings.
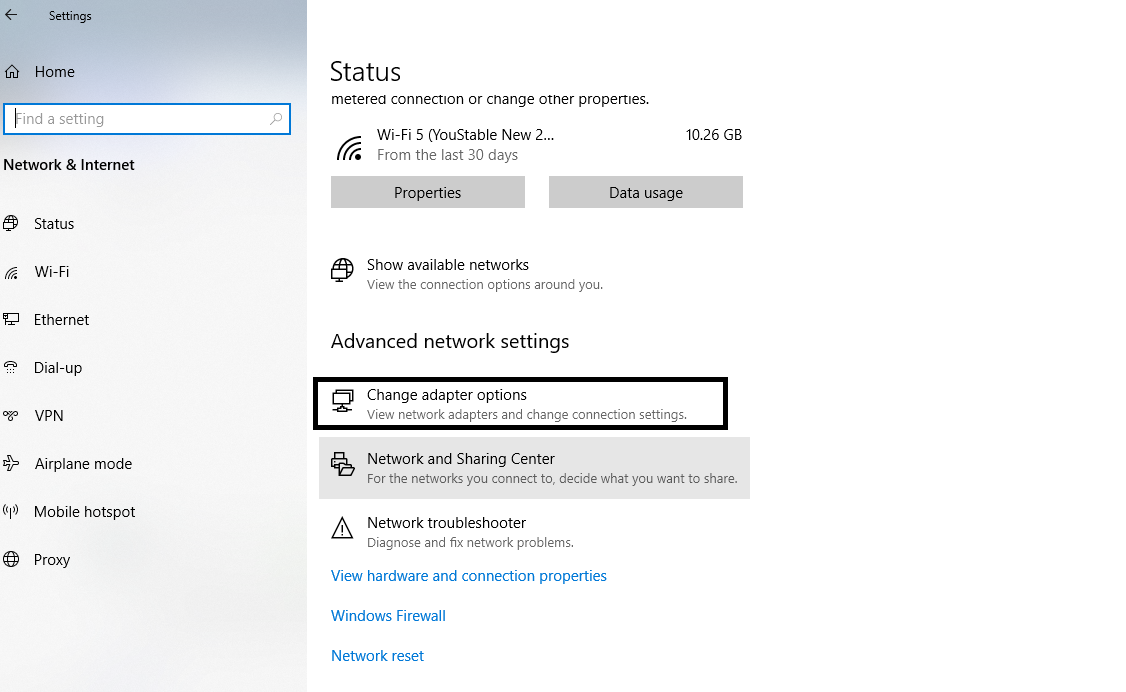
- On the Network Connections page, right-click on Local Area Connection and other connections you’re not using, and then choose Disable.
On Mac
- Navigate to the Apple menu, then System Preferences, and then Network.

- Select the unused connections on the left side of the screen and choose the minus (–) button to disconnect that connection.
Read: How to Perform a WordPress Search and Replace
Change the DNS Server Address
The next thing you could do now is change your DNS server address. Your internet service provider automatically offers you a DNS server address, but your internet connection will also not work if it does not exist.
To resolve this issue, you may temporarily change your DNS server address. Luckily Cloudflare and Google offer a few free DNS server addresses.
How to change DNS Server Address?
On Windows:
- Go to the Network Connections page by typing ncpa.CPL into the Windows search bar. Click on Enter.
- Right-click on the connection you’re using and select Properties.

- Select Internet Protocol Version 4 (TCP/IPv4) in Properties.
- Tick on the Obtain an IP address automatically and Use the following DNS server Addresses in the Internet Protocol Version 4 (TCP/IPv4) Properties page.

- Type the DNS server addresses you want in the Preferred DNS Server and Alternate DNS Server areas.
- Check the Validate settings upon exit box and click on OK.
- Restart your computer.
On Mac:
- Navigate to the Apple menu, then System Preferences, and then Network.
- Select your primary network connection and choose Advanced and then DNS.

- Click on the + button to add a new DNS server. Click on OK and then select Apply.
After this, try to reset your internet connection, and you’re done!
Flush DNS Cache
Another thing you could do is get rid of the DNS cache, which might have saved some erroneous data causing the “DNS Server Not Responding” error.
How to Flush DNS Cache and reset my IP?
- Type in cmd in the Windows Search bar and hit Enter to reach the Windows command prompt console.
- On the command prompt, type in ipconfig/flushdns and click Enter.

- If it has been successful, a confirmation message will appear on the command prompt:
Disable IP Version 6 (IPv6)
Sometimes the latest version of IP, IPv6, could also be causing the “DNS Server Not Responding” error. So it might sometimes help to disable it.
How Do I Disable IPv6?
On Windows:
- Navigate Network Connections, right-click on your active connection and click on Properties.
- Now under Networking, look for Internet Protocol Version 6 (TCP/IPv6) and unselect it.
- Click OK.

On Mac:
- Go to the Apple menu, then System Preferences, and then Network.
- Select your current network connection, Advanced, and TCP/IP.

- Select Configure IPv6 and set it to Off.
- Click OK.
Once you are done doing this, restart your device and try to re-access the website.
Read: How to Remove Date on your WordPress URL
Update the Network Adapter Driver
An outdated network adapter driver might also cause the “DNS Server Not Responding” error. The updating of the network adapter driver can be done through two methods, it either happens automatically, or you might have to perform it manually.
For beginners, using a tool such as Drive Easy would be better to update your network adapter driver. But make sure to create a system restore point in your Windows before using the accessible version of Driver Easy. This will help your computer return to its previous state if something happens.
How to update the Network Adapter Driver?
To update automatically:
- Download and install Driver Easy on your computer.
- Run the software and select the Scan Now option.
- Select Update next to each of the outdated drivers.
- Wait for the download and installation process to complete, and then try to restart your computer.
Once you have been through this process, try re-accessing the same website and check if the “DNS Server Not Responding” error still occurs.
What Causes the “DNS Server Not Responding” Error?
There could be many causes for the “DNS Server Not Responding” error. One of the most significant reasons would be the faulty configuration of the DNS records, which could be due to the wrong values or IP addresses being entered.
Some of the reasons why you encounter the “DNS Server Not Responding” error are:
- Unavailable DNS provider
- Malfunctioning router or modem
- Hardware or network issues
- Antivirus software
Read: Fix ‘Another Update is Currently in Progress’ Error in WordPress
Conclusion
Now that we have been through this entire guide on how to fix the “DNS Server Not Responding” error, we may now look at the overview of it. In this article, we saw this “DNS Server Not Responding” error and its causes.
Also, we gave about eleven easy ways to resolve this error on the user level. These methods are beginner-friendly and will not require you to be an expert in the technical field. But the first and final advice here would be to keep a backup before you perform any of these processes.