
Webmin is a free, browser-based control panel for Linux that lets you manage users, services, packages, firewalls, and servers without the command line. To use Webmin on a Linux server: install the Webmin package, open port 10000, visit https://your-server:10000, log in as root or a sudo user, secure it with SSL/2FA, and manage tasks via modules.
If you’re learning how to use Webmin on a Linux server, this guide walks you through installation, first login, essential modules, security hardening, and troubleshooting.
Written from a hosting engineer’s perspective, it covers Ubuntu/Debian and RHEL-based systems, plus best practices we use daily for production servers.
What is Webmin and Why Use it?
Webmin is a lightweight, modular control panel for Linux. It exposes system administration tasks—like managing users, SSH, firewall rules, Apache/Nginx, MySQL/MariaDB, cron, backups—through a secure web UI. It’s ideal for admins who prefer a graphical interface or need to delegate routine work without granting full shell access.
Unlike heavy hosting panels, Webmin stays close to the OS. It edits native configuration files, so your command-line workflows remain compatible. Pair it with Virtualmin (a module for hosting multiple websites) to run a lean, flexible web hosting stack.
Prerequisites and Supported Linux Distributions
System and access requirements
Before installing Webmin, ensure you have:
- A supported Linux distro (Ubuntu, Debian, AlmaLinux, Rocky Linux, RHEL, or openSUSE)
- Root or sudo-enabled user
- Open port 10000/tcp for the Webmin interface
- Basic packages: OpenSSL, Perl, and a firewall (UFW or firewalld)
Network and security basics
Webmin binds to port 10000 over HTTPS by default (self-signed). Plan to:
- Allow inbound TCP/10000 only from your IP(s)
- Replace the self-signed cert with Let’s Encrypt or your CA
- Change the default port and enable 2FA for extra security
Install Webmin on Popular Linux Distros
Ubuntu / Debian
Add the official repository and install Webmin:
sudo apt update
sudo apt install -y wget gnupg2 apt-transport-https
wget -qO- https://download.webmin.com/jcameron-key.asc | sudo gpg --dearmor -o /usr/share/keyrings/webmin.gpg
echo "deb [signed-by=/usr/share/keyrings/webmin.gpg] https://download.webmin.com/download/repository sarge contrib" | sudo tee /etc/apt/sources.list.d/webmin.list
sudo apt update
sudo apt install -y webmin

# Open the firewall (UFW)
sudo ufw allow 10000/tcp
AlmaLinux / Rocky Linux / RHEL / CentOS
Create a YUM/DNF repo file, import the key, and install:
sudo tee /etc/yum.repos.d/webmin.repo >/dev/null <<'EOF'
[Webmin]
name=Webmin
baseurl=http://download.webmin.com/download/yum
enabled=1
gpgcheck=1
gpgkey=http://www.webmin.com/jcameron-key.asc
EOF

sudo dnf install -y perl perl-Net-SSLeay openssl unzip
sudo dnf install -y webmin

# Open the firewall (firewalld)
sudo firewall-cmd --permanent --add-port=10000/tcp
sudo firewall-cmd --reload
openSUSE / SLES
sudo rpm --import http://www.webmin.com/jcameron-key.asc
sudo zypper addrepo -f http://download.webmin.com/download/yum webmin
sudo zypper refresh
sudo zypper install -y webmin
After installation, Webmin runs as a service named webmin and listens on port 10000.
First Login and Dashboard Tour
Access the interface
- Browse to https://YOUR-SERVER-IP:10000
- Log in as root or a sudo-enabled user
- Accept the initial self-signed certificate warning (we’ll replace it shortly)
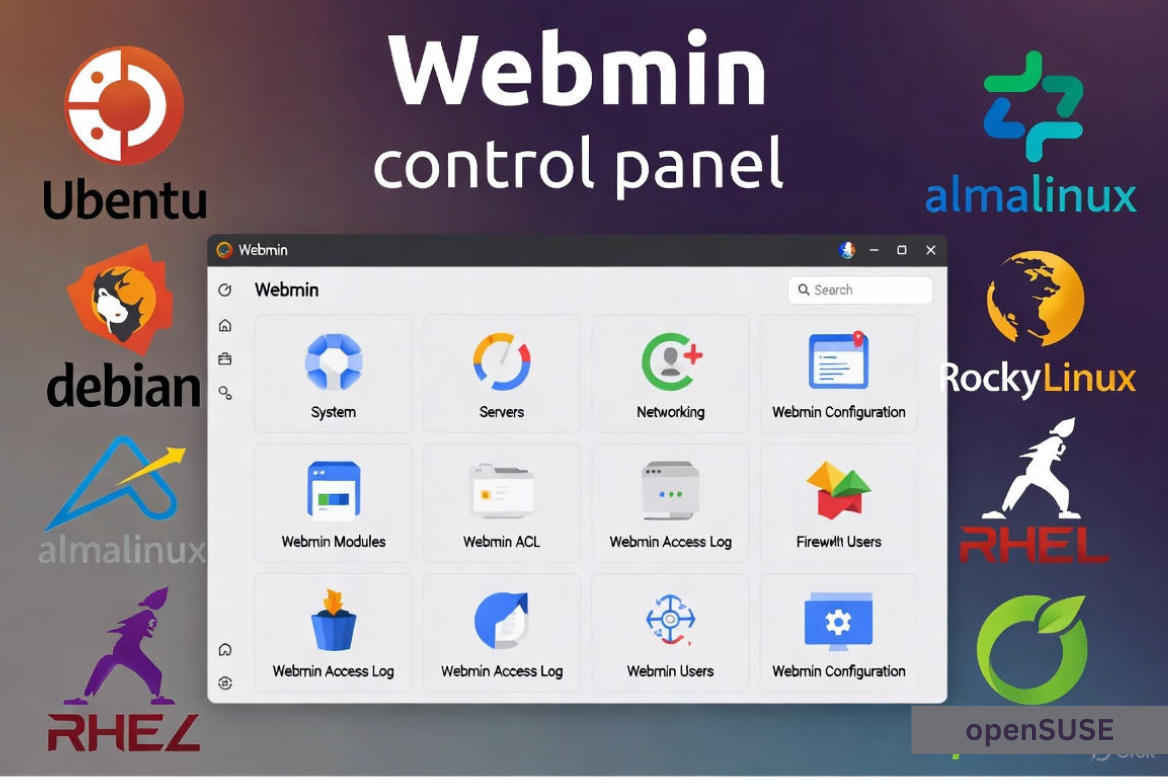
The dashboard shows system info, CPU/RAM usage, running services, and quick links to modules such as System, Servers, Networking, and Webmin Configuration.
Understand Webmin modules
- System: Users & Groups, Bootup and Shutdown, Software Package Updates, Scheduled Cron Jobs
- Servers: Apache Webserver, Nginx, MySQL/MariaDB, Postfix, Dovecot, BIND DNS
- Networking: FirewallD or UFW, Linux Firewall, Network Configuration
- Hardware: Partitions, RAID, Sensors (where supported)
- Webmin: Configuration, Webmin Users, Two-Factor Auth, Backup Configuration Files
Secure Webmin (Must-Do)
Enable a valid SSL certificate (Let’s Encrypt)
Replace the self-signed cert so browsers trust your panel:
- Point a DNS record (e.g., panel.example.com) to your server IP
- In Webmin > Webmin Configuration > SSL Encryption > Let’s Encrypt, request a certificate for your hostname
- Set automatic renewal
Change the default port and restrict access
- Webmin > Webmin Configuration > Ports and Addresses: change 10000 to a high, random port
- Webmin > Webmin Configuration > IP Access Control: allow only your management IPs
- Firewall: allow the new port and remove 10000
# UFW example
sudo ufw allow 10443/tcp
sudo ufw delete allow 10000/tcp

# firewalld example
sudo firewall-cmd --permanent --add-port=10443/tcp
sudo firewall-cmd --permanent --remove-port=10000/tcp
sudo firewall-cmd --reload
Harden authentication
- Use a non-root sudo user for Webmin login
- Enable 2FA: Webmin > Webmin Users > Two-Factor Authentication
- Disable unused modules and remove unneeded packages
- Keep the OS and Webmin updated
Essential Webmin Tasks (With Real-World Tips)
Manage users and SSH access
- System > Users and Groups: add users, set shells, control sudo privileges
- Servers > SSH Server: adjust SSH port, disable root login, enforce key-based auth
Update packages and repositories
- System > Software Package Updates: review and apply updates
- Schedule automatic security updates during low-traffic windows
Start/stop services and enable at boot
Use System > Bootup and Shutdown to manage systemd services. This is safer than editing symlinks manually and reduces human error during maintenance windows.
Firewall and intrusion prevention
- Networking > FirewallD or Linux Firewall: manage port rules with a UI
- Optional: install Fail2ban and configure via Webmin or CLI to block brute-force attempts
Web servers: Apache or Nginx
- Servers > Apache or Nginx: create virtual hosts, manage logs, set PHP handlers
- Use syntax checks before applying changes to avoid downtime
Databases: MySQL/MariaDB
- Servers > MySQL Database Server: create databases, users, and set permissions
- Use backups before schema changes; schedule dumps with Cron
Cron jobs and backups
- System > Scheduled Cron Jobs: add periodic tasks without crontab syntax errors
- Webmin > Backup Configuration Files: back up critical configs before upgrades
File management
Webmin’s File Manager lets you upload, edit, and set permissions with a visual interface. For bulk transfers, use SFTP; keep ownership and SELinux contexts in mind on hardened systems.
Advanced Administration With Webmin
Virtualmin for multi-site hosting
Virtualmin (a Webmin module) adds account-based hosting—perfect for agencies or resellers. It automates virtual hosts, mail, DNS, databases, and SSL per domain while keeping resource isolation.
Edit config files safely
Most modules provide “Edit Config File” buttons for context-aware changes. Always validate syntax (e.g., apachectl configtest) before restarting services to prevent outages.
Monitoring and alerts
- System and Server Status modules: track CPU, memory, disk, and service health
- Configure email alerts on failures or resource thresholds
Role-based access and ACLs
Webmin Users allows granular permissions. Create roles for helpdesk, developers, or DBAs to limit access to only the modules they need—improving security and accountability.
Troubleshooting Common Webmin Issues
Webmin won’t start
sudo systemctl status webmin
sudo journalctl -u webmin --no-pager -n 100
sudo systemctl restart webmin
Check if another process is using the Webmin port, and confirm required Perl modules are present.
Cannot access the panel
- Verify firewall rules: is the correct port open?
- Confirm Webmin’s listening address in Webmin Configuration > Ports and Addresses
- Ensure your public IP is allowed if IP access control is enabled
Certificate warnings
- Use a domain pointing to your server
- Issue a Let’s Encrypt certificate via Webmin and enable auto-renew
Module not visible or missing
- Check Webmin version and install the corresponding server package (e.g., Apache, Nginx, MariaDB)
- Enable the module in Webmin > Webmin Configuration > Webmin Modules
Best Practices and Performance Tips
- Use strong, unique passwords and 2FA for all admin users
- Restrict Webmin to a management VLAN or VPN when possible
- Apply OS and Webmin updates regularly, test on a staging server first
- Back up configuration files and databases before major changes
- Monitor resource usage; right-size your VPS (CPU/RAM/IO) for workload
- Document changes made through Webmin to streamline audits and rollbacks
Why Run Webmin on a YouStable VPS
Webmin shines on reliable, root-access VPS hosting. With YouStable, you get fast storage, dedicated resources, and full control—ideal for a secure Webmin setup. Our uptime-first infrastructure, seasoned support, and clean OS templates help you deploy Webmin, harden it, and scale smoothly as your workloads grow.
Quick Command Reference
# Start/stop/status
sudo systemctl start webmin
sudo systemctl stop webmin
sudo systemctl status webmin

# Change firewall (examples)
sudo ufw allow 10000/tcp
sudo firewall-cmd --permanent --add-port=10000/tcp && sudo firewall-cmd --reload

# Update Webmin (Ubuntu/Debian)
sudo apt update && sudo apt upgrade -y webmin

# Update Webmin (RHEL-based)
sudo dnf upgrade -y webmin
Pros and Cons of Webmin
- Pros: Lightweight, free, edits native configs, modular, great for delegation, works across many distros
- Cons: Requires hardening, not as feature-heavy as commercial hosting panels, self-signed cert by default
Real Use Cases
- Developers: spin up staging servers and manage Apache/Nginx, PHP, and databases visually
- SMBs: centralize routine admin (users, updates, backups) without deep Linux expertise
- Agencies: pair Webmin with Virtualmin to host multiple client sites efficiently
FAQs
Is Webmin safe to use on a production server?
Yes—when hardened. Use a trusted certificate, change the default port, restrict by IP or VPN, enable 2FA, and keep your OS/Webmin updated. Limit modules and users to the least privileges needed.
How do I access Webmin after installation?
Open https://YOUR-SERVER-IP:10000 in a browser and log in as root or a sudo user. If you changed the port, use that instead. Ensure your firewall allows the port and that your IP is permitted.
How do I change Webmin’s default port?
Go to Webmin Configuration > Ports and Addresses and set a new high port (e.g., 10443). Update your firewall rules accordingly and reconnect using the new port over HTTPS.
How do I reset the Webmin root password?
On Ubuntu/Debian, use: sudo /usr/share/webmin/changepass.pl /etc/webmin root NEWPASSWORD. On RHEL-based systems, the path is typically the same. Then restart Webmin and log in with the new credentials.
What’s the difference between Webmin and Virtualmin?
Webmin is the core system administration panel. Virtualmin is an add-on focused on web hosting: it manages domains, mail, DNS, databases, and SSL per site. Use Webmin for server admin; add Virtualmin to manage multiple websites at scale.


