To set up a VPS server in 2026, choose a provider and OS, create the instance, secure SSH with keys, add a sudo user, update packages, enable a firewall, harden SSH, install a web stack (Nginx/Apache, PHP, and MariaDB/MySQL), point your domain via DNS, enable HTTPS with Let’s Encrypt, and configure backups and monitoring.
If you’re wondering how to setup VPS server in 2026, this beginner friendly guide walks you from zero to a secure, production ready server.
We’ll use best practices I’ve refined over 12+ years managing Linux servers and hosting environments, with clear steps, code examples, and practical tips that match modern Google SEO guidance.
What is a VPS Server in 2026 and Who Should Use it?
A Virtual Private Server (VPS) is a virtualized machine with dedicated resources (CPU, RAM, NVMe storage) on a shared physical host.
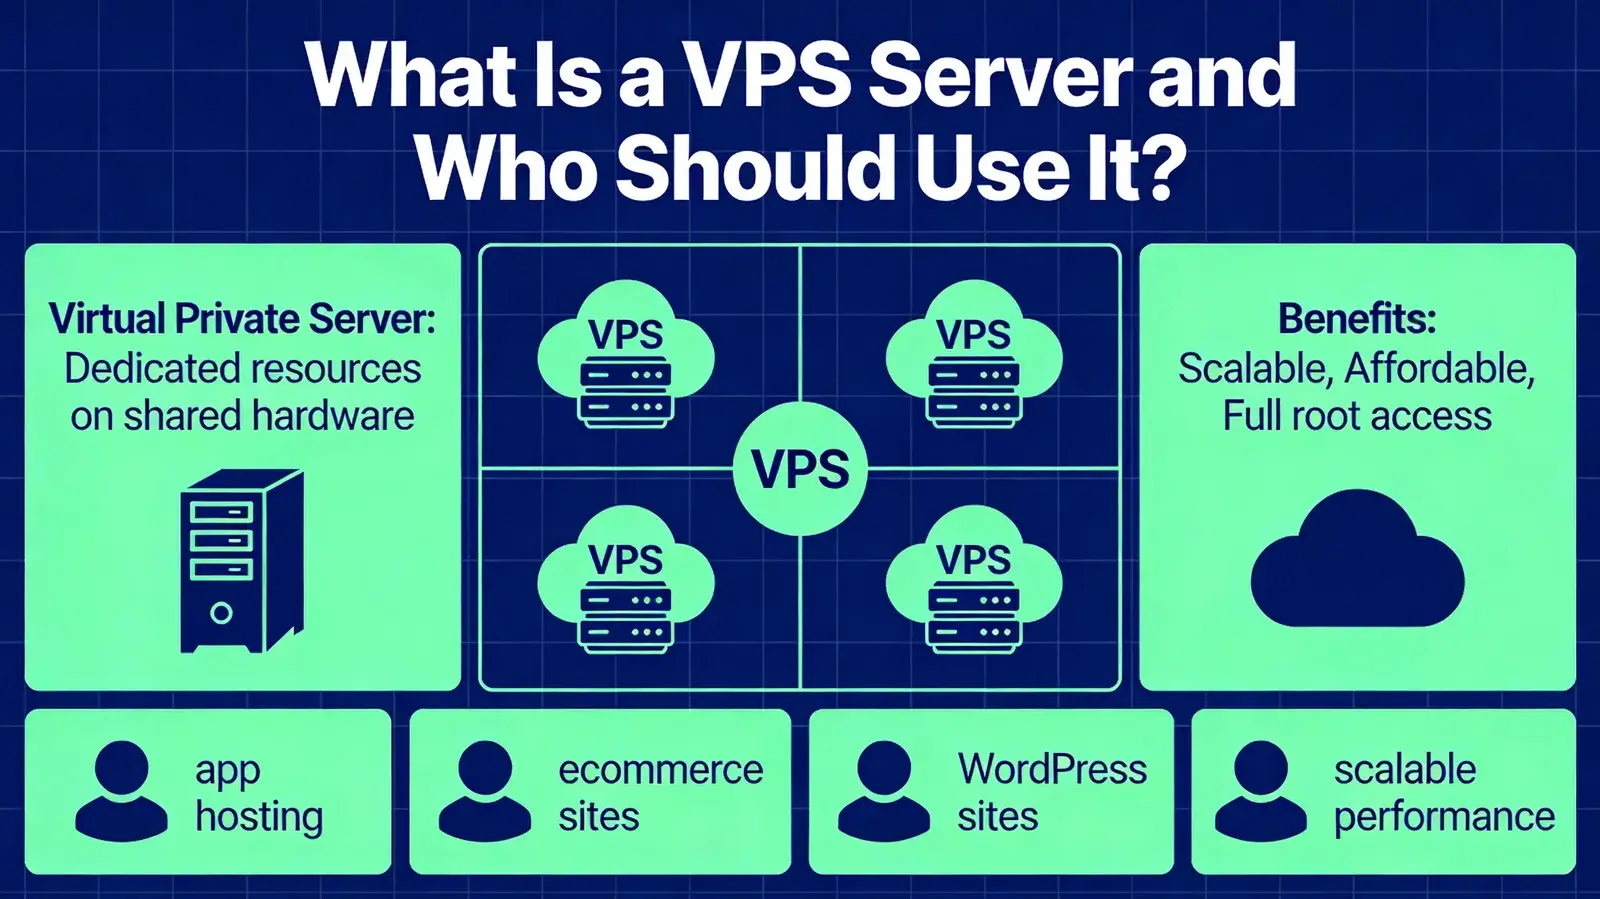
It’s ideal for websites, apps, APIs, game servers, staging environments, and learning Linux. Compared to shared hosting, a VPS offers more control, better performance, and stronger isolation at an affordable cost.
In 2026, NVMe storage, IPv6, optimized kernels, and easy snapshots are common. Providers like YouStable offer managed and unmanaged VPS plans so beginners can start small, then scale as traffic grows.
Prerequisites and Key Terms (Beginner Glossary)
- SSH: Secure shell protocol used to log in to your VPS.
- Root: The superuser with full system privileges.
- Sudo user: A regular user with permission to run admin commands.
- Firewall: Network rules that allow or block traffic.
- DNS: Maps your domain name to your VPS IP address.
- Stack: The software powering your app (e.g., Nginx + PHP + MariaDB).
- OS/Distro: Operating system, typically Ubuntu 24.04 LTS, Debian 12, or AlmaLinux 9.
Quick Decision Guide: OS, Plan Size, and Region
- Best OS for beginners: Ubuntu 24.04 LTS (stable, well documented).
- Plan size: Start with 1-2 vCPU, 2-4 GB RAM, 40-80 GB NVMe. Upgrade as needed.
- Region: Choose the data center closest to your primary audience for lower latency.
- Networking: Enable IPv6 if available and keep a static IPv4 for DNS.
- Storage: Prefer NVMe for faster I/O and better database performance.
How to Setup a VPS Server in 2026 – (Step-by-Step)
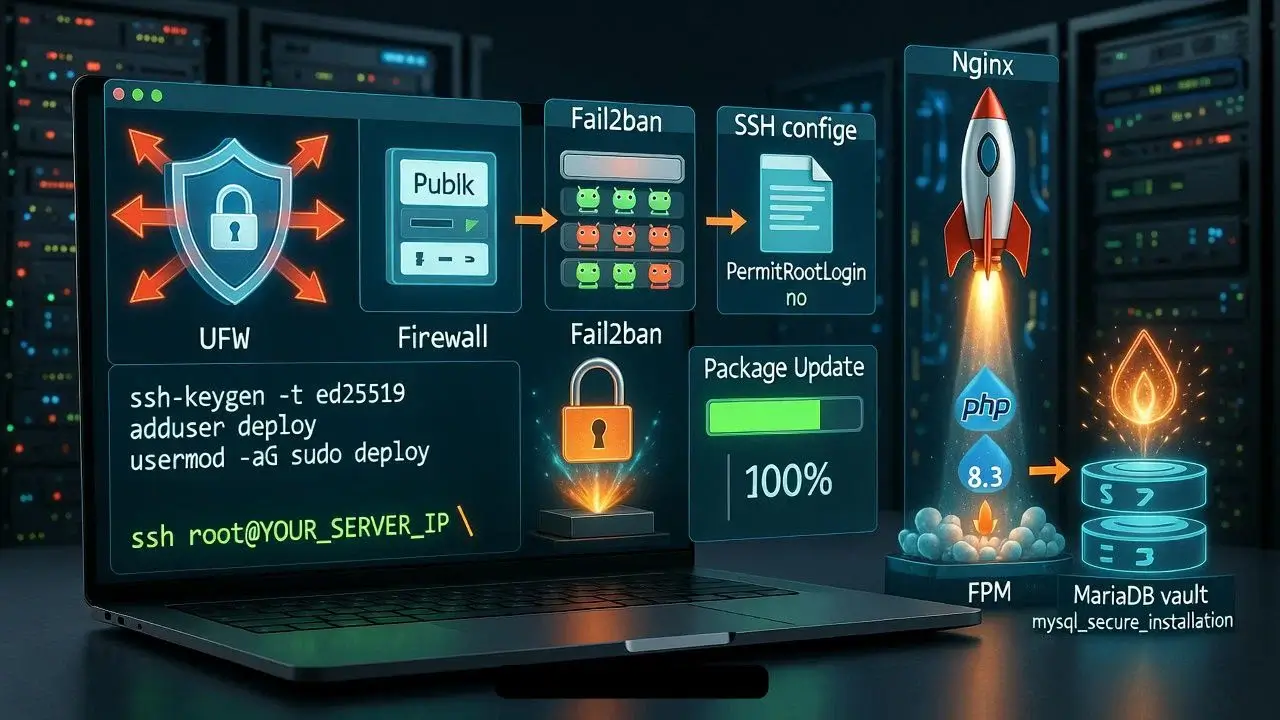
Step 1: Create Your VPS Instance
Sign up with a reliable provider and create your VPS with Ubuntu 24.04 LTS. Name your server, pick a region, and choose a plan that matches your use case. Enable automated backups or snapshots if offered.
Tip: YouStable VPS plans include fast NVMe storage, DDoS protection, and 24/7 expert support. Beginners can start unmanaged to learn, or choose managed VPS to offload security and maintenance.
Step 2: Generate SSH Keys (Local Computer)
Use SSH keys instead of passwords. On macOS/Linux, generate a key pair. On Windows, use PowerShell or PuTTYgen. Do not share your private key.
# macOS/Linux (ED25519 key)
ssh-keygen -t ed25519 -a 100 -f ~/.ssh/myvps -C "you@domain.com"

# Windows PowerShell (OpenSSH client)
ssh-keygen -t ed25519 -a 100 -f $env:USERPROFILE\.ssh\myvps -C "you@domain.com"
Copy the public key (the file ending with .pub) into your provider’s “Add SSH Key” field during VPS creation, or add it later using root access.
Step 3: First Login and Create a Sudo User
Connect via SSH using the server’s IP address. Replace placeholders with your details.
# First login as root (if your provider gives root)
ssh -i ~/.ssh/myvps root@YOUR_SERVER_IP

# Create a new user and grant sudo
adduser deploy
usermod -aG sudo deploy

# Create SSH directory and copy your key
mkdir -p /home/deploy/.ssh
chmod 700 /home/deploy/.ssh
nano /home/deploy/.ssh/authorized_keys   # paste your public key
chmod 600 /home/deploy/.ssh/authorized_keys
chown -R deploy:deploy /home/deploy/.ssh
Open a second terminal to confirm the new user works:
ssh -i ~/.ssh/myvps deploy@YOUR_SERVER_IP
sudo whoami   # should print "root"
Step 4: Update, Firewall, and Basic Security Hardening
Keep the system current, enable a firewall, and harden SSH. These baseline steps block most automated attacks.
# Update packages
sudo apt update && sudo apt upgrade -y

# UFW firewall: allow SSH and web traffic
sudo apt install -y ufw
sudo ufw allow OpenSSH
sudo ufw allow 80,443/tcp
sudo ufw enable
sudo ufw status

# Harden SSH: disable root login and password auth
sudo cp /etc/ssh/sshd_config /etc/ssh/sshd_config.bak
sudo sed -i 's/^#\?PermitRootLogin.*/PermitRootLogin no/' /etc/ssh/sshd_config
sudo sed -i 's/^#\?PasswordAuthentication.*/PasswordAuthentication no/' /etc/ssh/sshd_config
sudo systemctl restart ssh

# Fail2ban (protect SSH and other services)
sudo apt install -y fail2ban
sudo systemctl enable --now fail2ban

# Unattended security updates
sudo apt install -y unattended-upgrades
sudo dpkg-reconfigure -plow unattended-upgrades
Optional: Add swap on small memory plans (avoid on robust NVMe backed plans if you can simply scale RAM).
# 2G swap example
sudo fallocate -l 2G /swapfile
sudo chmod 600 /swapfile
sudo mkswap /swapfile
sudo swapon /swapfile
echo '/swapfile none swap sw 0 0' | sudo tee -a /etc/fstab
Step 5: Set Hostname, Timezone, and Server Identity
# Hostname (use your domain or a subdomain)
sudo hostnamectl set-hostname server.example.com

# Timezone (UTC is standard for servers)
sudo timedatectl set-timezone UTC

# Reboot to ensure clean state (optional at this stage)
sudo reboot
Step 6: Install Your Web Stack (LEMP or LAMP)
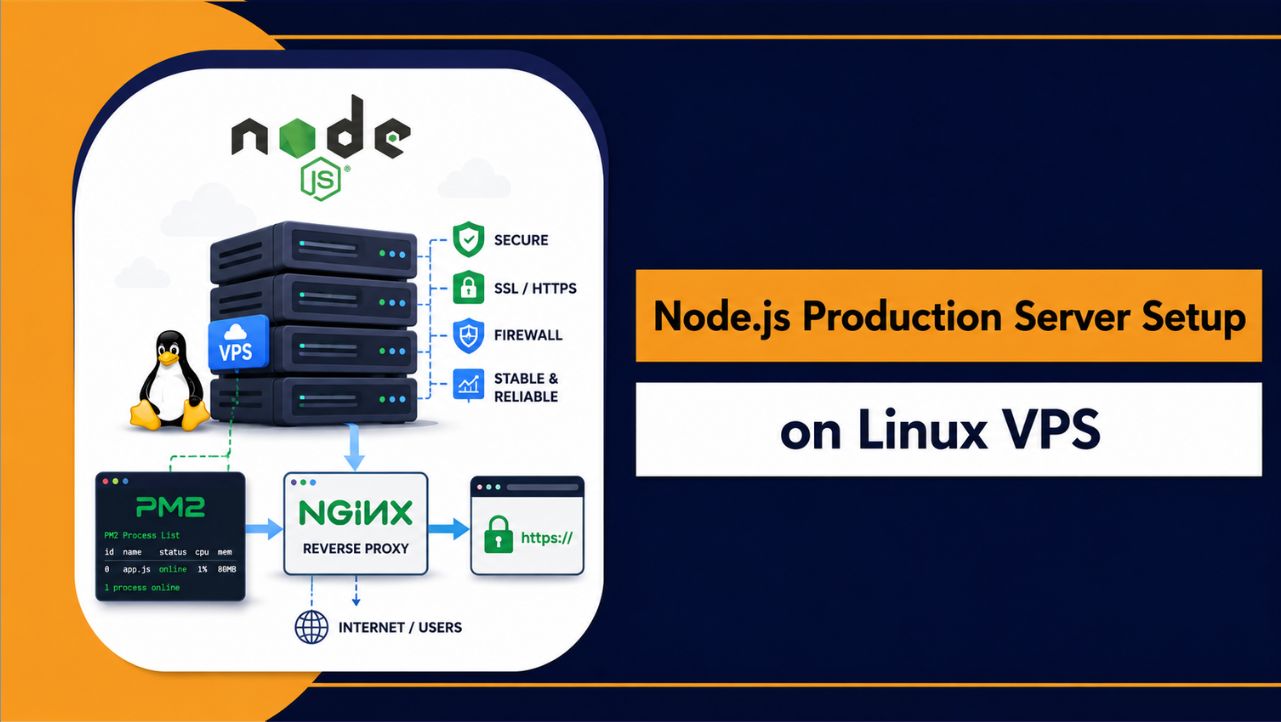
LEMP (Nginx + PHP-FPM + MariaDB/MySQL) is popular for performance. LAMP (Apache + PHP + MariaDB/MySQL) is simpler for .htaccess-heavy apps. Below is a modern LEMP install for Ubuntu 24.04.
# Nginx, PHP 8.3, and MariaDB
sudo apt install -y nginx
sudo apt install -y php8.3-fpm php8.3-mysql php8.3-cli php8.3-curl php8.3-xml php8.3-gd php8.3-zip php8.3-mbstring
sudo apt install -y mariadb-server

# Secure MariaDB
sudo mysql_secure_installation

# Check services
systemctl status nginx --no-pager
systemctl status php8.3-fpm --no-pager
systemctl status mariadb --no-pager
Create a basic Nginx server block. Replace example.com with your domain.
sudo mkdir -p /var/www/example.com/public
sudo chown -R deploy:www-data /var/www/example.com
sudo chmod -R 750 /var/www/example.com

sudo tee /etc/nginx/sites-available/example.com >/dev/null <<'EOF'
server {
    listen 80;
    listen [::]:80;
    server_name example.com www.example.com;

    root /var/www/example.com/public;
    index index.php index.html;

    access_log /var/log/nginx/example_access.log;
    error_log  /var/log/nginx/example_error.log;

    location / {
        try_files $uri $uri/ /index.php?$args;
    }

    location ~ \.php$ {
        include snippets/fastcgi-php.conf;
        fastcgi_pass unix:/run/php/php8.3-fpm.sock;
    }

    location ~* \.(png|jpg|jpeg|gif|ico|css|js|svg|webp)$ {
        expires max;
        access_log off;
    }
}
EOF

sudo ln -s /etc/nginx/sites-available/example.com /etc/nginx/sites-enabled/
sudo nginx -t
sudo systemctl reload nginx
Step 7: Point Your Domain (DNS Records)
At your domain registrar or DNS host, set an A record for example.com and www to your VPS IPv4. If you have IPv6, add AAAA records. DNS propagation usually completes within minutes to a few hours.
- A @ → your.IP.v4.address
- A www → your.IP.v4.address
- AAAA @ → your:ipv6::address (optional)
- AAAA www → your:ipv6::address (optional)
Step 8: Enable HTTPS with Let’s Encrypt
Once DNS resolves to your server, request an SSL/TLS certificate. Certbot can auto configure Nginx for HTTPS.
sudo apt install -y certbot python3-certbot-nginx
sudo certbot --nginx -d example.com -d www.example.com
# Agree to prompts, provide email, and enable auto-redirect to HTTPS

# Test renewal
sudo certbot renew --dry-run
Step 9: Optional Deploy WordPress on VPS
Create a database and user, then download WordPress. This is a quick, manual install suitable for small sites.
# Create DB and user
sudo mysql -e "CREATE DATABASE wpdb DEFAULT CHARACTER SET utf8mb4 COLLATE utf8mb4_unicode_ci;"
sudo mysql -e "CREATE USER 'wpuser'@'localhost' IDENTIFIED BY 'strong_password_here';"
sudo mysql -e "GRANT ALL PRIVILEGES ON wpdb.* TO 'wpuser'@'localhost'; FLUSH PRIVILEGES;"

# Download WordPress
cd /tmp
curl -O https://wordpress.org/latest.tar.gz
tar -xzf latest.tar.gz
cp -r wordpress/* /var/www/example.com/public/
cd /var/www/example.com/public/
cp wp-config-sample.php wp-config.php

# Configure WordPress
sed -i "s/database_name_here/wpdb/" wp-config.php
sed -i "s/username_here/wpuser/" wp-config.php
sed -i "s/password_here/strong_password_here/" wp-config.php

# Set ownership and permissions
sudo chown -R deploy:www-data /var/www/example.com
find /var/www/example.com/public/ -type d -exec chmod 755 {} \;
find /var/www/example.com/public/ -type f -exec chmod 644 {} \;

# Reload services
sudo systemctl reload php8.3-fpm
sudo systemctl reload nginx
Visit https://example.com to finish the installation wizard. Consider adding a caching plugin and a CDN for speed.
Step 10: Backups, Snapshots, and Monitoring
- Backups: Take daily offsite backups of files and databases. Test restores monthly.
- Snapshots: Use provider snapshots before major changes (OS upgrades, config edits).
- Monitoring: Enable uptime checks, baseline CPU/RAM/disk metrics, and alerts.
- Logs: Review Nginx, PHP-FPM, and auth logs. Rotate and compress logs to save space.
# Quick database backup example (MariaDB/MySQL)
mysqldump -u root -p wpdb > /home/deploy/wpdb_$(date +%F).sql

# Log quick views
sudo tail -f /var/log/nginx/error.log
sudo journalctl -u php8.3-fpm -f
Performance Tuning Checklist (Beginner Safe)
- Nginx: Serve static assets with long expires and gzip/brotli compression.
- PHP-FPM: Match pm.max_children to your RAM. Start low (e.g., 5-10) and scale.
- Database: Use utf8mb4, enable slow query log, and add basic indexes.
- Caching: Page cache for CMS, OPcache for PHP, and object cache (Redis) for dynamic sites.
- Images: Serve next gen formats (WebP/AVIF) and lazy load where possible.
- CDN: Offload global delivery and reduce origin load.
# Enable gzip on Nginx (baseline)
sudo sed -i 's/# gzip_/gzip_/' /etc/nginx/nginx.conf
sudo systemctl reload nginx

# Example: enable PHP OPcache (php.ini)
sudo sed -i 's/;opcache.enable=1/opcache.enable=1/' /etc/php/8.3/fpm/php.ini
sudo systemctl reload php8.3-fpm
Security Best Practices for 2026
- Use SSH keys only; keep PasswordAuthentication disabled.
- Enable 2FA/MFA on your hosting and registrar accounts.
- Apply unattended security patches and regularly review pending reboots.
- Harden Nginx and PHP; hide version headers, restrict file execution in uploads.
- WAF/CDN: Place Cloud WAF/CDN in front for DDoS and bot mitigation.
- Backups: Follow 3-2-1 rule (3 copies, 2 media, 1 offsite).
- Principle of Least Privilege: Minimal permissions for files, DB users, and SSH users.
- Audit: Periodically scan with tools like Lynis or ClamAV; review auth logs for brute force.
Common Mistakes to Avoid
- Leaving root SSH enabled or password logins on.
- Not enabling a firewall or exposing unused ports.
- Skipping HTTPS or HSTS for live sites.
- Running everything as root; not using a sudo user.
- No backups or untested backups.
- Overloading a small VPS instead of upgrading resources.
Managed vs Unmanaged VPS: Which Should You Choose?
If you enjoy learning Linux and want maximum control, an unmanaged VPS is cost effective. You handle security, updates, and performance.
If uptime matters and you prefer focus on your app, choose a managed VPS. YouStable’s managed VPS includes hardening, updates, proactive monitoring, and expert support ideal for teams without in house sysadmins.
If you want a reliable option with strong speed and privacy, choosing a VPS Hosting Server in Netherlands can be a great fit for both managed and unmanaged setups.
Troubleshooting Quick Fixes
- Cannot SSH: Verify IP, security group/firewall (UFW), and that sshd is running.
- Site not loading: Check Nginx syntax, service status, and that DNS A/AAAA records point correctly.
- SSL errors: Ensure DNS has propagated; re-run Certbot with correct domain; check port 80 open.
- PHP 502/504: Increase PHP-FPM pm.max_children or timeout; check error logs.
- Database refused: Confirm credentials and that MariaDB is running locally on 127.0.0.1.
# Useful checks
sudo ufw status
sudo systemctl status ssh nginx php8.3-fpm mariadb --no-pager
sudo nginx -t
dig +short example.com
curl -I http://example.com
tail -n 50 /var/log/nginx/error.log
Real World Use Cases (Beginner to Pro)
- Personal site/portfolio: 1 vCPU, 2 GB RAM with LEMP and free SSL.
- Small business WordPress: 2 vCPU, 4 GB RAM, Redis cache, daily backups, CDN.
- API/microservice: Nginx reverse proxy to Node.js/Go app; systemd service; HTTPS enforced.
- Staging server: Separate VPS mirroring production with password protected access.
- Ecommerce: 4+ GB RAM, PHP-FPM tuned, database optimization, WAF, and managed support.
FAQs
Is a VPS good for beginners in 2026?
Yes. With Ubuntu 24.04 and guides like this, a VPS is beginner friendly. Use an unmanaged VPS to learn, or pick a managed VPS from YouStable to handle security, updates, and monitoring while you focus on your site.
How much RAM do I need for a VPS?
For a small WordPress or PHP site, 2-4 GB RAM is a safe start. Resource heavy apps or ecommerce can need 4-8 GB+. Monitor memory and upgrade vertically when swap usage grows or performance degrades.
Which OS is best for VPS in 2026?
Ubuntu 24.04 LTS is the best blend of stability and documentation for beginners. Debian 12 is great if you prefer ultra stable packages. AlmaLinux 9 fits those coming from cPanel/WHM or RHEL ecosystems.
How do I secure a new VPS quickly?
Use SSH keys, disable root and password logins, enable UFW, install Fail2ban, apply updates, and enable automatic security patches. Add HTTPS with Let’s Encrypt, restrict permissions, and back up offsite. A WAF and CDN further reduce risk.
How do I install WordPress on a VPS?
Install Nginx (or Apache), PHP-FPM, and MariaDB/MySQL. Create a database, download WordPress, configure wp-config.php, set permissions, and secure with HTTPS. Use caching and a CDN for performance and resilience.
What’s the difference between VPS and cloud server?
A VPS is a virtual machine with dedicated resources on a single host node. “Cloud server” often implies infrastructure wide features like auto scaling, distributed storage, and advanced networking. For most websites, a performant VPS is sufficient and cost effective.
When should I consider a managed VPS?
Choose managed when uptime, security, and updates are critical or when you lack time or Linux expertise. YouStable’s managed VPS adds proactive monitoring, hardening, and expert help so your stack stays fast and secure.
Conclusion
Setting up a VPS in 2026 is straightforward with the right steps: secure access, a tuned web stack, HTTPS, backups, and monitoring. Start small, iterate, and scale as demand grows. If you prefer a head start, YouStable can provision and manage a production ready VPS so you can focus on building.