
Mixed content errors occur when a site loaded over HTTPS pulls resources (images, scripts, CSS) over HTTP. To fix them: force HTTPS, update your site URLs, replace HTTP links in your database and files, ensure third party resources support HTTPS, add security headers like upgrade insecure requests, then purge caches and recheck your pages.
If you’ve just installed SSL and still see “Not Secure” or broken padlock icons, you’re facing mixed content. This step‑by‑step guide explains how to fix mixed content errors after SSL installation with practical WordPress methods, command line options, and server rules that work on real production sites.
What is Mixed Content (and Why it Happens After SSL)?
Mixed content happens when a page is served over HTTPS, but one or more resources load over HTTP.
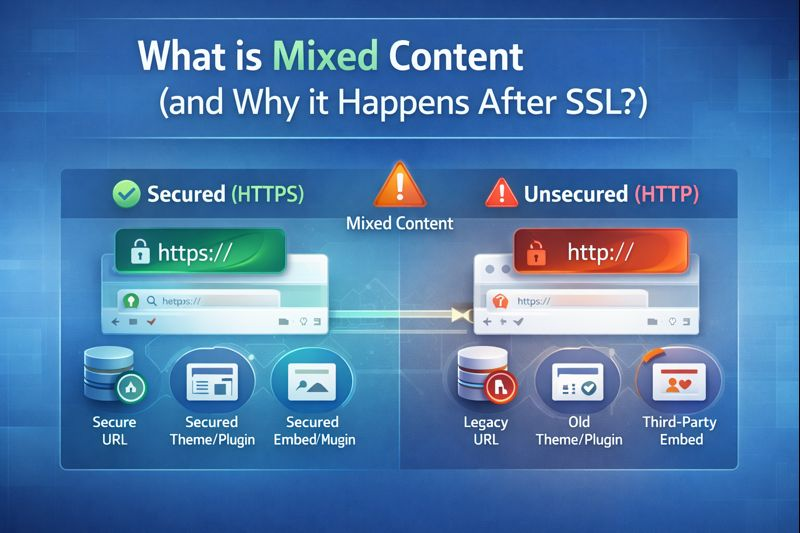
Browsers block or warn about these requests because they can be intercepted, defeating SSL protection. After SSL installation, legacy URLs in your database, themes, plugins, or third‑party embeds often still point to HTTP.
How to Identify Mixed Content Errors
Use Browser DevTools (Fastest Way)
- Open your site in Chrome or Edge.
- Right‑click > Inspect > Console.
- Look for “Mixed content” errors; they show exact HTTP URLs that need fixing.
- Use the Network tab and filter by “blocked” or sort by scheme.
Scan with Online Tools
Use mixed content checkers (e.g., “Why No Padlock” style tools) to crawl multiple pages and list insecure assets. Security scanners and site audit tools also flag HTTP references sitewide.
Check Your CDN and Proxy
If you use a CDN or reverse proxy, verify its SSL mode and origin URL. Misconfigured “Flexible SSL” or an HTTP origin often triggers mixed content even when your site has a valid certificate.
Pre‑Fix Checklist (Do This First)
- Back up your WordPress files and database.
- Confirm your SSL is valid and the primary domain resolves to HTTPS.
- Note your canonical domain (www or non‑www) for consistent redirects.
- Temporarily disable aggressive caching during fixes.
Step 1: Force HTTPS Sitewide
Update WordPress Address and Site Address
- Go to Settings > General.
- Change both WordPress Address (URL) and Site Address (URL) to https://yourdomain.com
Add 301 Redirects (Apache)
# .htaccess (place above WordPress rules)
RewriteEngine On
RewriteCond %{HTTPS} !=on
RewriteRule ^(.*)$ https://%{HTTP_HOST}%{REQUEST_URI} [L,R=301]
Add 301 Redirects (Nginx)
server {
    listen 80;
    server_name example.com www.example.com;
    return 301 https://example.com$request_uri;
}
Secure Admin and Proxies
// wp-config.php
define('FORCE_SSL_ADMIN', true);
if (isset($_SERVER['HTTP_X_FORWARDED_PROTO']) && $_SERVER['HTTP_X_FORWARDED_PROTO'] === 'https') {
    $_SERVER['HTTPS'] = 'on';
}
This ensures the admin area and reverse‑proxy setups respect HTTPS.
Step 2: Replace HTTP URLs in Your Database
No‑Code Plugin Method
- Install “Better Search Replace” or a similar tool.
- Search for http://yourdomain.com and replace with https://yourdomain.com
- Dry run first, then run on all tables (skip columns = guid by default).
WP‑CLI Method (Recommended for Accuracy)
wp search-replace 'http://example.com' 'https://example.com' \
  --all-tables --precise --recurse-objects --skip-columns=guid
SQL Snippet (Targeted)
-- Update core site URLs only
UPDATE wp_options
SET option_value = REPLACE(option_value,'http://example.com','https://example.com')
WHERE option_name IN ('home','siteurl');
Back up your database before bulk replacements. Serialized data needs a safe tool (plugins or WP‑CLI handle this properly).
Step 3: Fix Hardcoded Assets in Themes and Plugins
Developers sometimes hardcode full HTTP URLs in templates or enqueue calls. Replace them with HTTPS or dynamic functions.
Use WordPress Functions to Generate HTTPS URLs
// functions.php (enqueue example)
wp_enqueue_style(
  'theme-style',
  get_stylesheet_directory_uri() . '/assets/css/style.css',
  [],
  '1.0'
);

wp_enqueue_script(
  'theme-js',
  get_template_directory_uri() . '/assets/js/app.js',
  ['jquery'],
  '1.0',
  true
);
Avoid protocol relative URLs (//example.com/script.js). Use explicit HTTPS to prevent edge‑case downgrades.
Step 4: Update Third‑Party Resources and CDNs
- Fonts, analytics, chat widgets, maps, and payment buttons must load over HTTPS.
- Replace outdated HTTP snippet codes with current HTTPS versions.
- Confirm your CDN origin is HTTPS and the SSL/TLS mode is “Full (strict).”
- Enable “Always Use HTTPS” and “Automatic HTTPS Rewrites” where available.
If a third‑party asset doesn’t support HTTPS, replace it with a secure alternative or host a copy locally (respecting licenses).
Step 5: Add Security Headers That Help
Content-Security-Policy: upgrade-insecure-requests
This header tells modern browsers to auto upgrade HTTP requests to HTTPS, reducing mixed content noise while you fix sources.
# Apache
Header always set Content-Security-Policy "upgrade-insecure-requests;"
# Nginx (in server block)
add_header Content-Security-Policy "upgrade-insecure-requests;" always;Enable HSTS (After Everything Works)
Only enable HSTS when all pages work over HTTPS. It forces users to always use HTTPS.
# Apache
Header always set Strict-Transport-Security "max-age=31536000; includeSubDomains; preload"
# Nginx
add_header Strict-Transport-Security "max-age=31536000; includeSubDomains; preload" always;Step 6: Clear Caches and Recheck
- Purge WordPress cache (plugin), server cache (e.g., Varnish), and CDN cache.
- Hard refresh your browser (Ctrl/Cmd + Shift + R).
- Reopen DevTools Console and verify no mixed content remains.
WordPress Quick Fix with a Plugin (Use Carefully)
Plugins like “Really Simple SSL” can enable HTTPS, fix redirects, and attempt automatic rewrites. They’re great for speed, but manual cleanup of hardcoded HTTP links still delivers the most robust, permanent fix.
Post Fix SEO and Platform Checks
- Update sitemaps to HTTPS and resubmit in Search Console.
- Ensure canonical tags, Open Graph, and schema URLs use HTTPS.
- Refresh CDN settings, image optimizers, and caching rules for HTTPS.
- Verify payment gateways and webhooks point to HTTPS endpoints.
Troubleshooting Common Scenarios
- Only images are flagged: Regenerate thumbnails and check theme templates for img src with HTTP.
- WooCommerce pages break: Confirm HTTPS in settings and ensure checkout/cart templates don’t hardcode schemas.
- Admin is secure, front end isn’t: Your 301 redirect or caching layer is bypassing HTTPS; recheck server rules and proxies.
- Cloud proxy shows mixed content: Set SSL to Full (strict); set origin to HTTPS; purge cache.
- Legacy embeds (old sliders, iframes): Replace with current HTTPS embeds or self‑host assets securely.
Pro Tip from the Hosting Trenches
After 12+ years fixing production WordPress sites, the fastest stable path is: enforce HTTPS at the edge, correct WordPress URLs, run a precise database search‑replace, and clean any theme/plugin hardcoding. CSP “upgrade-insecure-requests” reduces noise during the transition but should not replace real fixes.
Why Consider a Managed Host for SSL and HTTPS
Reliable hosting prevents most mixed content headaches. At YouStable, our teams help enforce HTTPS at the server and CDN layers, provision auto‑renewing SSL, tune redirects, and audit your stack for insecure calls—so you spend less time debugging and more time growing your site.
Final Checklist
- 301 redirect all HTTP to HTTPS.
- Set WordPress and site URLs to HTTPS.
- Search replace HTTP to HTTPS in the database.
- Fix hardcoded URLs in themes/plugins.
- Update third‑party scripts, fonts, and CDNs to HTTPS.
- Add CSP upgrade insecure requests; enable HSTS when stable.
- Purge all caches and re‑test with DevTools.
Follow these steps, and your padlock will stay solid. If you prefer concierge help, YouStable can run the audit, implement server‑level HTTPS, and monitor your stack for regressions.
FAQ’s
1. What causes mixed content right after installing SSL?
Old HTTP links persist in your database, theme files, or third‑party embeds. Without 301 redirects and URL updates, browsers load some assets insecurely, triggering warnings.
2. How do I quickly find which files or URLs are insecure?
Use Chrome DevTools > Console to see blocked requests, then scan with a mixed content checker to crawl more pages. The console gives the exact HTTP URLs you must update or remove.
3. Should I use a plugin or fix mixed content manually?
Plugins can automate redirects and rewrites, which is fine as a first pass. For a durable solution, also update database URLs and hardcoded assets in themes, plugins, and embeds.
4. Does HSTS or CSP alone fix mixed content?
CSP’s upgrade-insecure-requests helps browsers auto‑upgrade HTTP calls, but you should still correct sources. Enable HSTS only after the site is fully HTTPS, as it forces TLS for all visits.
5. Cloudflare says “Flexible SSL.” Is that okay?
Use “Full (strict)” with a valid certificate at the origin. “Flexible” terminates TLS at the edge and uses HTTP to your server, which often causes mixed content and security gaps.


