When I first started working with OpenClaw, I wanted a simple way to connect it with apps people actually use every day. That’s when I decided to link it with WhatsApp and Telegram.
At first, it felt a bit confusing, especially figuring out how APIs and messaging flows come together. But once I got it working, everything started to make sense, it opened up so many possibilities.
I’m going to tell you exactly how I did it, so you can set it up for yourself much faster.
I’ll share a step-by-step guide on how I connected OpenClaw to both WhatsApp and Telegram, using clear and easy instructions that you can follow along with.
I’ll also explain how OpenClaw works with APIs, so you understand what’s happening.
So, let’s get started!
What Is OpenClaw and Why Messaging Integration Matters?
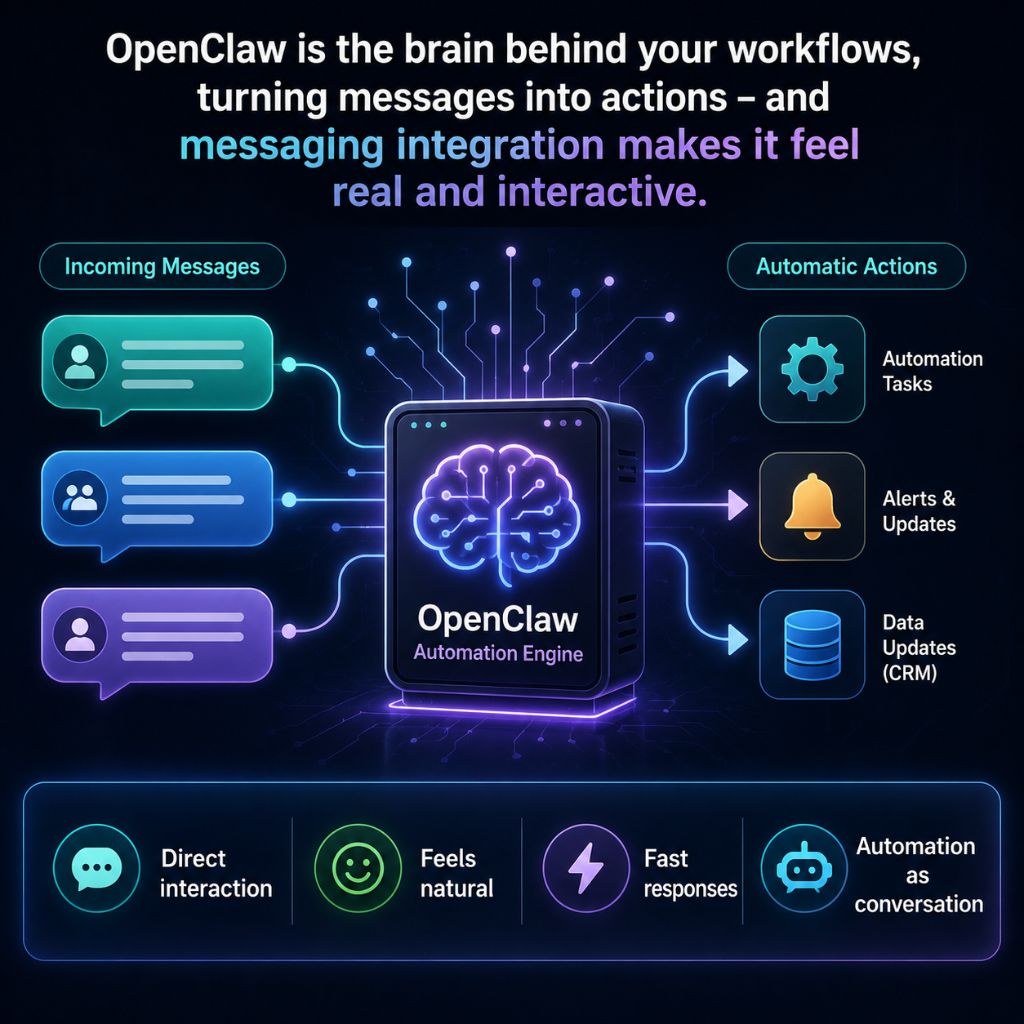
OpenClaw is a platform that helps you connect different services and automate how they work together. It allows you to take incoming data (like messages), apply logic to it, and then trigger actions automatically. It acts like the brain behind your workflows.
Actually I was looking for a way to connect different tools I was using. I had messages coming from one place and actions I wanted to trigger automatically.
That’s when I came across OpenClaw.
At first, I didn’t fully understand what it could do, but once I began testing it, I saw how it could take an input (like a message) and turn it into an action instantly.
Now, let’s talk about why messaging integration is such a big deal. When I connected OpenClaw to messaging platforms, everything changed.
It suddenly became more real, more direct, and way more useful. Instead of systems talking in the background, I was now interacting with real users in real time.
Here’s why messaging integration matters so much:
- It creates direct interaction: Instead of users going through multiple steps, they can just send a message and get a response instantly.
- It feels natural to users: Messaging is something people are already comfortable with, so there’s no learning curve.
- It brings speed to communication: Responses happen almost immediately, which keeps users engaged and satisfied.
- It turns automation into conversation: Rather than running tasks silently, your system can now “talk” and respond like a real assistant.
- It makes your setup actually useful in daily life: From handling queries to sending updates, messaging integration turns your workflow into something people can interact with anytime.
How OpenClaw Works with APIs for Messaging Automation?
When people hear about automation, it can sound complicated, but tools like OpenClaw make it feel surprisingly simple.
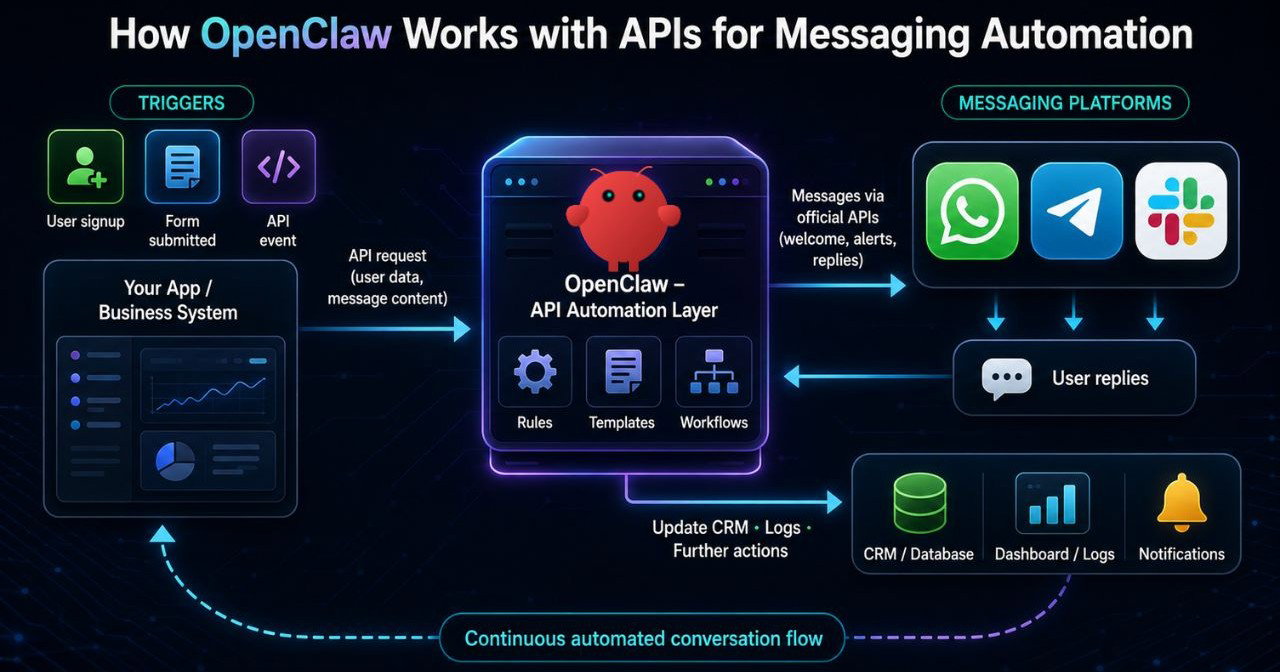
Think of OpenClaw as a smart middle layer that sits between your system and messaging platforms like WhatsApp, Telegram, or Slack. Instead of manually sending messages or replies, OpenClaw uses APIs (Application Programming Interfaces) to connect everything together.
This allows your app or business system to automatically send, receive, and respond to messages in real time, saving effort and keeping communication smooth.
Here’s a simple step-by-step explanation:
- API Connection Setup: OpenClaw connects to messaging platforms using their official APIs. These APIs act like bridges that allow OpenClaw to send and receive messages securely.
- Trigger Events: An action happens in your system, like a user signing up or submitting a form. This event becomes the trigger for automation.
- Request Sent to OpenClaw: Your system sends an API request to OpenClaw with details (like user name or message content).
- Processing the Data: OpenClaw reads the request and decides what to do next. It can apply rules, templates, or workflows you have already set.
- Message Creation: Based on the workflow, OpenClaw prepares the message, this could be a welcome message, alert, reminder, or reply.
- Sending via Messaging API: OpenClaw sends the message through the platform’s API (for example, WhatsApp API), delivering it instantly to the user.
- Receiving Replies: When a user replies, the message is sent back to OpenClaw through the API.
- Automated Response Handling: OpenClaw can automatically respond based on keywords, flows, or logic you’ve defined, like a chatbot.
- Integration with Other Systems: It can also pass data to CRMs, databases, or other tools for further action (like updating user status).
- Loop: The process keeps running, creating a smooth, automated conversation flow between your system and users.
This way, OpenClaw turns APIs into a powerful communication engine, helping businesses respond faster, stay consistent, and handle large volumes of messages with ease.
Requirements Before Connecting OpenClaw to WhatsApp and Telegram
It’s really important to get a few things ready first before connecting OpenClaw to Whatsapp and Telegram. Think of this like setting up your tools before starting work, once everything is in place, the actual connection process becomes super quick and smooth (you can literally finish it in around 10 minutes).
In this section, I’ll tell you all the basic requirements you need so you don’t get stuck in the middle of the setup and can connect everything in one go.
- OpenClaw Installed: You must have OpenClaw installed on your system or server.
- Node.js Installed (Important for WhatsApp): Install Node.js (version 18 or higher) on your system.
- Dedicated WhatsApp Number: Use a separate phone number (not your personal one).
- WhatsApp Access on Your Phone: You need the WhatsApp mobile app installed.
- Telegram Account: You must have a Telegram account.
- Telegram Bot Token (from BotFather): Open Telegram and search for BotFather >> Create a new bot using /newbot >> Copy the API token you receive.
- Basic Configuration File Access: You should be able to edit the OpenClaw config file (openclaw.json).
- Internet Connection & Server Access: A stable internet connection is required >> Make sure you have full root access to your VPS server
- Phone Numbers in Correct Format: Numbers should be in international format, like +1 8018953014.
- Basic Understanding of Commands: You should be comfortable running simple terminal commands like: openclaw channels login
Once you have all these things ready, the actual connection process becomes very quick and smooth. In the next step, you can directly connect OpenClaw to WhatsApp and Telegram and start sending automated messages almost instantly.
How to Connect OpenClaw to Telegram (Step-by-Step Guide)
I’ve connected OpenClaw to Telegram many times, and honestly, once you understand the flow, it’s a quick 5 to 10 minute setup. Below, I’ll tell you the exact steps I follow.
Just go step by step and you’ll have your OpenClaw bot running on Telegram smoothly.
Step 1: Create Your Telegram Bot
This is where everything begins.
- Open Telegram >> Search for @BotFather (official Telegram bot) >> Start the chat
- Send: /newbot >> Enter: A name (anything you like) >> A username (must end with bot)
- You get a Bot Token (very important)
Example token: 123456789:ABCdefGHIjklMNOpqrsTUVwxyz
Save this token safely! It’s like your bot’s password.
Step 2: Get Your Telegram User ID
You need this so OpenClaw knows who is allowed to use the bot.
Search for @userinfobot in Telegram >> Send any message >> Copy your numeric user ID
Example: 123456789
This will be used later for access control.
Step 3: Configure OpenClaw with Telegram
Now connect your bot to OpenClaw.
Option A: Using Command Line
Run this command in your OpenClaw setup:
openclaw config set channels.telegram.bottoken YOUR_TOKEN
(Replace YOUR_TOKEN with your actual bot token.)
Option B: Manual Config (JSON)
Open your OpenClaw config file and add:
"channels": { "telegram": { "botToken": "YOUR_TOKEN", "allowFrom": ["YOUR_USER_ID"] }}- botToken >> from BotFather
- allowFrom >> your Telegram user ID
This step connects Telegram with your OpenClaw agent.
Step 4: Restart OpenClaw Gateway
After saving the config: openclaw gateway restart
OpenClaw loads Telegram integration >> You’ll see something like: [channel:telegram] connected
This confirms everything is working.
Step 5: Start Chatting with Your Bot
Now go back to Telegram >> Search your bot username >> Open chat >> Click Start or send a message like: hello
Step 6: Complete Pairing (Important Step)
The first time you message: OpenClaw may send a pairing code
- Go to your OpenClaw terminal/dashboard >> Approve the pairing
- Once done: Your Telegram account is linked & Your bot is fully active
Step 7: Test the Integration
Try sending messages like:
- “summarize today’s logs”
- “status”
- “what tasks ran today?”
Your OpenClaw agent should respond directly in Telegram >> It works just like chatting in a terminal.
| Please Note: Turn privacy OFF so the bot reads all messages What You Can Do After SetupSend commands to your AIReceive alerts & reportsUpload files for processingAutomate workflows |
Telegram becomes your control panel for OpenClaw.
How to Connect OpenClaw to WhatsApp (Step-by-Step Guide)
Now that you’ve already seen how to connect OpenClaw to Telegram, it’s time to take things a step further.
In this guide, we’re going to turn WhatsApp into your personal control panel for OpenClaw. That means you’ll be able to send commands, trigger automations, and manage workflows directly from your chats, just like texting a friend.
The goal here is simple: make OpenClaw feel natural and easy to use, right from an app you already open every day.
Let’s walk through it together step by step so you can get everything running smoothly.
Step 1: Understand the Setup Flow
To connect OpenClaw with WhatsApp, you’ll need:
- A WhatsApp API provider (since WhatsApp doesn’t allow direct bot connections)
- OpenClaw running (locally or on a VPS)
- A webhook URL from OpenClaw
Step 2: Choose a WhatsApp API Provider
WhatsApp doesn’t allow direct bot integration, so you’ll need a bridge service.
Popular options include: Meta WhatsApp Cloud API
For beginners, Meta WhatsApp Cloud API is usually easier to start with.
Step 3: Set Up WhatsApp Business API
Option A: Using Meta (Recommended)
- Go to Meta for Developers >> Create an app >> Add WhatsApp product
- Get: Phone Number ID, Access Token & WhatsApp Business Account ID >> Add a test phone number (your own)
Option B: Using Twilio
- Create a Twilio account >> Go to Messaging >> Try WhatsApp
- Join the sandbox using the given code >> Then Copy: Account SID, Auth Token & Sandbox number
Step 4: Get Your OpenClaw Webhook URL
Now go to your OpenClaw setup >> Start OpenClaw server (VPS server) >> Find or create a webhook endpoint (example): http://your-server-ip:3000/webhook/whatsapp
- If you’re using a local machine (which we won’t suggest you to do)
- Use a tool like ngrok to expose it: ngrok http 3000 >> This will give you a public URL like: https://abc123.ngrok.io/webhook/whatsapp
Step 5: Configure Webhook in WhatsApp API
- For Meta >> Go to Webhooks section >> Add your OpenClaw webhook URL >> Verify the token (set same token in OpenClaw config) >> Subscribe to: messages & message_status
- For Twilio >> Go to WhatsApp Sandbox settings >> Find “WHEN A MESSAGE COMES IN” >> Paste your OpenClaw webhook URL >> Save
Step 6: Connect OpenClaw Logic
Now you need to tell OpenClaw how to handle incoming messages.
Inside OpenClaw >> Create a handler for WhatsApp messages >> Parse incoming JSON >> Extract:
Sender number & Message text
Step 7: Send Messages Back to WhatsApp
Now configure outgoing messages.
- Using API (Example concept): Use provider API to send replies >> Attach: Recipient number & Message text
- OpenClaw will act as the brain >> Reads incoming message >> Decides response >> Sends reply via API
Step 8: Test the Connection
- Open WhatsApp >> Send a message to your bot number >> Check: OpenClaw logs & API provider logs
- You should see >> Message received >> Processed by OpenClaw >> Reply sent back
Step 9: Move to Production (This step is Optional)
Once everything works:
- Replace test number with real WhatsApp Business number >> Verify your business >> Deploy OpenClaw on VPS >> Secure your webhook (HTTPS + auth)
Once this setup is complete, WhatsApp becomes more than just a messaging app, it turns into a powerful command center for OpenClaw. You can control automations and even build smart assistants, all through simple chat messages.
Take it step by step, test along the way, and you’ll have everything up and running faster than you might expect.
WhatsApp API vs Third Party Services: What You Should Choose
When you’re connecting OpenClaw to WhatsApp, one of the biggest decisions you’ll face is which one to choose between the official WhatsApp API and third-party services.
At first, both seem the same thing, they help you send and receive messages, but the way they work, the level of control they offer and how easy they are to set up can feel very different.
So the important question isn’t just which one works, but which one fits your workflow better.
The official WhatsApp Business API (now commonly accessed through the WhatsApp Cloud API) gives you direct access to WhatsApp’s infrastructure and on the other hand, 3rd-party platforms act as a bridge. They simplify the setup and add extra features.
To understand it in much easier manner, below we’ve added a table to get you a proper idea:
| On What Basis | WhatsApp Business API | Third Party Services |
| Control & Flexibility | Full control over workflows, automation, and OpenClaw logic | Limited control, depends on platform features |
| Ease of Setup | More technical setup (webhooks, tokens, verification) | Beginner-friendly with dashboards and guided setup |
| Cost Structure | Pay per conversation (direct pricing from Meta) | Extra platform fees added on top |
| Features & Tools | Basic messaging features (you build everything yourself) | Pre-built tools like chatbots, analytics, automation |
| Scalability | Highly scalable and stable (direct connection to Meta) | Depends on provider reliability and limits |
As far as my analysis is concerned:
- Go with the official API when you want full control and better long-term value
- Go with third-party services when you want quick setup and ready-made features
How to Build Automation Workflows with OpenClaw
When I built an automation workflow with OpenClaw, it felt like giving clear instructions to a very fast assistant. Once I understood how messages, triggers and actions connect, everything started to click.
Instead of switching between tools and doing repetitive tasks manually, I could just define a flow once and let OpenClaw handle it every time.
That’s exactly what I want to help you do here, build your own workflows step by step so they actually work the way you want.
Step 1: Start with a Clear AIM
Before touching OpenClaw, decide what you want the workflow to do.
For example:
- Reply automatically to messages
- Trigger a task from WhatsApp command
- Fetch data from an API and send results
I keep it simple at first.
Step 2: Define the Trigger
A trigger is what starts the workflow.
In OpenClaw, I usually use:
- Incoming message (WhatsApp / Telegram)
- API request
- Scheduled event
Example: When I receive /status on WhatsApp, start the workflow.
Step 3: Process the Input
Now, tell OpenClaw how to understand the input.
What you, means the OpenClaw, need to do is:
- Extract message text
- Identify command (/start, /help, etc.)
This step is like telling OpenClaw: Here’s what the user is asking.
Step 4: Add Logic (Conditions)
This is where the workflow becomes smart. >> Create conditions like:
- If message = /start >> Send welcome message
- If message = /status >> Fetch system info
- Else >> Send help message
OpenClaw now knows how to react differently based on input.
Step 5: Connect External APIs (Optional)
When you want more powerful workflows, connect APIs.
Example: Fetch weather data or Get server status and Pull data from a database. OpenClaw acts like a bridge between user input and external services.
Step 6: Define the Response
Now, decide what OpenClaw should send back >> A simple text reply >> A formatted message >> Data from an API
Example of the message sent by the AI agent:
Your server is running smoothly
Step 7: Chain Actions Together
Instead of stopping at one action, Connect multiple steps.
Some examples are:
- Receive command to do an action
- Check condition
- Fetch data of the required status
- Format response
- Send reply
This is where automation really excels.
Step 8: Test the Workflow
Always test before using it fully >> What you need to check is:
- Trigger working correctly, and
- Responses accurate
Send real messages and watch how OpenClaw reacts.
When I build workflows in OpenClaw, I don’t try to make things complex at once. I start small, test and then expand step by step.
That approach keeps things clear. Once you get comfortable with triggers and responses, you’ll realize you can automate almost anything.
Real Use Cases of OpenClaw with WhatsApp and Telegram
Before jumping into tools and setup, it’s important to understand who can actually use OpenClaw with WhatsApp and Telegram and more importantly, how they can use it in real life.
When I first started, I thought this kind of automation was only for developers. But that’s not true at all. I’ve seen freelancers and even content creators use it in smart ways.
The thing is that, if you send or receive messages regularly, you can automate a big part of that work. It saves time and helps you stay consistent with replies, even when you’re not actively online.
Now let me tell you some real use cases so you can clearly see how it fits into everyday work:
1. Customer Support Automation
You can use OpenClaw to handle customer support in a much smarter way by automating replies on WhatsApp and Telegram.
Instead of typing the same answers again and again, you can create pre-defined responses for common questions like pricing or business hours. So whenever someone sends a message asking about these things, the system instantly replies with the right information.
2. Lead Generation and Follow-Ups
When it comes to getting leads, you can set up OpenClaw to automatically interact with anyone who messages me.
As soon as a user starts a conversation, you can ask simple questions like their name, what they are looking for, or their requirements. All this information can be stored and used later. You can also set follow-up messages that go out after a few hours or even the next day.
3. Appointment Booking System
You can turn WhatsApp into a simple booking system using OpenClaw.
When a user sends a message like “Book appointment,” the AI agent can guide them step by step, asking for their preferred date and time, and then confirming the booking. It feels like a virtual assistant handling tasks for me all the time.
This is useful for services like coaching or any business that depends on appointments, because it removes the need for back-to-back messaging.
4. Content or Update Broadcasting
With OpenClaw, you can easily stay connected with your audience by sending updates and content in bulk. Instead of messaging people one by one, you can broadcast messages to multiple users at once.
This includes daily tips, new blog posts, product updates or special offers. It helps to keep the audience engaged regularly. I like this because it makes communication consistent.
5. E-commerce Order Updates
If you’re running an online store, OpenClaw can take care of sending important order updates automatically. Once a customer places an order, they can instantly receive a confirmation message.
As the order progresses, you can send shipping updates and delivery notifications without doing anything manually. This keeps customers informed at every step and builds trust.
At the same time, it reduces your workload since you don’t have to message each customer about their order status.
Common Mistakes to Avoid During Setup
When I first connected OpenClaw with WhatsApp, I got into some setup problems in the beginning. Even a minor configuration issue can stop the bot from responding properly.
That’s why I always recommend double-checking every setting during the setup process instead of rushing through it.
A smooth integration depends on proper API configuration, correct webhook setup, stable hosting and secure authentication details. By avoiding a few common mistakes from the start, you can save hours of troubleshooting and make your OpenClaw automation run smoothly.
Mistakes You Should Avoid !!!
- Using incorrect API keys or bot tokens during integration
- Forgetting to enable webhooks properly for Telegram or WhatsApp
- Hosting OpenClaw on low-performance servers (Go for YouStable OpenClaw VPS servers)
- Ignoring SSL certificates, which can break webhook connections
- Not testing message delivery before going live
- Skipping firewall and security configurations on the VPS
Performance, Limits, and Best Practices
I always pay attention to how the AI agent performs in real situations, what limitations come with it and how I can set things up in a smart way.
This helps me keep everything smooth and avoid unexpected issues later.
Performance
In day-to-day use, OpenClaw performs best when the workflows are simple and well-structured. Messages are delivered quickly, and responses feel almost instant when the setup is clean.
I notice that performance stays consistent when I keep my automations focused, like separate flows for support, instead of mixing everything into one complex chain.
Limits
Like any messaging automation system, there are a few practical limits I need to keep in mind. Very large message volumes at once can slow down processing or cause delays. Complex workflows with too many branching conditions can also become harder to manage and troubleshoot.
Another point is that external platform restrictions (from WhatsApp or Telegram) can affect message delivery patterns, especially when sending bulk messages too quickly.
Best Practices
Over time, I’ve learned a few habits that make everything work more smoothly:
- Keep workflows simple and split them into clear use cases
- Use short and clear message templates for faster replies
- Test each automation step before going live
- Avoid sending too many messages in a short time span
Security and Data Handling While Using Messaging APIs
When I connect messaging systems through OpenClaw, one thing I see is how data is handled and protected during the entire flow.
Since messages often include personal details, customer queries, or business information, keeping everything secure becomes a core part of the setup. A safe configuration protects data and builds trust with users who interact with my automation.
Here’s how security and data handling typically work while using messaging APIs with OpenClaw:
1. API Authentication Control
Every connection between OpenClaw and messaging platforms runs through secure API keys or tokens. These things act like a gatekeeper, allowing only verified requests to pass through. I always make sure these keys are stored securely and never exposed in public code.
2. Limited Data Access
OpenClaw only processes the data needed for automation tasks such as sending replies or triggering workflows. I keep data scope minimal so unnecessary personal details are not stored or processed longer than required.
3. Webhook Security Layer
When incoming messages trigger automation, webhooks are used. These endpoints are secured using verification checks so only genuine platform requests are accepted. This prevents fake or unauthorized triggers from entering the system.
4. Role-Based Access Control
Access inside the OpenClaw setup can be restricted based on roles. This means only authorized users can change workflows, view sensitive logs, or modify API settings, reducing the risk of accidental or unwanted changes.
5. Rate Limiting and Abuse Protection
To prevent misuse, API calls are often limited in frequency. This helps protect the system from spam-like behavior, overload attempts, or unexpected traffic spikes.
6. Encrypted Data Transfer
Messages exchanged between OpenClaw and platforms like WhatsApp or Telegram move through encrypted channels (HTTPS). This ensures that any data sent or received stays protected during transit and cannot be easily intercepted.
Together, these layers create a safer workflow where messaging automation through OpenClaw stays reliable and controlled, while still allowing smooth communication across WhatsApp and Telegram.
Troubleshooting Common Integration Issues
While connecting OpenClaw to WhatsApp and Telegram, I encountered several integration challenges that affected bot performance and message delivery.
To ensure smooth communication between the platforms, I carefully monitored the setup process, tested API connections as well. By troubleshooting each problem step by step, I improved the overall stability of the integration system.
- I verified API keys and authentication credentials to avoid connection failures.
- I fixed webhook and callback URL issues for proper message synchronization.
- I checked bot permissions and platform settings to ensure smooth functionality.
- I tested real-time message delivery and response timing on both platforms.
FAQs
Is OpenClaw WhatsApp Integration Free?
Yes, absolutely it is! OpenClaw WhatsApp integration is free. It allows basic integration and later you can upgrade based on business needs. This helps businesses automate customer communication as well.
Telegram or WhatsApp: Which Is Easier?
Telegram is easier to integrate with OpenClaw because it offers a simpler bot setup process and flexible API access. WhatsApp integration, on the other hand, may require additional verification and API approvals, which can take more time.
Do I Need Coding to Connect OpenClaw?
No, you do not need any coding experience to connect to OpenClaw. Basic OpenClaw integrations can be completed without advanced coding knowledge by using guided setup tools, plugins, or API documentation.
Can OpenClaw Send Auto Replies Easily?
Yes, OpenClaw can send automated replies easily on both WhatsApp and Telegram once the bot rules and workflows are properly configured. Users can set instant responses for customer queries, greetings, support messages, and FAQs.
Conclusion
As you can see, I have explained how to connect OpenClaw to both WhatsApp and Telegram in a simple and step-by-step manner. I discussed the complete integration process, including the basic setup, API connections, and bot configuration needed to get everything running smoothly.
Along with the setup steps, I also covered the common issues users may face during integration, such as authentication errors, webhook problems, delayed responses, and permission-related challenges. To make the process easier for beginners and businesses,
I also shared troubleshooting methods to solve these common integration issues quickly and effectively.
By following the steps carefully, you can successfully integrate OpenClaw with WhatsApp and Telegram and create a seamless communication experience for your users.