
To set up CI/CD on a Linux server, create a secure deploy user, install a CI engine (GitHub Actions self hosted runner, GitLab Runner, or Jenkins), configure SSH and environment secrets, write a pipeline file to build/test/package (often with Docker), and deploy behind Nginx with SSL, health checks, and rollbacks.
If you want to set up CI/CD on a Linux server, this guide walks you through a modern, secure, and beginner-friendly process. We’ll cover architecture choices (GitHub Actions, GitLab CI, Jenkins), step-by-step installation on Ubuntu, sample pipelines, zero-downtime deployments, SSL, and best practices I’ve honed across real-world hosting environments.
What is CI/CD and Why Do it on a Linux Server?
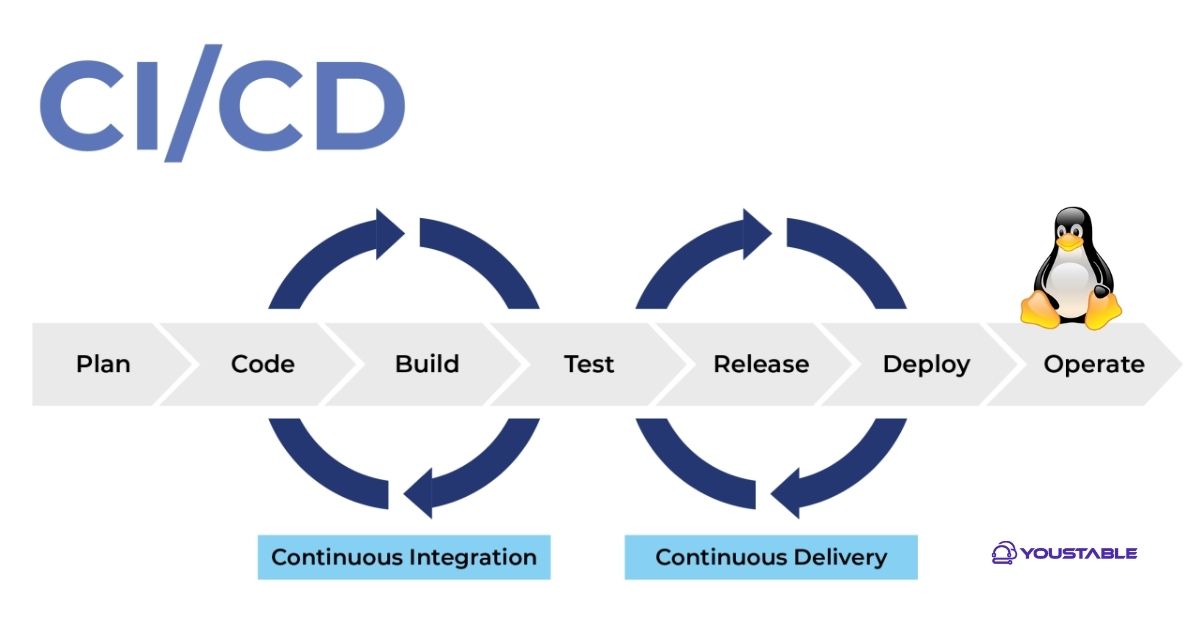
CI/CD stands for Continuous Integration and Continuous Delivery/Deployment. CI automates building and testing on every commit. CD automates packaging and releasing to your environments. Running CI/CD on your own Linux server gives you control, compliance, speed, and cost-efficiency—especially when paired with Docker and a lean reverse proxy like Nginx.
CI vs. CD vs. Deployment
– CI: compile, lint, unit/integration test.
– CD: package artifact (Docker image, zip), prepare release, run migrations.
– Deployment: push to production, swap traffic, verify health, and roll back if needed.
Prerequisites and Architecture Options
Primary keyword focus: how to set up CI/CD on a Linux server. We’ll assume Ubuntu 22.04+, SSH access, a domain, and sudo privileges. Your code lives on GitHub or GitLab. Choose one of three common patterns:
Option A: GitHub Actions Self-Hosted Runner (Simple and Popular)
Install a GitHub Actions runner directly on your Linux server. Your workflows run locally (“runs-on: self-hosted”), which makes deployments as easy as running Docker or systemd commands. Great for small to mid-size teams.
Option B: GitLab Runner (Shell or Docker Executor)
If your repos are on GitLab, install a GitLab Runner with the shell or Docker executor. The runner pulls your project and executes your .gitlab-ci.yml stages for build, test, and deploy.
Option C: Jenkins (Maximum Flexibility)
Jenkins gives deep customization, plugins, and agent-based scaling. It takes more setup and maintenance but is ideal for complex pipelines and on-prem standards.
Step-by-Step: Set Up CI/CD on a Linux Server (Ubuntu)
1) Create a Non-Root Deploy User, SSH Keys, and Basic Firewall
Always run CI/CD tasks as a non-root user and restrict SSH. Set up UFW for basic protection.
sudo adduser deploy
sudo usermod -aG sudo,adm deploy

# SSH hardening (optional but recommended)
sudo -u deploy mkdir -p /home/deploy/.ssh
sudo -u deploy chmod 700 /home/deploy/.ssh
sudo -u deploy ssh-keygen -t ed25519 -C "ci@server" -f /home/deploy/.ssh/id_ed25519

# Firewall
sudo ufw allow OpenSSH
sudo ufw allow "Nginx Full"
sudo ufw enable
2) Install Core Dependencies: Git, Docker, Docker Compose, Nginx
Docker simplifies packaging and rollbacks. Nginx serves as the reverse proxy with SSL.
sudo apt update && sudo apt upgrade -y
sudo apt install -y git ca-certificates curl gnupg lsb-release nginx

# Docker + Compose v2
curl -fsSL https://get.docker.com | sudo sh
sudo usermod -aG docker deploy
# log out/in to apply docker group

docker --version
docker compose version
3) Install Your CI Engine (Choose One)
We’ll show GitHub Actions runner in full, with brief notes for GitLab and Jenkins.
GitHub Actions: Self-Hosted Runner
In your GitHub repo: Settings → Actions → Runners → New self-hosted runner → Linux. Follow the commands provided by GitHub (similar to below). Run as your deploy user.
# As 'deploy' user
mkdir -p ~/actions-runner && cd ~/actions-runner
curl -o actions-runner.tar.gz -L https://github.com/actions/runner/releases/latest/download/actions-runner-linux-x64-2.317.0.tar.gz
tar xzf actions-runner.tar.gz

# Replace URL and TOKEN with values from GitHub
./config.sh --url https://github.com/OWNER/REPO --token YOUR_TOKEN --labels linux,x64,self-hosted
sudo ./svc.sh install
sudo ./svc.sh start
Create .github/workflows/ci-cd.yml in your repo. Use “runs-on: self-hosted”.
name: CI/CD on Linux Server

on:
  push:
    branches: [ "main" ]

jobs:
  build-test-deploy:
    runs-on: self-hosted
    steps:
      - name: Checkout
        uses: actions/checkout@v4

      - name: Set up Node
        uses: actions/setup-node@v4
        with:
          node-version: "20"

      - name: Install & Test
        run: |
          npm ci
          npm test --if-present

      - name: Build Docker image
        run: |
          docker build -t myapp:latest .

      - name: Deploy container
        env:
          APP_ENV: production
        run: |
          docker stop myapp || true
          docker rm myapp || true
          docker run -d --name myapp --restart=always \
            -e NODE_ENV=$APP_ENV -p 127.0.0.1:3000:3000 myapp:latest

      - name: Health check
        run: |
          curl -fsS http://127.0.0.1:3000/health || (echo "Health check failed" && exit 1)
GitLab Runner (Alternative)
Install GitLab Runner and register it to your project with the shell executor, then create .gitlab-ci.yml. The runner executes build, test, and deploy commands on your server.
curl -L https://packages.gitlab.com/install/repositories/runner/gitlab-runner/script.deb.sh | sudo bash
sudo apt install -y gitlab-runner
sudo gitlab-runner register
# Provide GitLab URL, token, description, tags, and choose 'shell' or 'docker'
Jenkins (Alternative)
Install Jenkins, then create a Pipeline job with a Jenkinsfile. Use a local agent or Docker for builds.
wget -q -O - https://pkg.jenkins.io/debian-stable/jenkins.io.key | sudo tee \
  /usr/share/keyrings/jenkins-keyring.asc > /dev/null
echo deb [signed-by=/usr/share/keyrings/jenkins-keyring.asc] \
  https://pkg.jenkins.io/debian-stable binary/ | sudo tee \
  /etc/apt/sources.list.d/jenkins.list > /dev/null
sudo apt update && sudo apt install -y openjdk-17-jre jenkins
sudo systemctl enable --now jenkins
Example Jenkinsfile:
pipeline {
  agent any
  stages {
    stage('Checkout') { steps { checkout scm } }
    stage('Build & Test') { steps { sh 'npm ci && npm test --if-present' } }
    stage('Dockerize') { steps { sh 'docker build -t myapp:latest .' } }
    stage('Deploy') {
      steps {
        sh '''
          docker stop myapp || true
          docker rm myapp || true
          docker run -d --name myapp --restart=always -p 127.0.0.1:3000:3000 myapp:latest
        '''
      }
    }
  }
}
4) Secret Management
Never hardcode secrets in code or Dockerfiles. Use:
- GitHub Actions: Repository Settings → Secrets and variables → Actions
- GitLab: Settings → CI/CD → Variables
- Jenkins: Manage Credentials
- On-server: export via systemd EnvironmentFile or docker run -e
5) Sample Dockerfile (Node.js Example)
FROM node:20-alpine
WORKDIR /app
COPY package*.json .
RUN npm ci --omit=dev
COPY . .
EXPOSE 3000
HEALTHCHECK --interval=30s --timeout=3s CMD wget -qO- http://127.0.0.1:3000/health || exit 1
CMD ["node", "server.js"]
6) Systemd Autostart with Docker Compose (Optional)
If you prefer Docker Compose and boot-time restart, create a systemd service that calls it.
# /etc/systemd/system/myapp.service
[Unit]
Description=MyApp via Docker Compose
After=network-online.target docker.service
Wants=network-online.target

[Service]
User=deploy
WorkingDirectory=/home/deploy/myapp
ExecStart=/usr/bin/docker compose up -d
ExecStop=/usr/bin/docker compose down
Restart=always

[Install]
WantedBy=multi-user.target
Enable and start it:
sudo systemctl daemon-reload
sudo systemctl enable --now myapp
7) Nginx Reverse Proxy and Free SSL
Point your domain’s A record to the server IP. Then proxy traffic to 127.0.0.1:3000 and secure with Let’s Encrypt.
# /etc/nginx/sites-available/myapp.conf
server {
  server_name example.com www.example.com;
  listen 80;
  location / {
    proxy_pass http://127.0.0.1:3000;
    proxy_set_header Host $host;
    proxy_set_header X-Forwarded-For $remote_addr;
    proxy_set_header X-Forwarded-Proto $scheme;
  }
}
sudo ln -s /etc/nginx/sites-available/myapp.conf /etc/nginx/sites-enabled/
sudo nginx -t && sudo systemctl reload nginx
# Install certbot and request SSL
sudo apt install -y certbot python3-certbot-nginx
sudo certbot --nginx -d example.com -d www.example.com --redirect8) Observability, Logs, and Rollbacks
Confirm deployments with health checks and logs. Keep at least one previous image for rollbacks.
- Logs: docker logs -f myapp, journalctl -u myapp, nginx error/access logs
- Rollback: tag known-good images, or docker run previous tag
- Monitoring: Uptime checks, alerts, and resource graphs
Best Practices for Fast, Secure CI/CD
- Use a dedicated deploy user; disable root SSH; enable UFW.
- Cache dependencies in CI to speed up builds.
- Pin Docker base images and package versions for reproducibility.
- Run tests in parallel when possible; keep pipelines under 10 minutes.
- Store secrets in CI vaults; never commit .env files.
- Use labels and taints on runners to isolate sensitive workloads.
- Automate database migrations with a pre-traffic step; include a rollback plan.
- Regularly prune old images and containers to free disk space.
Common Errors and Quick Fixes
- Permission denied for Docker: add user to docker group and re-login.
- Host key verification failed: pre-populate known_hosts or use StrictHostKeyChecking=no for first run.
- Runner not executing: ensure service is active and labels match in your workflow.
- Port conflicts: map container to 127.0.0.1 only and use Nginx for public access.
- Out of disk space: docker system prune -af and rotate logs.
Cost and Sizing: How Big Should Your Server Be?
Start with 2 vCPU, 4 GB RAM, and 40–80 GB NVMe for small apps. Add more CPU for parallel builds, RAM for Java/Node builds, and disk for Docker layers and logs. If you want predictable performance, a Linux VPS with NVMe storage from a reliable host like YouStable is a cost-effective baseline for CI/CD runners and app workloads.
When to Consider Managed CI/CD or Kubernetes
Use managed runners or Kubernetes when you need autoscaling, multi-region deployments, or hard isolation between teams. If you’re not ready to maintain clusters, a managed VPS with proactive security and snapshots (offered by providers like YouStable) lets you scale confidently without heavy DevOps overhead.
Real-World Example Flow
- Developer pushes to main.
- Runner checks out code, installs dependencies, runs tests and linters.
- Pipeline builds a Docker image and runs a container locally.
- Health check passes; Nginx continues routing to the updated container.
- If health check fails, pipeline exits and previous image is relaunched.
FAQs: CI/CD on Linux Server
What’s the easiest way to set up CI/CD on a Linux server?
Use a GitHub Actions self-hosted runner or GitLab Runner on the same server that hosts your app. Your pipeline runs locally, can build a Docker image, restart the container, and verify health behind Nginx and SSL. It’s simple, fast, and cost-effective for most teams.
Is Docker required for CI/CD?
No, but it’s highly recommended. Docker standardizes build and runtime environments, simplifies rollbacks, and makes zero-downtime deployments easier. You can still deploy with systemd services and artifacts if containers don’t fit your use case.
How do I secure secrets in my pipeline?
Store secrets in CI vaults (GitHub Actions Secrets, GitLab Variables, Jenkins Credentials) and inject them at runtime. Avoid committing .env files. Optionally, use an external secret manager (e.g., HashiCorp Vault) for centralized control and auditing.
Can I achieve zero-downtime deployments?
Yes. Run blue/green containers with different tags or ports, warm up the new version, pass health checks, then switch the Nginx upstream. If health fails, keep the old container running. Tools like Docker Compose or Traefik can simplify this pattern.
What hosting do you recommend for CI/CD runners?
Choose NVMe-backed Linux VPS with predictable CPU and strong network. At YouStable, we provide performance-optimized VPS and managed servers ideal for self-hosted CI/CD, complete with quick scaling, snapshots, and 24/7 support—so you can focus on shipping code, not firefighting infrastructure.
Conclusion
With this step-by-step approach, you can confidently set up CI/CD on a Linux server, automate testing and delivery, and deploy securely at speed. Start simple with one runner and a Dockerized app, then iterate toward blue/green releases, observability, and autoscaling as your team grows.


