
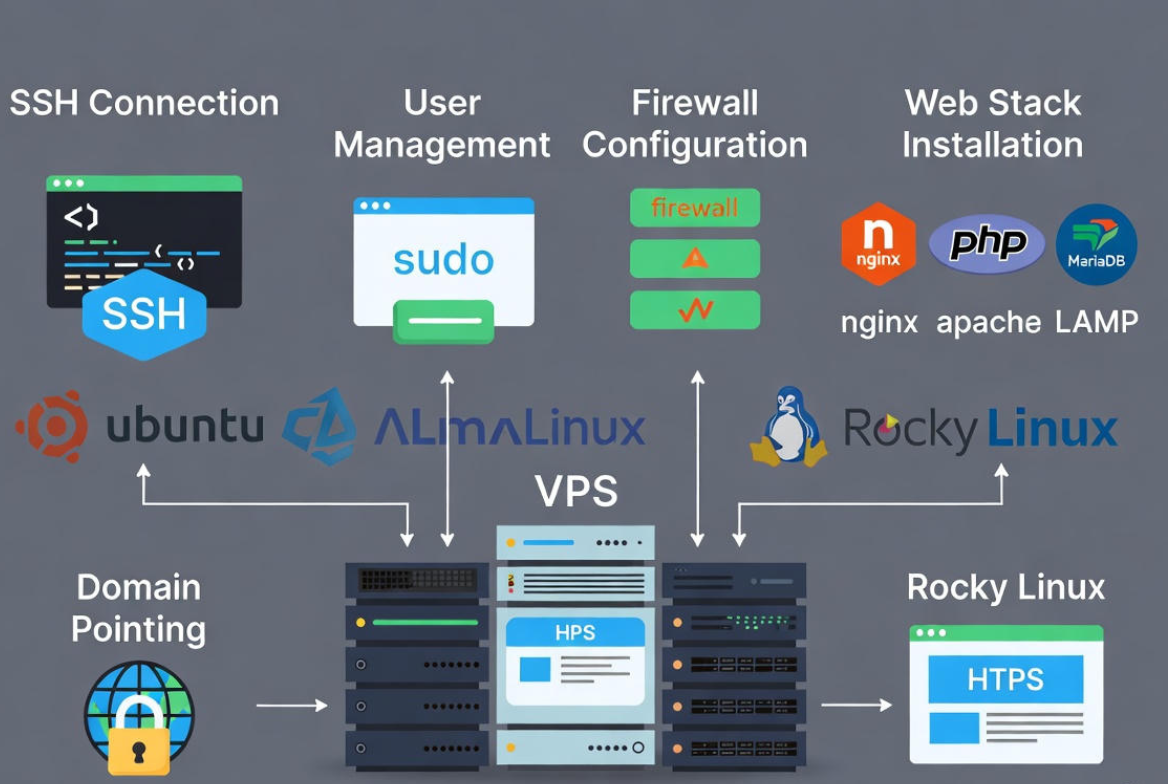
To use VPS hosting on a Linux server, choose a reliable provider, deploy a Linux distribution, and connect via SSH. Update the system, create a sudo user, enable a firewall, harden SSH, and install a web stack (Nginx/Apache, PHP, MariaDB).
Point your domain to the VPS, enable HTTPS with Let’s Encrypt, then monitor performance and schedule backups.
Getting started with VPS hosting on a Linux server is easier than it looks. This guide explains how to set up, secure, and run apps or websites on a Linux VPS using SSH, a web stack (LAMP/LEMP), a firewall, SSL, and backups. Whether you’re hosting WordPress, a Node app, or an API, the steps below will set you up the right way.
What is a VPS and Why Use Linux?
A Virtual Private Server (VPS) is a virtualized machine with dedicated resources (CPU, RAM, storage) on a powerful host. Unlike shared hosting, you get root access and control over your OS, software, and security. Linux is the default choice for VPS hosting because it’s stable, secure, fast, and widely supported across stacks and frameworks.
Prerequisites and Choosing the Right VPS
Before you begin, decide on a Linux distribution (Ubuntu 22.04/24.04 LTS, Debian 12, AlmaLinux 9). Ubuntu LTS is beginner-friendly; Debian is minimal and stable; AlmaLinux/Rocky Linux mirrors RHEL for enterprise consistency. Ensure your provider offers IPv4, optional IPv6, snapshots, and firewall controls.
Minimum Specs and Use-Case Guidance
Start with at least 1 vCPU, 1–2 GB RAM, and 25–40 GB SSD for a simple WordPress site or small app. For eCommerce, multiple sites, or staging, 2–4 GB RAM and 2 vCPU are a safer baseline. For databases or Docker workloads, prioritize RAM and NVMe storage.
Control Panel vs CLI (and a Soft Recommendation)
Beginners often choose a control panel (e.g., cPanel, CyberPanel), while developers prefer CLI for full control. YouStable’s VPS plans include fast NVMe storage, root access, DDoS protection, and snapshot backups—handy whether you go with a panel or pure CLI. Pick what matches your comfort and scalability needs.
First Login and Basic Server Setup
Connect to Your VPS via SSH
From macOS/Linux, use Terminal. On Windows, use PowerShell or an SSH client. Your provider will share the server IP, root user, and initial password or SSH key.
# Replace with your server IP:
ssh root@203.0.113.10

# If using a custom SSH key
ssh -i ~/.ssh/id_ed25519 root@203.0.113.10
Update Packages and Create a Sudo User
Always update first, then avoid daily root use by creating a sudo user.
# Ubuntu/Debian
apt update && apt -y upgrade && apt -y autoremove

# AlmaLinux/Rocky
dnf -y update

# Create a sudo user (Ubuntu/Debian)
adduser devops
usermod -aG sudo devops

# AlmaLinux/Rocky: add to wheel group
useradd -m devops
passwd devops
usermod -aG wheel devops

# Test:
su - devops
sudo whoami
Set Hostname, Timezone, and Optional Swap
# Hostname and timezone
hostnamectl set-hostname web-01
timedatectl set-timezone UTC

# Optional: add swap (if RAM < 2GB or for bursty workloads)
fallocate -l 1G /swapfile
chmod 600 /swapfile
mkswap /swapfile
swapon /swapfile
cp /etc/fstab /etc/fstab.bak
echo '/swapfile none swap sw 0 0' | tee -a /etc/fstab
sysctl vm.swappiness=10
Secure Your Linux VPS (Do This Early)
Enable a Firewall (UFW or firewalld)
Open only what you need. For web servers: SSH, HTTP, and HTTPS.
# Ubuntu/Debian with UFW
apt -y install ufw
ufw default deny incoming
ufw default allow outgoing
ufw allow OpenSSH
ufw allow 80/tcp
ufw allow 443/tcp
ufw enable
ufw status

# AlmaLinux/Rocky with firewalld
dnf -y install firewalld
systemctl enable --now firewalld
firewall-cmd --permanent --add-service=ssh
firewall-cmd --permanent --add-service=http
firewall-cmd --permanent --add-service=https
firewall-cmd --reload
Harden SSH (Keys, Port, No Root Login)
Use SSH keys, disable password logins, and stop root SSH access. Always keep an active session before restarting SSH to avoid lockout.
# On your laptop: create a key pair if you don't have one
ssh-keygen -t ed25519 -C "you@example.com"

# Copy your public key to the server for the sudo user
ssh-copy-id devops@203.0.113.10

# On the server, edit SSH config
sudo nano /etc/ssh/sshd_config

# Recommended changes:
# Port 2222
# PermitRootLogin no
# PasswordAuthentication no
# PubkeyAuthentication yes

# Apply changes
sudo systemctl restart sshd
Add Fail2ban and Automatic Updates
# Ubuntu/Debian
sudo apt -y install fail2ban unattended-upgrades
sudo dpkg-reconfigure --priority=low unattended-upgrades
sudo systemctl enable --now fail2ban

# AlmaLinux/Rocky (EPEL may be required)
sudo dnf -y install epel-release fail2ban
sudo systemctl enable --now fail2ban

# Check status
sudo fail2ban-client status
Install a Web Stack: LEMP (Nginx) or LAMP (Apache)
LEMP: Nginx + PHP-FPM + MariaDB
Nginx with PHP-FPM is performant and memory-efficient. Great for WordPress, Laravel, and static sites.
# Ubuntu/Debian
sudo apt -y install nginx mariadb-server php-fpm php-mysql php-cli php-curl php-xml php-mbstring
sudo ufw allow 'Nginx Full'
sudo systemctl enable --now nginx mariadb

# Secure MariaDB
sudo mysql_secure_installation

# Create a database and user
sudo mysql -e "CREATE DATABASE appdb;"
sudo mysql -e "CREATE USER 'appuser'@'localhost' IDENTIFIED BY 'StrongP@ss!';"
sudo mysql -e "GRANT ALL PRIVILEGES ON appdb.* TO 'appuser'@'localhost'; FLUSH PRIVILEGES;"

# Optional: PHP info page
echo '<?php phpinfo(); ?>' | sudo tee /var/www/html/info.php
# Visit http://your_server_ip/info.php
LAMP: Apache + PHP + MariaDB
Apache is flexible with .htaccess and familiar to many users. Ideal if you rely on Apache modules or shared hosting workflows.
# Ubuntu/Debian
sudo apt -y install apache2 mariadb-server php php-mysql libapache2-mod-php
sudo systemctl enable --now apache2 mariadb
sudo ufw allow 'Apache Full'

# Secure MariaDB as above
sudo mysql_secure_installation
Deploy Your Site or Application
Create a Deploy User and Use SFTP/SSH
Separate deployment from administration. Use SSH keys for the deploy user and grant ownership of the web root or a project directory.
# Create deploy user and add key
sudo adduser deploy
sudo usermod -aG www-data deploy   # Ubuntu/Debian web group
sudo mkdir -p /var/www/project
sudo chown -R deploy:www-data /var/www/project

# From your local machine, upload files with SFTP:
sftp -i ~/.ssh/id_ed25519 deploy@203.0.113.10
Point Your Domain to the VPS (DNS)
At your domain registrar or DNS provider, create:
- A record: @ → your VPS IPv4 (e.g., 203.0.113.10)
- AAAA record: @ → your VPS IPv6 (if enabled)
- Optional: CNAME for www → @
Propagation typically completes within minutes to a few hours. You can verify with dig or nslookup.
Enable HTTPS with Let’s Encrypt (Certbot)
Free TLS certificates protect users and boost SEO. Install Certbot and let it configure your web server automatically.
# Ubuntu/Debian (Nginx)
sudo apt -y install certbot python3-certbot-nginx
sudo certbot --nginx -d example.com -d www.example.com

# Ubuntu/Debian (Apache)
sudo apt -y install certbot python3-certbot-apache
sudo certbot --apache -d example.com -d www.example.com

# Auto-renewal check
sudo systemctl status certbot.timer
sudo certbot renew --dry-run
Optional: Run Containers with Docker
Containers make deployments repeatable and portable. A Linux VPS is perfect for lightweight Docker workloads.
# Install Docker on Ubuntu/Debian
sudo apt -y install ca-certificates curl gnupg
sudo install -m 0755 -d /etc/apt/keyrings
curl -fsSL https://download.docker.com/linux/ubuntu/gpg | sudo gpg --dearmor -o /etc/apt/keyrings/docker.gpg
echo \
  "deb [arch=$(dpkg --print-architecture) signed-by=/etc/apt/keyrings/docker.gpg] \
  https://download.docker.com/linux/ubuntu $(. /etc/os-release && echo $VERSION_CODENAME) stable" | \
  sudo tee /etc/apt/sources.list.d/docker.list > /dev/null
sudo apt update
sudo apt -y install docker-ce docker-ce-cli containerd.io docker-buildx-plugin docker-compose-plugin
sudo usermod -aG docker devops
newgrp docker
docker run hello-world
Monitoring, Logging, and Backups
Monitor Resources and Logs
Keep an eye on CPU, RAM, disk, and network. For quick checks, use built-in tools; for deeper visibility, add lightweight agents.
- System: top, htop, vmstat, iostat, df -h, free -m
- Web server: access/error logs under /var/log/nginx/ or /var/log/apache2/
- Journals: journalctl -u nginx, journalctl -u apache2, journalctl -xe
- Security: fail2ban-client status, last, who
# Examples
sudo journalctl -u nginx --since "1 hour ago"
sudo tail -f /var/log/nginx/access.log
sudo df -h
sudo htop
Set Up Reliable Backups
Backups are non-negotiable. Use at least one onsite and one offsite copy. Schedule both file-level and database backups.
- Provider snapshots for rapid whole-server recovery
- rsync/rclone to object storage (S3-compatible) or another VPS
- mysqldump/MariaDB backups with rotation
- Encrypted archives (gpg or age) stored offsite
YouStable VPS plans include snapshot and backup options that dramatically cut recovery time after accidents, updates gone wrong, or cyber incidents.
Common Mistakes to Avoid (and Best Practices)
- Skipping updates: enable unattended upgrades and schedule maintenance windows.
- Using root for everything: create a sudo user and use SSH keys.
- Open ports everywhere: restrict via UFW/firewalld and your provider’s network firewall.
- No HTTPS: install Certbot and redirect HTTP to HTTPS.
- Weak passwords or exposed keys: rotate keys, enforce strong passphrases, and limit SSH access by IP when possible.
- No backups: test a restore quarterly and keep at least one offsite copy.
- Single point of failure: for growing sites, separate database, use load balancers, or scale up the plan.
Real-World Use Cases
- WordPress or WooCommerce with Nginx, PHP-FPM, and MariaDB on Ubuntu 24.04 with automated backups.
- Laravel/Node backends reverse-proxied by Nginx with PM2 or systemd services and Let’s Encrypt SSL.
- Dockerized microservices on a single VPS, using Docker Compose and UFW to expose only required ports.
- Static sites served by Nginx with HTTP/2 and brotli, deployed via GitHub Actions over SSH.
When to Upgrade or Scale
- CPU pegged >80% for sustained periods
- RAM consistently >80% with swapping
- Disk I/O waits impacting response times
- Traffic spikes causing timeouts or 502/504 errors
Upgrading to a higher-tier YouStable VPS with more vCPU/RAM or moving to a load-balanced setup can stabilize performance and protect user experience.
FAQs:
Is a Linux VPS good for beginners?
Yes. With a provider that offers quick OS images and a basic firewall, a Linux VPS is beginner-friendly. Use Ubuntu LTS, follow the steps here (SSH keys, UFW, web stack, SSL), and consider a panel if you prefer a GUI. YouStable’s VPS options suit both CLI and panel users.
Which Linux distro is best for VPS hosting?
Ubuntu LTS is the most approachable and widely documented. Debian is lean and stable for minimalists. AlmaLinux/Rocky Linux is ideal if you want a RHEL-like environment. Choose based on familiarity and application support.
How do I secure a Linux VPS quickly?
Update packages, create a sudo user, enable UFW/firewalld, add SSH keys, disable root and password authentication, change the SSH port, install Fail2ban, and enable automatic security updates. Use Let’s Encrypt for HTTPS and keep only necessary ports open.
LEMP vs LAMP: which should I choose?
LEMP (Nginx) is lightweight and fast under high concurrency. LAMP (Apache) is flexible and familiar, especially if you rely on .htaccess rules. Both run PHP and MariaDB/MySQL well; pick the stack that matches your site’s requirements and your experience
Do I need a control panel for a Linux VPS?
No, but it can help. A panel simplifies email, DNS, and multi-site hosting. If you’re comfortable with the command line, you can manage everything with SSH, systemd, Nginx/Apache configs, and Certbot. YouStable supports both workflows on its VPS plans.

