
DNS on a Linux server lets you resolve domain names to IPs and optionally host your own DNS zones. To use DNS, configure resolvers for your system (resolv.conf or systemd-resolved), install tools like dig, optionally run a caching resolver (Unbound), or deploy an authoritative server (BIND9) to host records and zones.
If you’re wondering how to use DNS on Linux server environments, this guide walks you through client-side resolution, caching resolvers, and full authoritative DNS with BIND9. You’ll learn essential commands, secure configurations, and real-world tips from production hosting scenarios so you can resolve, serve, and troubleshoot DNS confidently.
What is DNS and Why it Matters on a Linux Server?
DNS (Domain Name System) translates human-readable domains (example.com) into IP addresses. On Linux, you’ll typically deal with:
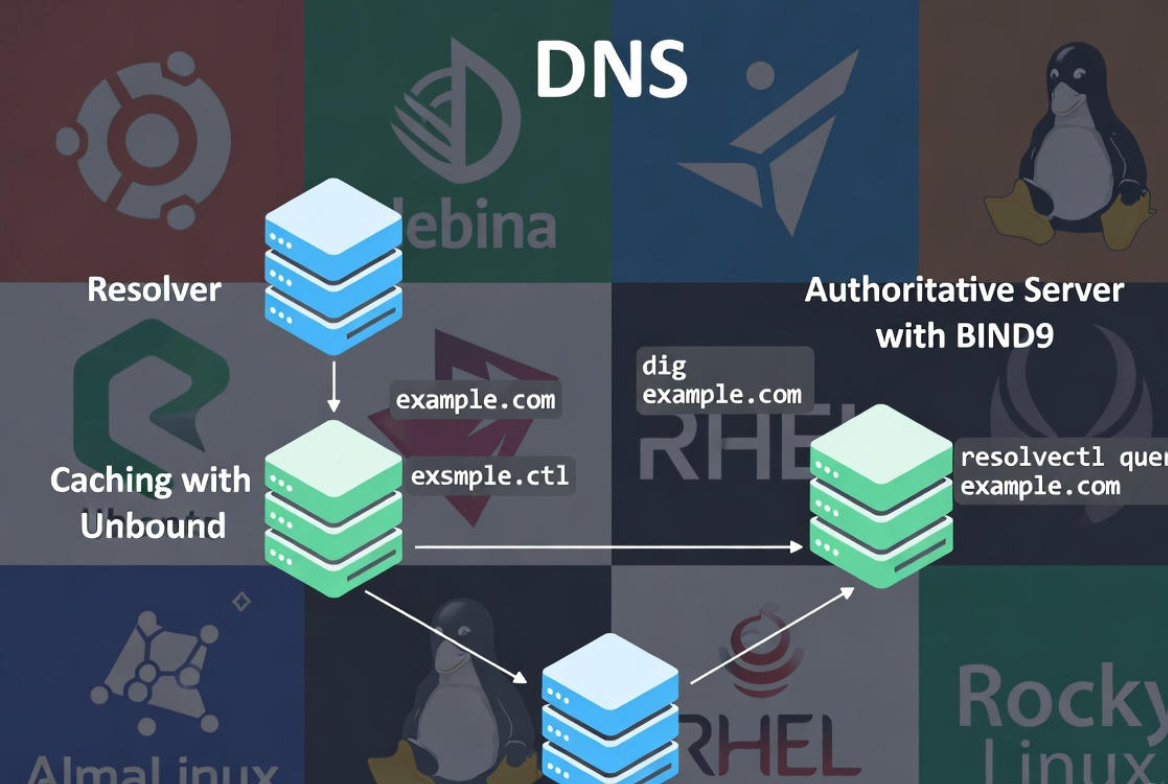
- Resolvers (clients): Your server queries upstream DNS to resolve names.
- Caching resolvers: Locally cache answers to speed lookups and reduce latency.
- Authoritative servers: Host DNS records for your domains and answer queries for those zones.
Common use cases include speeding up application lookups, providing internal name resolution for private networks, or hosting public DNS for websites and mail.
Quick Start: Use DNS on Linux as a Client
Most servers only need to query DNS. Here’s how to configure resolvers and verify resolution.
Check Your Current DNS Resolvers
Modern distributions often use systemd-resolved. Check the active configuration:
resolvectl status
cat /etc/resolv.conf
If /etc/resolv.conf is a symlink to systemd-resolved, manage DNS with resolvectl or your network stack (NetworkManager, netplan).
Set DNS Servers (Ubuntu/Debian)
On Ubuntu using netplan:
sudo nano /etc/netplan/01-netcfg.yaml
# Example snippet:
# network:
#   version: 2
#   ethernets:
#     eth0:
#       addresses: [203.0.113.10/24]
#       gateway4: 203.0.113.1
#       nameservers:
#         addresses: [1.1.1.1,8.8.8.8]

sudo netplan apply
On Debian or older Ubuntu with NetworkManager:
nmcli con mod "System eth0" ipv4.dns "1.1.1.1 8.8.8.8"
nmcli con up "System eth0"
Set DNS Servers (RHEL/CentOS/AlmaLinux/Rocky)
Using NetworkManager:
nmcli con mod eth0 ipv4.dns "9.9.9.9 1.1.1.1"
nmcli con up eth0
If you must edit /etc/resolv.conf directly (not recommended with systemd-resolved):
sudo nano /etc/resolv.conf
# Example:
# nameserver 1.1.1.1
# nameserver 8.8.8.8
Test DNS Resolution
Install tools and query:
# Debian/Ubuntu
sudo apt update && sudo apt install dnsutils -y

# RHEL family
sudo dnf install bind-utils -y

# Tests
dig example.com +short
dig A example.com @1.1.1.1 +short
nslookup example.com
getent hosts example.com
Set Up a Caching DNS Resolver
A local caching resolver reduces latency and improves reliability. Two common approaches are systemd-resolved’s cache and Unbound.
Enable systemd-resolved Caching
systemd-resolved can run a local stub at 127.0.0.53. Verify and point your system to it:
sudo systemctl enable --now systemd-resolved
resolvectl status
# Ensure /etc/resolv.conf symlinks to /run/systemd/resolve/stub-resolv.conf
Then specify upstream DNS servers (e.g., Cloudflare, Google, your ISP) via netplan or nmcli, as shown above. systemd-resolved will cache responses locally.
Install Unbound (Recommended for Advanced Caching + DNSSEC)
Unbound is a lightweight, secure recursive resolver with DNSSEC validation.
# Debian/Ubuntu
sudo apt install unbound -y

# RHEL/CentOS/Alma/Rocky
sudo dnf install unbound -y

# Basic config
sudo nano /etc/unbound/unbound.conf.d/caching.conf
# Example:
# server:
#   interface: 0.0.0.0
#   access-control: 127.0.0.0/8 allow
#   access-control: 10.0.0.0/8 allow
#   prefetch: yes
#   cache-min-ttl: 60
#   msg-cache-size: 128m
#   rrset-cache-size: 256m
#   harden-dnssec-stripped: yes
#   do-ip4: yes
#   do-ip6: no
#   hide-identity: yes
#   hide-version: yes

sudo systemctl enable --now unbound
dig @127.0.0.1 example.com +short
Point your server’s DNS to 127.0.0.1 for fast local resolution. Consider enabling DNS over TLS upstreams if required for privacy.
Configure an Authoritative DNS Server with BIND9
If you host domains, BIND9 (named) is the industry-standard authoritative DNS server on Linux. Below is a minimal, secure setup to serve a public zone.
Install BIND9
# Debian/Ubuntu
sudo apt update && sudo apt install bind9 bind9-utils -y

# RHEL family
sudo dnf install bind bind-utils -y
sudo systemctl enable --now named
BIND9 Core Configuration
Edit named.conf.options and named.conf.local (Debian/Ubuntu) or named.conf (RHEL). Disable recursion on an authoritative-only server.
# /etc/bind/named.conf.options (Debian/Ubuntu)
options {
    directory "/var/cache/bind";
    recursion no;           // Authoritative only
    allow-query { any; };
    dnssec-validation no;   // Not needed for authoritative-only
    listen-on { any; };
    listen-on-v6 { none; };
};
Create a Forward Zone
Define the zone and its zone file:
# /etc/bind/named.conf.local
zone "example.com" {
    type master;
    file "/etc/bind/zones/db.example.com";
    allow-transfer { none; }; // Adjust if using secondary servers
};
Now create the zone file with essential records:
sudo mkdir -p /etc/bind/zones
sudo nano /etc/bind/zones/db.example.com
; /etc/bind/zones/db.example.com
$TTL 3600
@   IN SOA ns1.example.com. admin.example.com. (
        2025010101 ; Serial (YYYYMMDDNN)
        3600       ; Refresh
        900        ; Retry
        1209600    ; Expire
        300 )      ; Negative Cache TTL

; NS records
@       IN NS  ns1.example.com.
@       IN NS  ns2.example.com.

; A/AAAA records
ns1     IN A   203.0.113.10
ns2     IN A   203.0.113.11
@       IN A   203.0.113.20
www     IN CNAME @

; Mail (MX) records
@       IN MX 10 mail.example.com.
mail    IN A   203.0.113.30

; TXT (SPF) example
@       IN TXT "v=spf1 a mx ~all"
Create a Reverse Zone (PTR)
Serve PTR records if you control the IP block or operate an internal DNS.
# /etc/bind/named.conf.local (add)
zone "113.0.203.in-addr.arpa" {
    type master;
    file "/etc/bind/zones/db.203.0.113";
    allow-transfer { none; };
}

# /etc/bind/zones/db.203.0.113
$TTL 3600
@   IN SOA ns1.example.com. admin.example.com. (
        2025010101 3600 900 1209600 300 )
    IN NS ns1.example.com.

10  IN PTR ns1.example.com.
11  IN PTR ns2.example.com.
20  IN PTR example.com.
30  IN PTR mail.example.com.
Validate and start:
named-checkconf
named-checkzone example.com /etc/bind/zones/db.example.com
sudo systemctl enable --now bind9
sudo systemctl restart bind9
Firewall and Public Reachability
Allow DNS (TCP/UDP 53):
# ufw
sudo ufw allow 53
# firewalld
sudo firewall-cmd --add-service=dns --permanent
sudo firewall-cmd --reload
Update your domain registrar’s nameservers to ns1.example.com and ns2.example.com, ensuring glue records exist for your hostnames.
Security Best Practices for Linux DNS
Separate Roles: Authoritative vs Recursive
Do not run open recursion on a public authoritative server. Use separate instances or views. For authoritative-only BIND, set recursion no; as shown.
Access Control and Rate Limiting
Restrict who can query recursion with ACLs and consider Response Rate Limiting (RRL) modules to mitigate abuse.
Secure Zone Transfers
Permit transfers only to known secondary servers and use TSIG keys for integrity.
DNSSEC
Enable DNSSEC validation on resolvers (e.g., Unbound) and sign zones on authoritative servers if you control the domain. Keep keys safe and automate resigning.
Troubleshooting DNS on Linux
Diagnose with dig and drill
dig example.com +trace
dig NS example.com @a.root-servers.net
dig -x 203.0.113.20 +short
drill example.com
Common Errors
- SERVFAIL: Often DNSSEC, lame delegation, or upstream timeout.
- NXDOMAIN: Record or zone does not exist.
- Timeout: Firewall blocking UDP/TCP 53, or upstream unreachable.
Check Logs and Flush Caches
# BIND logs (systemd)
journalctl -u bind9 -f
journalctl -u named -f

# systemd-resolved
journalctl -u systemd-resolved -f
resolvectl flush-caches

# Unbound
journalctl -u unbound -f
sudo unbound-control flush_zone example.com
Performance Tips
- Use a caching layer: Unbound or systemd-resolved reduces query latency.
- Tune cache: Increase rrset and message cache sizes for busy servers.
- Choose reliable upstreams: Anycast resolvers (1.1.1.1, 8.8.8.8, 9.9.9.9) or your ISP’s low-latency DNS.
- Keep TTLs realistic: Lower TTLs (e.g., 300–900s) help during migrations; raise later for fewer queries.
- Monitor: Graph query rates, cache hit ratio, and NXDOMAIN spikes to catch issues early.
When to Use Managed DNS or Hosting
Running BIND9 is powerful but adds operational overhead. For most businesses, using a reliable managed DNS or your hosting provider’s DNS panel is simpler and safer. With YouStable hosting, you get a DNS zone editor, fast global resolvers, and 24×7 support—so you can focus on your apps, not nameserver upkeep.
Essential DNS Records Cheat Sheet
- A/AAAA: Map hostname to IPv4/IPv6.
- MX: Mail exchanger for your domain.
- CNAME: Alias to another hostname.
- NS: Authoritative nameservers for a zone.
- TXT: SPF, DKIM, verification tokens.
- PTR: Reverse mapping IP to hostname.
Step-by-Step: From Zero to Working DNS
- Configure system resolvers (resolv.conf, netplan, or nmcli).
- Install tools (dig, nslookup) and test resolution.
- Optional: Deploy Unbound for a local caching resolver.
- If hosting domains: Install BIND9, create forward and reverse zones, and validate configs.
- Open firewall ports 53 (UDP/TCP), set registrar nameservers, and verify with dig +trace.
- Harden (no open recursion, ACLs), monitor logs, and implement DNSSEC where appropriate.
FAQs:
What’s the difference between a DNS resolver and an authoritative server?
A resolver queries other DNS servers to answer your lookups and often caches results. An authoritative server hosts your domain’s zone files and provides the final, official answers for records like A, MX, and NS.
Should I edit /etc/resolv.conf directly?
Only if you’re not using systemd-resolved or NetworkManager. On modern Linux, manage DNS via netplan, nmcli, or resolvectl to avoid changes being overwritten.
How do I flush DNS cache on Linux?
With systemd-resolved: resolvectl flush-caches. With Unbound: unbound-control flush <name> or flush_zone. Applications may also cache DNS; restart services if needed.
Is BIND9 the only option for authoritative DNS?
No. Alternatives include NSD, PowerDNS (authoritative), and Knot DNS. BIND9 remains common due to extensive documentation and flexibility.
When should I choose managed DNS over self-hosting?
If you need global reliability, fast propagation, and minimal maintenance, managed DNS is ideal. It reduces complexity and provides SLA-backed performance—something providers like YouStable bundle with hosting and 24×7 support.
