As per the recent reports, OpenClaw crossed 250,000 GitHub stars in 2026, and it’s not hard to see why.
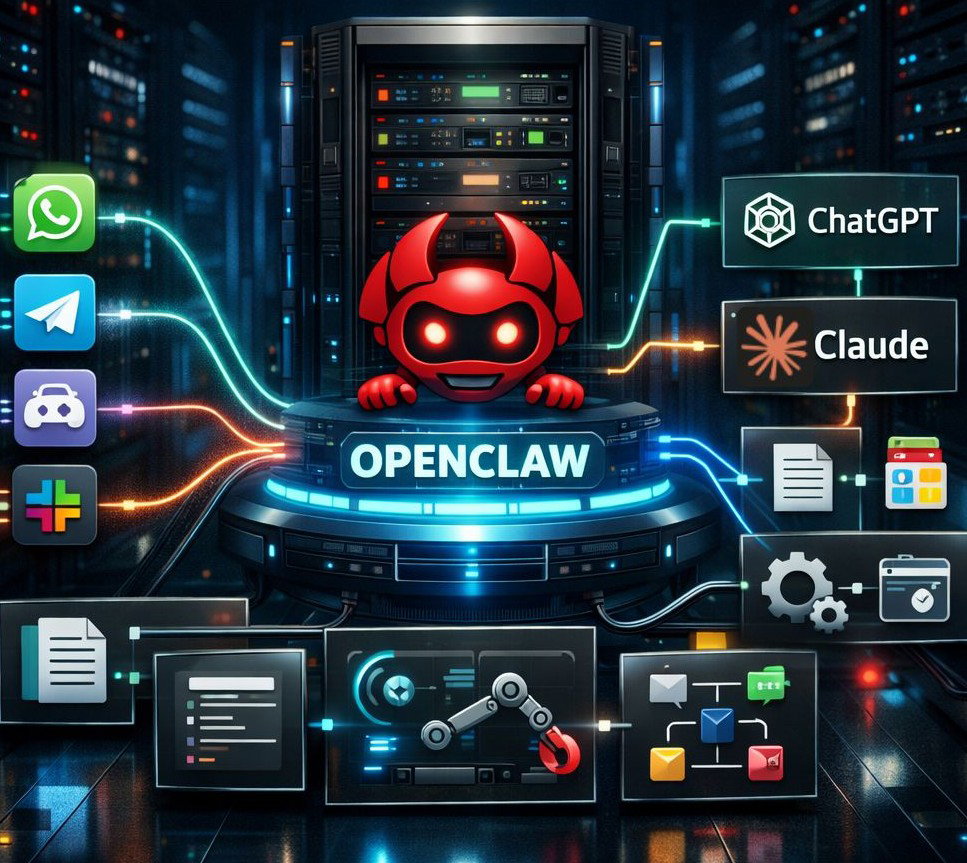
At its core, OpenClaw is a self-hosted AI assistant that runs seamlessly across platforms like WhatsApp, Telegram, Discord and Slack, all powered by your own API keys. It gives you full control over your automation and integrations, without depending on 3rd party hosted services.
If you’ve really tried running it on your local laptop, you’ve probably already hit the biggest limitation. The problem is that the moment your computer sleeps or shuts down, your AI agent goes offline with it.
That’s where a VPS changes everything. By hosting OpenClaw on a VPS, your AI agent stays online 24/7, responding instantly. Still, many users run into frustrating roadblocks along the way with issues like missing Docker installations, incorrect .env configurations, blocked ports and lost gateway tokens.
We’ll help you learn how to set up OpenClaw on an Ubuntu VPS using Docker, right from scratch. We’ll start from your first SSH login all the way to a fully working live AI agent.
We’ll explain each step clearly so you can avoid common issues and get things running smoothly.
| Note: This guide uses Docker Compose, the recommended method for VPS deployments because it keeps everything clean, isolated, and easy to update. |
What Is OpenClaw and How Does It Work?
OpenClaw is best understood as a self-hosted AI assistant gateway that runs on your own computer or on your VPS and connects your everyday messaging apps to ChatGPT or to Claude.
It doesn’t use a traditional chatbot interface, instead, OpenClaw lets you interact with AI directly through platforms like WhatsApp,
Telegram, Discord, or Slack, acting as a connector between your messages and AI models like Claude.
It is open-source and model-agnostic, which means that you can fully control it, choose which AI model to use, what data it can access and how it integrates with your workflows.
See! OpenClaw works as a main “gateway” that receives messages from messaging apps, processes them using an AI model and then does actions using tools. When you send a command, it flows through this gateway, where the system decides what needs to be done and calls the right tools, be it reading files or automating a browser.
This structure turns it from a simple chatbot into a full AI agent that can actually perform your tasks, making it more like an employee working for you, available for you 24/7.
Core Architecture
To really understand OpenClaw, it is more like a man working for you behind the scenes.
At the center of everything is the “gateway”!
- This is the main process running on your VPS, quietly receiving messages and deciding where they should go. Think of it as the brain’s front desk. Whenever you send a message from WhatsApp, it first lands here.
- These messaging platforms are simply the interface you interact with, See! They don’t do any work, they simply pass your requests along.
- Once a message reaches the gateway, the real thing begins. The request is forwarded to an AI model like Claude, GPT, which analyzes what you want.
- OpenClaw doesn’t just generate a response! This is where “skills” come into play. These are plugins that let your AI agent actually do things, like checking your Gmail, managing GitHub or even controlling a browser.
All four things starting from the gateway, messaging apps, AI model and skills, they work together, turning a message into an actual activity.
Why Docker for OpenClaw?
Did you ever try setting up software manually? You might know how messy things can get due to problems like outdated versions, missing dependencies, broken installs.
That’s exactly why Docker is really important for OpenClaw.
- Instead of installing everything step-by-step, Docker packs OpenClaw and all its dependencies (like its codes, library) into an isolated container.
- You do not need to worry about Node.js versions or system compatibility, it just works the same way everywhere.
- And then comes Docker Compose, which makes the whole setup feel almost effortless. You can define everything in a single configuration file and bring it all up with one command.
- Even the updating part is really smooth. Simply, pull the latest image, restart and you’re done. And while updating, your data doesn’t disappear when containers restart.
So you get a setup that’s clean and is easy to maintain in the future.
Key Concepts to Understand Before Starting
See! Before you jump into the OpenClaw setup on VPS, there are a few things that will save you a lot of confusion later. Means it’s going to make your setup process easy. Let’s check it out:
- First is the .env file! This is where all your sensitive configuration stays, like API keys and port settings. It’s basically the control panel and it’s important to keep it private.
- Along with that, you’ll come across the OPENCLAW_GATEWAY_TOKEN, which acts like a password for accessing your OpenClaw dashboard. This is generated automatically during setup.
- You’ll also see that OpenClaw runs on a specific port, typically 18789. If that port is blocked by your firewall, your setup might look fine but you won’t be able to access OpenClaw.
Just knowing what these do, gives you a big advantage when something doesn’t work as expected.
Use Cases
Once everything is up and running, this is where OpenClaw really starts to feel powerful.
- For personal use, it can act like a smart AI assistant living inside your messaging apps, setting reminders, managing your calendar, reminding you of your girlfriend’s birthday 😀. It’s like having a real professional helper (like Iron Man’s Jarvis) quietly working in the background.
- Even the SEO specialists can use OpenClaw to scrap websites for audit, compile reports and collect information related to the keywords and backlinks.
- For developers, the possibilities expand even further. You can trigger scripts, manage GitHub repositories or even automate CI/CD workflows, all through simple chat commands.
- Project Teams can share a single AI assistant within a trusted environment, working with it like a collaborative tool. And if you’re into data workflows, OpenClaw can keep working even when you’re offline.
Why You Should Setup OpenClaw on a VPS
If you’re serious about using OpenClaw (not just experimenting with OpenClaw, but to use it for your heavy projects), running it on a VPS is really important.
On a local system, everything depends on your laptop.
If it shuts down, sleeps, or loses internet, your AI agent instantly goes offline. That might be fine for testing, but it quickly becomes a problem when you expect your assistant to do your work consistently.
A VPS, on the other hand, keeps OpenClaw running 24/7 in the background, so your bot is always available no matter what.
There’s also a difference seen in performance.
On your local PC, speed depends on your internet connection and your system load, (when you open too many apps, the relevant things slow down). With a VPS, you’re working with dedicated internet connection and a controlled setup, which makes interactions smoother.
Security is another important thing. Instead of storing sensitive API keys on your computer, a VPS gives you an isolated, fully controlled server, where everything is easier to manage securely.
There’s one more thing that we’ll like to tell you!
A local computer ties you to your own network, but a VPS lets you connect from anywhere (in the world) using an SSH key. Let’s say you’re traveling or working with a team, your OpenClaw instance stays within your reach.
Local System vs VPS: Key Differences
To help you understand better, we’ve added a table to tell you the difference properly. You can get the entire picture about the difference in setting OpenClaw in Local System and VPS from the table given below.
| On What Basis? | Local System | YouStable VPS |
| Uptime | Only when PC is on | 24/7 Always on |
| Speed | Depends on your internet | Dedicated bandwidth |
| Security | API keys on personal machine | Isolated, root-controlled |
| Access | Only from your network | From anywhere via SSH |
| Cost | Power + hardware wear | Fixed monthly cost |
When VPS Becomes Necessary
If you want consistency and want your AI agent to work 24/7, that’s where a VPS becomes necessary.
For example, if you want your AI agent to keep running even when your laptop is shut down, a VPS is the only solution.
The same applies when you start using messaging platforms that rely on webhooks. It is because webhooks require a stable IP address, something a local setup can’t guarantee.
- A VPS also becomes important when your usage grows. If multiple team members need access to the same bot, hosting it at one place (like, VPS) makes collaboration easy.
- And if you’re running heavier tasks, like browser automation that consumes RAM, a VPS gives you the resources to handle those spikes without crashing your personal system.
This is the point where switching from a local system to VPS is important for scalability.
Minimum VPS Requirements for OpenClaw (2026)
When it comes to running OpenClaw smoothly on a VPS, choosing the right configuration makes all the difference.
At the very basic level, you can get started with a minimum setup of:
- 1 vCPU
- 2 GB RAM
- 20 GB SSD storage
It is enough for a simple Telegram bot that relies only on API calls. However, this setup is quite limited and leaves no room for growth.
A more widely recommended configuration (that our expert team also has suggested) is:
- 2 vCPU
- 4 to 8 GB RAM and
- 50 to 100 GB NVMe storage
It comfortably supports a full OpenClaw setup, including browser automation and multiple integrations.
If you want to use OpenClaw for advanced use cases like running local LLMs (such as Ollama) alongside OpenClaw or supporting an entire team environment, you’ll have to scale up to
- 4+ vCPU
- 16+ GB RAM
- and 100+ GB NVMe storage
This config helps you avoid performance bottlenecks.
You might be having a question, Why not choose 1 GB RAM to reduce the cost further? It is because it often fails during Docker image builds due to memory errors, so in practice, 2 GB RAM should be treated as the starting line.
Which OS? Use Ubuntu 22.04 LTS. It is the safest choice. Make sure your VPS uses KVM virtualisation, as Docker does not run properly on OpenVZ-based systems. This is a common mistake that can completely block your setup.
| If you’re looking for a balanced setup that handles any type of projects, a plan with 2 vCPU, 8 GB RAM, and 100 GB NVMe storage is a solid choice. It is enough for browser automation, multiple integrations and stable performance without running into resource limits too quickly. |
Things You Need Before Starting
Before you even open your terminal (Windows Button + R), it’s worth taking a few minutes to gather everything you’ll need, because missing even one of these can disturb your setup.
- First, make sure you have your VPS access details ready: the IP address, root username and password provided by your hosting panel (here, we’re going to use YouStable’s OpenClaw VPS Hosting to show the setup steps).
- Alongside that, you’ll need an SSH client to actually connect to your server. If you’re on Mac or Linux, the built-in Terminal works perfectly, while Windows users can use Windows Terminal.
- Next comes the part that runs OpenClaw, your AI provider API key. You can use either Anthropic (Claude) or OpenAI, but Anthropic is generally the recommended option for a smoother experience.
- You’ll also need a messaging platform bot token, especially if you’re starting with Telegram. This can be quickly generated using the BotFather inside the Telegram app, and it’s what allows your OpenClaw to communicate with your bot.
See! You do not need to be a Linux expert. You just need to have a basic understanding of simple commands like cd, ls, sudo, and nano.
This will make the process much easier to follow. (And even if you do not know, we’ll help you out in the steps below). These are the small things that help you move around your server and edit files.
As a quick note, if you’re unsure which AI provider to pick, go with Anthropic! OpenClaw works best with Claude models.
Step-by-Step Guide to Setup OpenClaw On VPS
Now we’re going to show the complete step-by-step process of setting up OpenClaw on your VPS, right from logging in via SSH all the way to getting your bot live and responding.
Each step is explained in a simple way so you can follow along, even if you’re doing this for the first time.
To make things even easier, we’ll also include clear screenshots at every stage, so you can visually match what you see on your screen and avoid common mistakes along the way.
Step 1) Buy a VPS and Connect to Your VPS via SSH
First of all, you need to buy an OpenClaw VPS hosting! For that, we’ve chosen YouStable’s OpenClaw VPS hosting.
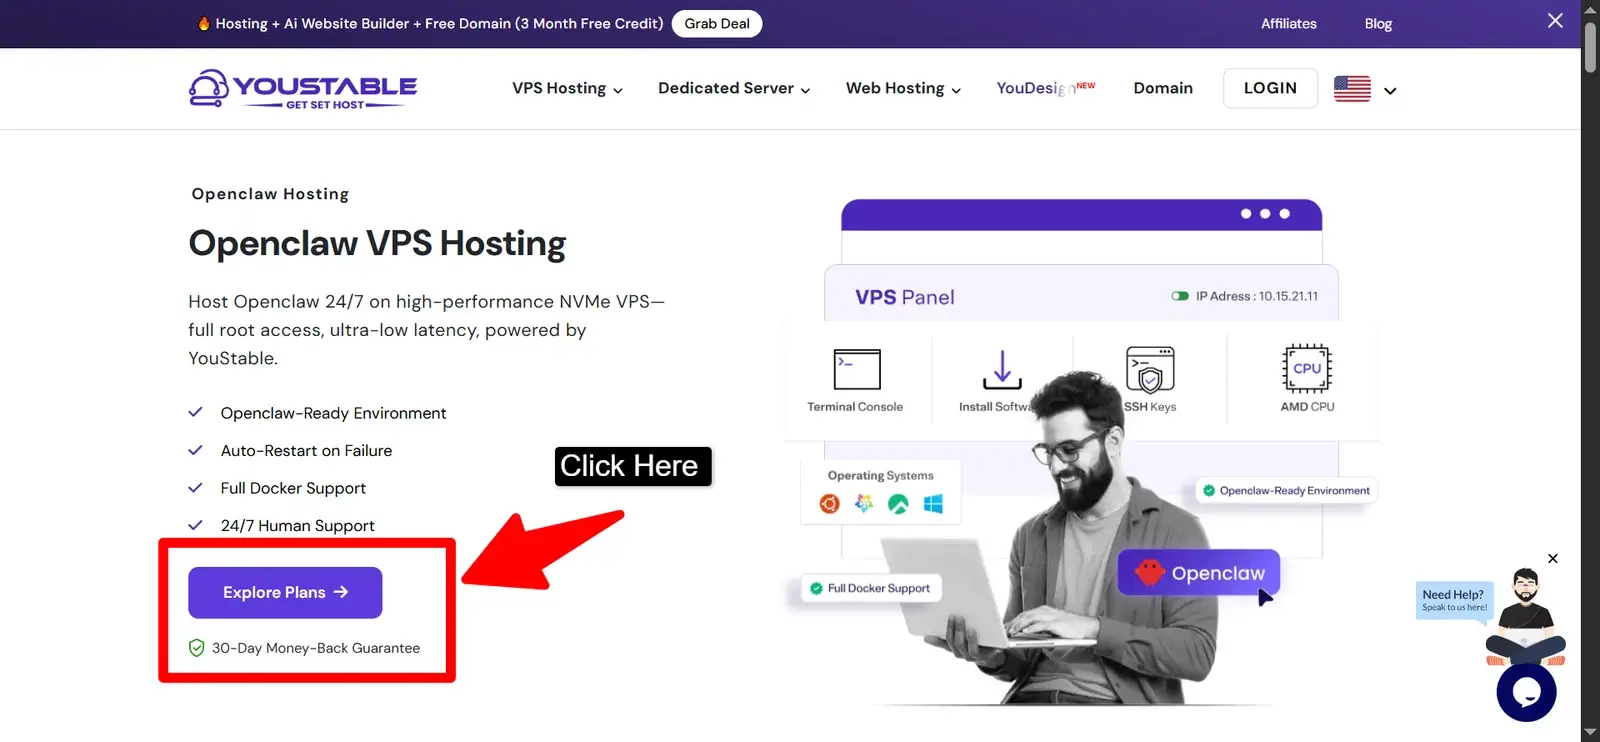
Go to the official website >> Scroll down & click the Order Now Button >> Choose the annual billing plan to save more >> press the checkout button >> you’ll be redirected to the payment page >> make the payment and wait for confirmation email (that also contains your VPS login credentials)

This is where everything begins! Your SSH session is like your “control panel” for the server. Think of it as remotely opening a terminal inside your VPS.
- To connect, open your Terminal (Mac/Linux) or Windows Terminal (You can also use puTTy if you’re a Windows user) and run:
ssh root@YOUR_VPS_IP
- Replace YOUR_VPS_IP with the actual IP address provided by your hosting provider (for example: 103.21.58.90).
- The first time you connect, your system will ask if you trust the host, just type yes and press Enter.
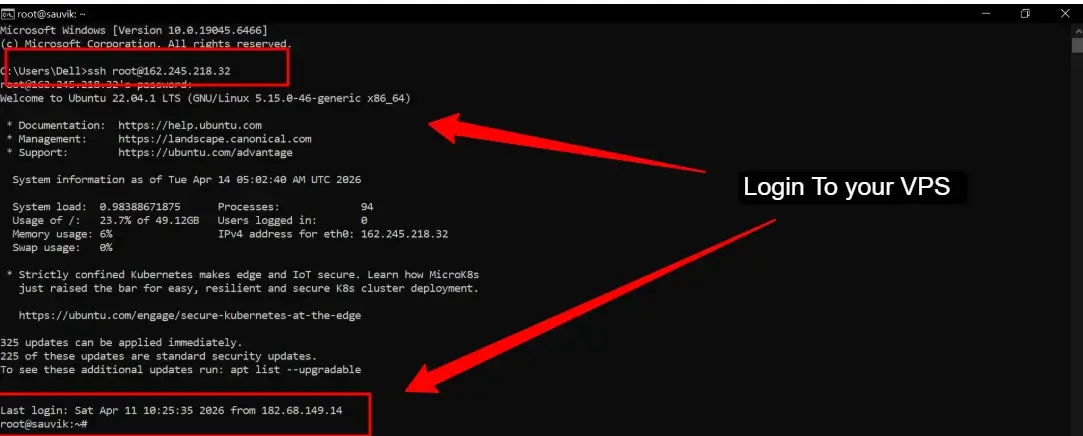
- After that, enter your root password (you won’t see it being typed, that’s normal). If something goes wrong, don’t panic.
- Errors like “Connection refused” usually mean SSH isn’t running, “Permission denied” means incorrect credentials, and a timeout often points to firewall issues (port 22 must be open).
Once you’re logged in successfully, you’re ready to start working on your server.
Step 2) Update Your Server
Before installing anything, it’s important to bring your server up to date.
- This step avoids a lot of hidden issues later, especially when installing Docker.
Run: apt update && apt upgrade -y
- This command refreshes package lists and upgrades everything to the latest stable versions.
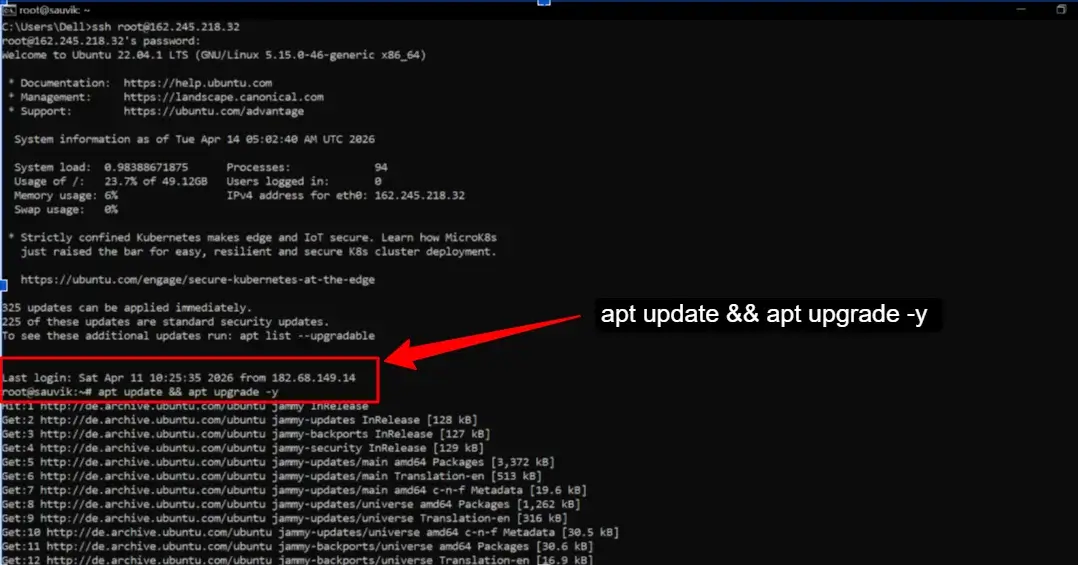
- During the process, you might be asked about restarting services, just press Enter to accept defaults. If the system suggests a reboot, go ahead and type reboot, wait about 30 seconds, and reconnect via SSH.
Skipping this step is one of the most common beginner mistakes and often leads to confusing errors later, so it’s always worth doing first.
Step 3) Install Docker on Your VPS
OpenClaw runs entirely inside Docker containers, so this is a very important step.
If you’re new to Docker or want a complete breakdown, you can also follow this detailed guide on setting up Docker properly on your server.
- Instead of installing Docker from Ubuntu’s default repositories (which are often outdated), you’ll install it from Docker’s official source. Start by installing required packages:
apt install -y ca-certificates curl gnupg lsb-release
- Then add Docker’s official repository and GPG key (this ensures you’re installing a trusted version).
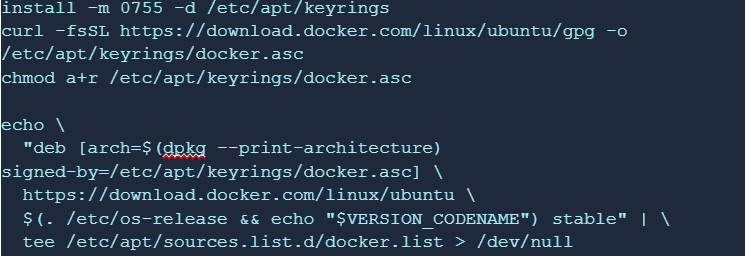
- After that, install Docker Engine:
apt update
apt install -y docker-ce docker-ce-cli containerd.io docker-buildx-plugin docker-compose-plugin
- Once installed, enable and start Docker:
systemctl enable docker
systemctl start docker
docker –version

You should see something like Docker version 26.x.x.
If you see “command not found”, the installation didn’t complete properly. Also, avoid using docker.io from apt. It often causes compatibility issues with OpenClaw.
Step 4) Verify Docker Compose
Modern Docker comes with Docker Compose built-in, which is what OpenClaw uses to manage multiple services.
- Just verify it’s working: docker compose version
- You should see version v2.x.x. If it’s missing, install it using: apt install -y docker-compose-plugin

Also note! OpenClaw uses docker compose (with a space), not the older docker-compose (with a hyphen).
This small detail trips up a lot of beginners.
Step 5) Clone the OpenClaw Repository
Now you’ll download the actual OpenClaw project files onto your server. First, install Git if needed:
apt install -y git
- Then clone the repository and enter the folder:
git clone https://github.com/openclaw-ai/openclaw.git
cd openclaw

- This creates a directory called openclaw containing all required files, including docker-compose.yml and setup scripts.
You can run ls to confirm everything is there. If Git isn’t installed, you’ll get a “command not found” error, just install it and retry.
Step 6) Configure the .env File
This is the most important step! Almost all setup issues come from incorrect .env values.
- First, create your config file:
cp .env.example .env
nano .env
- Inside this file, you’ll define your settings:
LLM_PROVIDER=anthropic
ANTHROPIC_API_KEY=your_api_key_here
GATEWAY_TOKEN=your_secure_token
MODEL_VERSION=claude-sonnet-4-5
PORT=18789

- Paste your actual API key (from Anthropic), and generate a strong gateway token using:
openssl rand -hex 32
- This token acts as your dashboard password.
- Once done, save the file using Ctrl + X, then Y, then Enter.
Never share this file publicly. It contains sensitive keys that could be abused.
Step 7) Run the Docker Setup Script
OpenClaw provides a setup script that builds and configures everything automatically. For most users, especially on smaller VPS plans, it’s best to use the pre-built image:
export OPENCLAW_IMAGE=”ghcr.io/openclaw/openclaw:latest”
Or
bash scripts/docker/setup.sh
- During setup, you’ll be asked a few questions. Just follow the prompts.

- Choose Yes to continue, select LAN access, pick Anthropic as your provider, and paste your API key when asked.
- Skip installing skills for now (you can add them later).
If you’re on a low-memory VPS (1–2 GB RAM), using the pre-built image is essential. Otherwise, the process may crash with memory errors.
Step 8) Start OpenClaw Containers
Once setup is complete, you need to start the services:
docker compose up -d
- The -d flag runs everything in the background.
- On the first run, Docker will download images, which can take a few minutes. To check if everything is running:
docker compose ps
- You should see services like openclaw-gateway running. If something fails, check logs using:
docker compose logs –tail 50
Step 9) Open Required Port in Firewall
By default, OpenClaw runs on port 18789, so you need to allow access to it:
ufw allow 22/tcp
ufw allow 18789/tcp
ufw enable
ufw status
- Port 22 is for SSH (never block it), and 18789 is for your dashboard.
- If your hosting provider has its own firewall panel, make sure the port is open there as well. You can verify the port is active using:
- ss -tlnp | grep 18789
Step 10) Access the OpenClaw Dashboard
Now comes the exciting part! Open your browser and go to:
http://YOUR_VPS_IP:18789
- You’ll see a login prompt.
- Paste your GATEWAY_TOKEN from the .env file.
- If everything loads correctly, your setup is working.
If the page doesn’t load, it’s usually a firewall or port issue. If login fails, double-check your token and restart containers.
| One important thing: OpenClaw may not load directly via public IP. You’ll need a proxy or port forwarding layer to expose it properly, so your VPS IP becomes accessible from outside. |
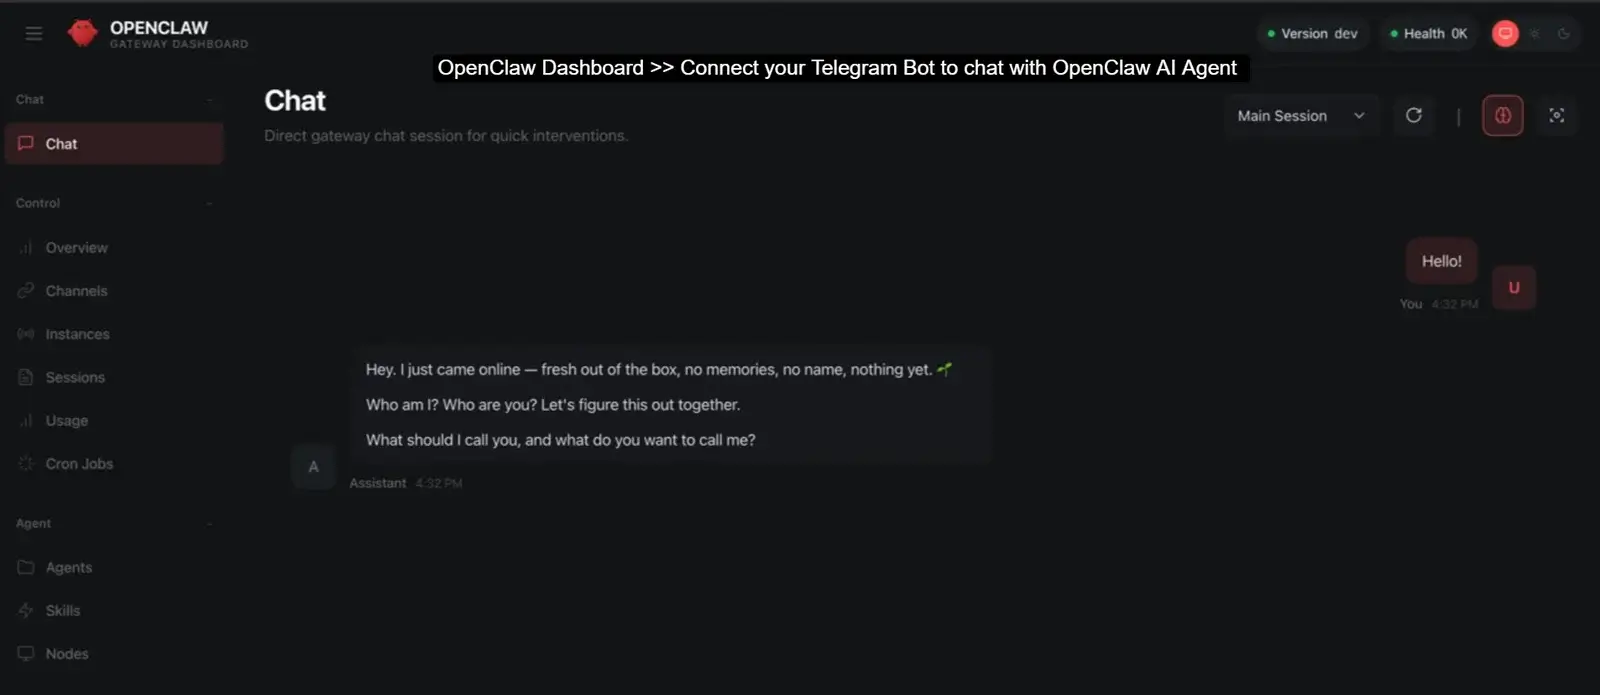
Step 11) Connect Your Messaging Platform
To actually use OpenClaw, connect it to a messaging app like Telegram.
- Start by creating a bot using @BotFather in Telegram. Just send /newbot and follow the steps to get your bot token.
- Then link it to OpenClaw:
docker compose run –rm openclaw-cli pairing add telegram YOUR_BOT_TOKEN
- Approve the pairing:
docker compose run –rm openclaw-cli pairing approve telegram PAIRING_CODE
- Now open your bot in Telegram and send /start. If everything is set up correctly, the bot should respond.
Step 12) Final Verification: Check If Everything Is Working
Before calling it done, run a quick checklist.
Make sure your dashboard loads, containers are running, and your bot responds to messages. You can also test system health using:
curl -fsS http://127.0.0.1:18789/healthz
curl -fsS http://127.0.0.1:18789/readyz
Both should return OK.
If not, check your logs immediately. Once everything passes, congratulations, your OpenClaw setup is fully live and running on your VPS.
Common Errors and How to Fix Them
Even with a step-by-step guide, it’s completely normal to run into a few issues during the setup, especially if you’re doing this for the first time. Most OpenClaw issues aren’t that complicated; they usually are small misconfigurations or some missing resources.
See! Almost every error has a cause and a quick fix as well. Instead of guessing, it’s always better to read the error message carefully and match it with the most likely issue.
If you’re still facing issues or your setup is not working as expected, you can follow this complete guide to fix OpenClaw not working on VPS for detailed troubleshooting steps.
| The Issue | What’s the Reason For The Issue | How To Fix The Issue |
| exit code 137 during setup | Not enough RAM to build image | Use pre-built: export OPENCLAW_IMAGE=ghcr.io/openclaw/openclaw:latest |
| Port already in use | Another service on port 18789 | Change PORT in .env, update firewall rule, restart containers |
| Docker not running | Docker service stopped | Run: systemctl start docker |
| API not responding | Wrong or expired API key | Update ANTHROPIC_API_KEY in .env → docker compose restart |
| .env errors on startup | Typo or missing value in .env | Re-check .env against the example; no spaces around = signs |
| Gateway token rejected | Token mismatch between .env and login | Copy token exactly from .env file; no extra spaces |
| Bot not responding on Telegram | Pairing not approved or container down | Re-run pairing approve command; check docker compose ps |
| Container keeps restarting | Missing env variable or crash loop | Run: docker compose logs –tail 50 to see the error |
The table above covers the most common problems users face and how you can fix them without wasting hours troubleshooting.
| There is one known issue in OpenClaw. WhatsApp QR sometimes fails to connect with OpenClaw, requiring retries, refreshing, or restarting containers to resolve the connection issue. |
OpenClaw Not Working on VPS: Troubleshooting Checklist
If your OpenClaw setup isn’t working as expected, don’t worry! This is a very common stage, especially after the first installation.
The key here is to check what’s happening behind the scenes.
Most issues come down to a few repeat patterns like containers not running, ports being blocked. Instead of randomly trying to fix the problem, you can quickly narrow down the problem by running a few simple diagnostic commands.
Diagnose with These Commands
Start by checking whether your containers are actually running.
- This is the most important thing. If they’re not up, nothing else will work. Run: docker compose ps, to see the status of your services. If something looks off, the next step is to inspect the logs using docker compose logs –tail 50, which will usually point you directly to the error.
- After that, shift your focus to networking. Use ufw status to confirm that port 18789 is allowed through the firewall or not and then verify if the service is actually listening on that port with ss -tlnp | grep 18789. These two checks together help you solve the “site not reachable” issues.
- Next, double-check your configuration. A quick cat .env | grep ANTHROPIC ensures your API key is present and correctly set.
- Finally, test if the OpenClaw gateway itself is alive internally by running http://127.0.0.1:18789/healthz. If this returns a response, your application is running, which means the issue is likely external (like firewall), not the app itself.
Common Root Causes
In most cases, the problem is due to some common causes.
- The biggest problem by far is the firewall blocking port 18789! As per our analysis, this can happen at two levels: inside your VPS (via ufw) and at the hosting provider level. Both need to allow the port.
- Another frequent mistake is using the wrong VPS IP! Always copy it directly from your hosting panel, not from the SSH session, which can sometimes be misleading.
- Resource limitations are another hidden issue. If your VPS has low RAM, tasks like browser automation can crash the OpenClaw gateway.
In such cases, upgrading your plan is often the only stable fix. Sometimes, containers may fail simply because Docker wasn’t fully ready. So, in that case, a quick reboot followed by docker compose up -d usually resolves this.
And also, do not ignore your API key and you need to see if it’s expired or deactivated. OpenClaw won’t be able to process requests at all, so always verify it from your provider dashboard.
Best VPS Setup for OpenClaw Performance
If you want OpenClaw to go fast, your VPS setup really plays a huge role in this.
A lot of users get the installation right but still face slow responses or unresponsive bots simply because the server isn’t properly sized.
The main thing is to match your VPS resources with how you actually plan to use OpenClaw, be it basic messaging automation or heavier workflows like browser tasks.
Resource Recommendations
Let’s start with the practical configurations.
For standard usage like Telegram bots, a setup with
- 2 vCPU, 4 to 8 GB RAM, and around 50 GB NVMe storage is more than enough and keeps things smooth.
But the moment you enable browser automation, your resource needs jump significantly. These tasks consume more RAM and CPU unpredictably, so moving to at least
- 8 GB RAM and 100 GB NVMe becomes important to avoid slowdowns or crashes.
If you’re planning something more advanced, like running a local LLM, alongside OpenClaw, then you’re stepping into a heavier workload category. In that case, you’ll want
- 4+ vCPU, 16+ GB RAM, and at least 100 GB NVMe storage.
This ensures your system can handle both the AI processing and the OpenClaw gateway without bottlenecks.
Why NVMe Storage Matters for OpenClaw
Storage might seem like a small detail, but with OpenClaw, it actually has a noticeable impact on performance.
NVMe storage is good, especially when it comes to random operations. This matters because Docker depends heavily on layer caching. So, faster storage means quicker updates and faster container restarts.
On top of that, OpenClaw constantly writes session logs and memory data. These are stored locally (often in JSON format), and slower storage can lead to delays when reading this data.
Over time, as your usage grows, this difference becomes even more noticeable. To sum up, we want to say that NVMe helps your bot feel responsive instead of laggy.
Choosing the Right VPS for OpenClaw
Other than basic configurations, the type of VPS you choose also affects stability.
- OpenClaw works best in a predictable environment, so avoid VPS providers that have a record of inconsistent performance. One of the most important requirements is KVM virtualization. Docker doesn’t run properly on OpenVZ-based systems, so this is very important.
- You’ll also want a dedicated IPv4 address. This ensures stable access to your dashboard and consistent webhook communication with messaging platforms.
- Location matters too! Choosing a data center close to your users reduces latency, which directly improves how quickly your bot responds.
- If you’re looking for a balanced option, a VPS plan with 2 vCPU, 8 GB RAM, and 100 GB NVMe storage is a strong middle ground. It gives you enough performance headroom for most OpenClaw use cases, including browser automation.
YouStable’s OpenClaw VPS Hosting is the good choice as it offers a virtual server at the most affordable cost and along with that you can also contact the support team (Highly expert in OpenClaw Setup) via LiveChat for free. You get recommended resources to run OpenClaw at a price you love.
Tips to Improve OpenClaw Performance
Even with a good VPS, a few simple habits can make a big difference.
Keep OpenClaw Updated
First, keep OpenClaw updated! Updates often include performance improvements and bug fixes. You can do this easily by pulling the latest Docker images and restarting your containers.
Just make sure to check release notes before updating a production setup to avoid surprises.
Backup Your OpenClaw Data
Backing up your data is equally important.
OpenClaw stores its configuration and memory locally on your server, so setting up a regular backup (for example using rsync) ensures you don’t lose everything if something goes wrong.
Also, keep your API keys backed up separately, never rely on a single copy stored on the server.
Monitor Logs Regularly
Monitoring logs regularly is another underrated habit. By streaming logs in real time, you can catch small issues before they turn into major outages.
Over time, session files and logs can grow quite large, so it’s a good idea to clean up old data periodically. A simple disk space alert can save you from unexpected downtime caused by full storage.
How to Check If OpenClaw Is Working Properly
After any setup or configuration change, it’s always smart to run a quick health check.
- Start by opening your dashboard in the browser! If it loads without authentication issues, that’s a good first sign.
- Then check your containers using docker compose ps and make sure everything shows as “Up” without constant restarts.
- Next, verify the internal health of the system using the /healthz endpoint. This confirms that the gateway itself is running correctly.
- After that, test your bot directly by sending a message (for example on Telegram) and checking if you get a response within a few seconds.
- Finally, scan your logs for any ERROR or FATAL messages and keep an eye on disk usage using df -h Ideally, it should stay below 80%.
Running through this checklist regularly helps you catch issues early and ensures your OpenClaw setup stays fast and reliable over time.
FAQs
How to install OpenClaw on VPS?
Setting up OpenClaw on a VPS follows a clear sequence of steps.
• You start by connecting to your Ubuntu VPS using SSH
• Then install Docker from the official repository to ensure compatibility
• After that, you clone the OpenClaw GitHub repository
• Configure the .env file with your API key and gateway token
• And run the provided setup script.
• Once everything is configured, you simply start the containers using docker compose up -d, and your OpenClaw instance will be live.
Do I need Docker to run OpenClaw on VPS?
Yes, for VPS deployments, Docker is the most reliable way to run OpenClaw. It bundles all dependencies, including Node.js, into isolated containers, which removes compatibility issues and makes the setup much cleaner.
Why is OpenClaw not starting after docker compose?
If OpenClaw doesn’t start after running docker compose up,
• the first thing you should do is check the logs using docker compose logs –tail 50. This usually points directly to the problem.
• In most cases, the issue is something simple, like an incorrect or missing API key in the .env file, port 18789 already being used by another service, or a failed Docker image pull due to network issues.
These are all common and can be resolved quickly once identified, especially by referring back to the common errors section.
How much RAM is required for OpenClaw?
2 GB RAM as the minimum required to run OpenClaw. For a smoother experience 4 to 8 GB RAM is strongly recommended. If you attempt to build the Docker image locally, having at least 2 GB is essential, otherwise the process may fail due to memory limits.
Can I run OpenClaw on shared hosting?
No! OpenClaw cannot run on shared hosting environments. It requires Docker, which in turn needs KVM-based virtualization and full root access to the server. To run OpenClaw properly, you’ll need a VPS or a dedicated server where you have full control over the environment.
How do I update OpenClaw?
Updating OpenClaw is easy and doesn’t affect your existing data. You simply navigate to your OpenClaw directory and run docker compose pull followed by docker compose up -d. This pulls the latest version of the containers and restarts them with the updated code.
Conclusion
By now, you’ve seen that setting up OpenClaw on a VPS is so easy. It just follows a clear, structured flow.
Once you SSH into your server, install Docker, clone the repository, configure your .env file, run the setup script, and bring up the containers, everything starts falling into one place. The result is a fully independent, 24/7 AI assistant that keeps running in the background. You simply do not need to depend on your laptop.
Setting your GATEWAY_TOKEN correctly is important since it acts as your dashboard password and forgetting to open port 18789 (both in your server firewall and hosting panel) is one of the most common reasons the dashboard doesn’t load.
And whenever something doesn’t work, checking logs with docker compose logs should always be your first troubleshooting step.
If you’re ready to get started, choose YouStable OpenClaw VPS hosting as it offers KVM virtualization, NVMe storage and consistent performance that will make the entire experience smoother, giving you a powerful, self-hosted AI assistant that’s always available when you need it.