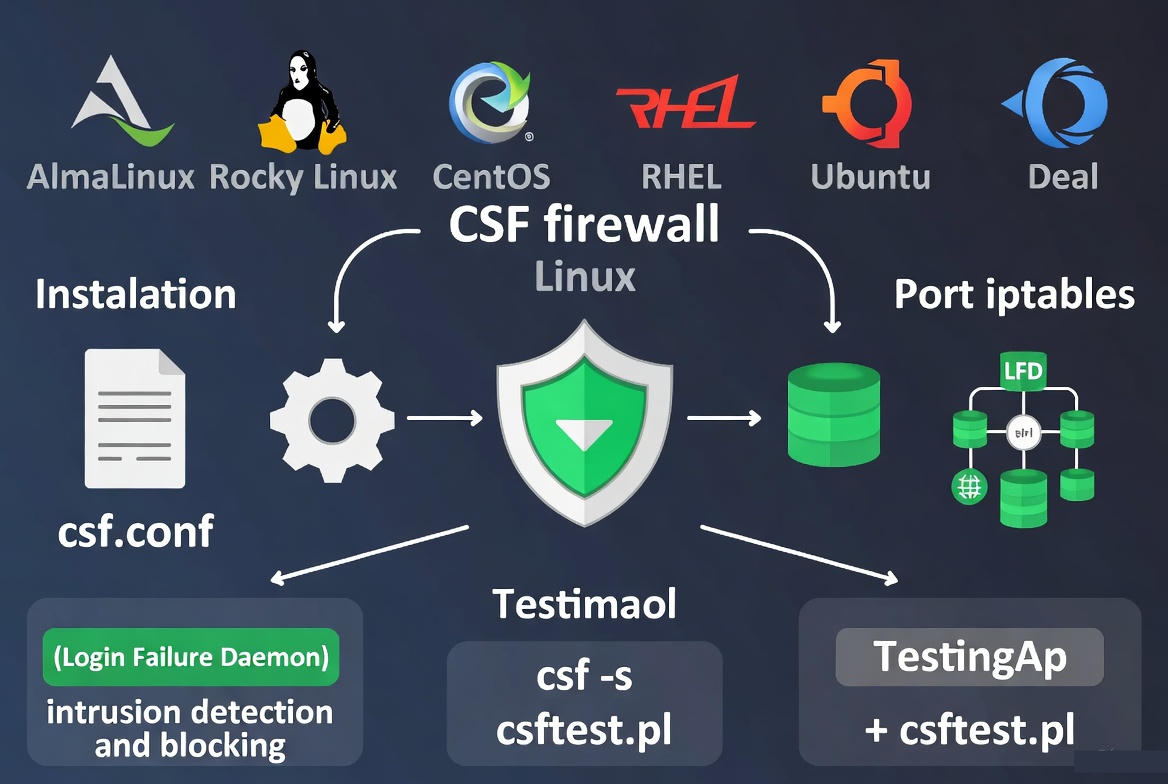
To create a CSF firewall on a Linux server, install dependencies, download CSF, run the installer, edit /etc/csf/csf.conf to add your SSH port and set TESTING = “0”, then enable CSF and LFD.
Finally, open only the required TCP/UDP ports and verify with csf -s and csftest.pl for kernel/module support. In this guide, you’ll learn how to create CSF firewall on a Linux server from scratch, configure it safely, and apply best-practice rules used on real production systems.
We’ll cover installation, must-have settings, essential commands, LFD protection, and troubleshooting—written for beginners but accurate enough for seasoned admins.
What is CSF Firewall and Why Use It?
ConfigServer Security & Firewall (CSF) is a robust Linux server firewall and security suite that manages iptables (or iptables-nft on modern distros) and adds LFD (Login Failure Daemon) to block brute-force attacks. Compared to basic tools like UFW or raw iptables, CSF offers granular rules, rate limiting, alerts, and panel integrations (cPanel, DirectAdmin, Webmin).
Primary keyword focus: CSF firewall on Linux server. Secondary keywords used naturally: install CSF, ConfigServer Security & Firewall, Linux server firewall, LFD.
Prerequisites and Supported Platforms
CSF runs on most mainstream Linux distributions and VPS/dedicated servers. You need root (or sudo) SSH access, a static IP (recommended), and iptables kernel support (the iptables-nft compatibility layer is fine on newer systems). Always keep a secondary console (VNC/ILO/Out-of-Band) to avoid lockouts.
- Tested OS families: AlmaLinux, Rocky Linux, CentOS (EOL), RHEL, Ubuntu, Debian
- Disable other firewalls to prevent conflicts: firewalld or UFW (you will replace them with CSF)
- Know your SSH port (default 22 or custom)
- Have your application ports ready (HTTP/HTTPS, mail, DB, panel, etc.)
Step-by-Step: Install and Create CSF Firewall on Linux Server
1) Update System and Install Dependencies
Ensure your server is up to date and has the required Perl modules and tools.
# RHEL/AlmaLinux/Rocky
sudo dnf -y update
sudo dnf -y install perl perl-libwww-perl.noarch perl-LWP-Protocol-https tar wget curl unzip

# Ubuntu/Debian
sudo apt update && sudo apt -y upgrade
sudo apt -y install perl libwww-perl liblwp-protocol-https-perl tar wget curl unzip
2) Stop and Disable firewalld or UFW
CSF manages iptables directly. Disable native firewalls to avoid rule conflicts.
# RHEL/AlmaLinux/Rocky (firewalld)
sudo systemctl stop firewalld
sudo systemctl disable firewalld
sudo systemctl mask firewalld

# Ubuntu/Debian (UFW)
sudo ufw disable
sudo systemctl stop ufw
sudo systemctl disable ufw
3) Download and Install CSF
Fetch the official tarball, extract, and run the installer.
cd /usr/src
sudo wget https://download.configserver.com/csf.tgz
sudo tar -xzf csf.tgz
cd csf
sudo sh install.sh
Validate your environment:
sudo perl /usr/local/csf/bin/csftest.plIf iptables modules are missing, fix kernel dependencies or ensure iptables-nft is present.
4) Prepare Safe Access: Allow SSH and Required Ports
Before taking CSF out of testing mode, ensure your SSH port and essential services are allowed in /etc/csf/csf.conf. Replace 22 with your custom SSH port if changed.
sudo nano /etc/csf/csf.conf

# Adjust these lines (examples):
TCP_IN = "22,80,443"
TCP_OUT = "80,443,53"
UDP_IN = "53"
UDP_OUT = "53,123"
IPV6 = "0"    # Set to "1" if you actively use IPv6
# For email servers add: 25,465,587,110,143,993,995
# For MySQL remote access add: 3306 (use carefully, prefer local only)
Optionally whitelist your management IP to prevent accidental lockout:
sudo csf -a YOUR.IP.ADDR.ESS "Admin workstation"5) Turn Off Testing Mode and Enable CSF/LFD
CSF installs with TESTING = “1”. Switch it off only after SSH and required ports are set.
sudo sed -i 's/^TESTING = .*/TESTING = "0"/' /etc/csf/csf.conf
sudo systemctl enable csf lfd
sudo systemctl start csf lfd

# or explicitly:
sudo csf -e     # enable firewall
sudo csf -r     # reload rules
Confirm status and rule load:
sudo csf -s    # show status
sudo csf -l    # list current rules
Essential CSF and LFD Commands
- Reload rules after edits: csf -r
- Disable/Enable firewall quickly: csf -x / csf -e
- Allowlist IP (permanent): csf -a IP
- Temp allowlist with expiry: csf -ta IP 3600
- Deny/Unblock IP: csf -d IP / csf -dr IP
- Check logs: tail -f /var/log/lfd.log and /var/log/messages
- Uninstall (from csf folder): sh uninstall.sh
Configure LFD: Active Brute-Force Protection
LFD monitors auth logs and triggers blocks via CSF when it detects repeated failures. Key options live in /etc/csf/csf.conf; tune based on your risk tolerance and workload.
sudo nano /etc/csf/csf.conf

# Popular hardening options (examples):
LF_SSHD = "5"           # SSH failures before block
LF_SSHD_PERM = "1"      # Enable permanent blocks for SSH
CT_LIMIT = "100"        # Connection tracking limit
CT_INTERVAL = "30"      # Check interval in seconds
SYNFLOOD = "1"
SYNFLOOD_RATE = "100/s"
SYNFLOOD_BURST = "150"
PORTFLOOD = "80;tcp;20;10,443;tcp;20;10"  # rate limit HTTP/HTTPS
CC_DENY = ""            # Block countries (use sparingly)
CC_ALLOW = ""           # Allow-only list (restrictive)
After tuning, reload CSF:
sudo csf -rOpen Ports for Common Stacks (Examples)
- Web servers: 80 (HTTP), 443 (HTTPS)
- SSH: 22 or your custom port
- DNS: 53 (TCP/UDP)
- Mail: 25, 465, 587, 110, 143, 993, 995
- Databases: 3306 (MySQL/MariaDB), 5432 (PostgreSQL) — prefer local-only
- cPanel/WHM: 2082, 2083, 2086, 2087, 2095, 2096
- Plesk: 8443; DirectAdmin: 2222; Webmin: 10000
Edit TCP_IN, TCP_OUT, UDP_IN, and UDP_OUT accordingly, then sudo csf -r to apply. Only open ports you truly need.
Best-Practice Rules and Hardening Tips
- Lock in your SSH port and allowlist your admin IPs first to avoid lockouts.
- Keep TESTING = “1” until ports are confirmed, then switch to “0”.
- Use PORTFLOOD and CT_LIMIT to rate-limit abusive traffic.
- Enable SYNFLOOD for basic SYN flood mitigation.
- Don’t overuse CC_DENY/CC_ALLOW; it can create maintenance headaches.
- Monitor /var/log/lfd.log for patterns and tune thresholds gradually.
- Back up csf.conf and related files before major edits.
- In cPanel/DirectAdmin environments, use CSF’s GUI for safer changes.
Troubleshooting and Safe Recovery
- Locked out after enabling CSF? Use your provider’s console (VNC/ILO) to revert TESTING = “1” or remove conflicting rules.
- Flushed rules for diagnosis: csf -x (disable), then csf -e when fixed.
- Check module support with csftest.pl and ensure iptables-nft is installed on modern distros.
- Conflicting firewalls: ensure firewalld/UFW are fully disabled.
- Service-specific issues: verify ports with ss -tulpn and that they’re present in TCP_IN/UDP_IN.
Real-World Example: Minimal Web Server Policy
This example allows SSH, HTTP/HTTPS, and DNS resolution out, suitable for a basic web server without mail. Adjust to your setup.
# /etc/csf/csf.conf (excerpt)
TESTING = "0"
TCP_IN = "22,80,443"
TCP_OUT = "80,443,53"
UDP_IN = ""
UDP_OUT = "53,123"
LF_SSHD = "5"
CT_LIMIT = "100"
SYNFLOOD = "1"
PORTFLOOD = "80;tcp;20;10,443;tcp;20;10"
Apply and verify:
sudo csf -r
sudo csf -s
curl -I https://yourdomain.tld
sudo tail -f /var/log/lfd.log
CSF vs UFW/Firewalld (Quick Perspective)
- UFW/Firewalld: Simpler interface for iptables/nftables; fine for basic rules.
- CSF: Adds security layers (LFD, rate limiting, login tracking), richer automation, and hosting-panel integration; ideal for production hosting servers.
Need a Managed Setup?
If you prefer a hardened, production-ready CSF configuration with 24/7 monitoring, YouStable’s managed VPS and dedicated servers ship with security best practices, proactive patching, and CSF/LFD tuning tailored to your stack—so you can focus on applications, not firewall minutiae.
FAQs
What is CSF and how is it different from a basic firewall?
CSF (ConfigServer Security & Firewall) manages iptables rules and adds LFD for active intrusion prevention. Unlike UFW/firewalld, CSF provides login failure detection, rate limiting, alerting, and cPanel/DirectAdmin/Webmin integration—ideal for hosting workloads.
Does CSF work with nftables?
Yes, On modern distros, CSF works through the iptables-nft compatibility layer. Ensure iptables-nft is available and that csftest.pl reports the necessary modules. You don’t need legacy iptables if the nft backend is present.
How do I open or close ports in CSF?
Edit /etc/csf/csf.conf and adjust TCP_IN, TCP_OUT, UDP_IN, and UDP_OUT. Example: add 8080 to TCP_IN to allow inbound web apps. Save, then run sudo csf -r to reload rules.
How do I whitelist or block an IP?
Use csf -a IP to allowlist permanently, csf -ta IP 3600 to allowlist temporarily, csf -d IP to block, and csf -dr IP to remove a block. You can also edit /etc/csf/csf.allow and /etc/csf/csf.deny directly.
How do I prevent locking myself out?
Before disabling testing mode, add your SSH port to TCP_IN and allowlist your admin IP with csf -a. Keep a console (VNC/ILO) ready. If needed, set TESTING = “1” to auto-flush rules during initial setup.