Is Go-Daddy hurting the price tag they charge for hosrting? If you were planning to move ahead and choose the best hosting with “YouStable”, there is an easy solution to it. Switching hosting to Youstable is surprisingly easy.
I will walk through easy steps on how to move your WordPress site from GoDaddy to Youstable in simple 10 super detailed steps.
You can choose to migrate your Domain along with hosting to Youstable however it’s optional that the domain registrar would be different from than hosting provider.
Lets’s see what all is required to move your website from the current hosting provider to Youstable.

UPDATE
YouStable is currently giving a special discount for the reader of this post! You can now get the best premium hosting for as little as $1.25/month (including a FREE .com domain name for the first year!). Claim your discounted Youstable hosting now.
How to migrate WordPress website from GoDaddy to Youstable:
- Choose the cheapest among the best hosting with Youstable.
- Download your WordPress files.
- Export your GoDaddy database.
- Change domain nameservers on GoDaddy or other Domain Web Registrar.
- Add your Custom Domain to Youstable.
- Transfer WordPress files to Youstable.
- Create a new database in Youstable.
- Move the database to Youstable.
- Edit Wp-Config.php file.
- Save permalinks.
In easy words, you can download your whole blog (including theme, plugins, posts, comments, photos, etc.) from GoDaddy to your local pc, add your custom domain to YouStable, and upload your blog from your Local Pc to Youstable. Trust me, it’s super easy!
Method 1:
Migrate to Youstable hosting manually (without the help of a plugin). It generally takes less than an hour to move entire Blog Website from GoDaddy to Youstable.
For the purpose of this tutorial, I’ll assume you already have a custom domain registered with Go-Daddy and looking for hosting options or trying to migrate to Youstable.
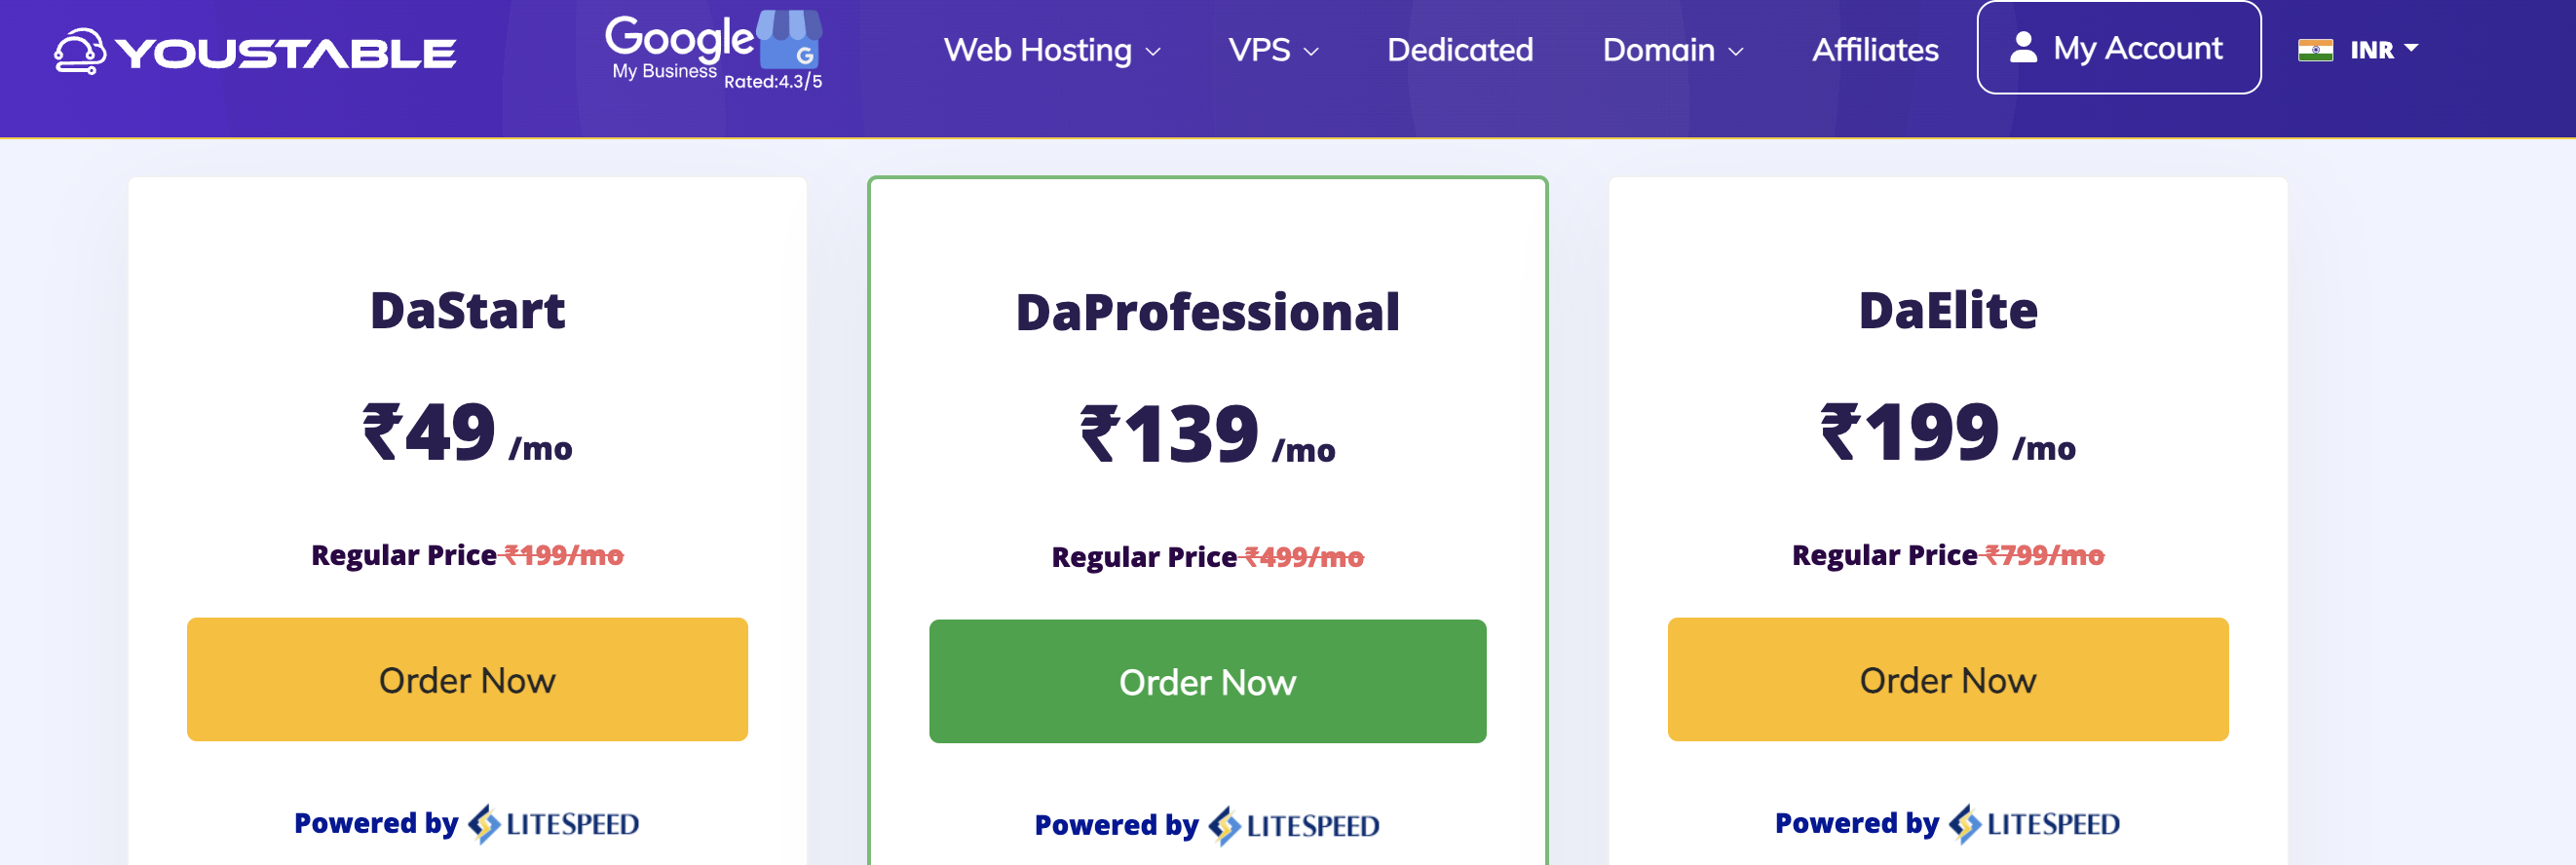
Step 1: Get hosted with Youstable
Sign up for a web hosting account with Youstable. You’ll get a 75% discount on the monthly hosting price + a free domain name for the first year. This is a special discounted price with Youstable, so you can host your blog with them for as little as Rs 95/month.
Then type in your details, choose the length of your plan (I recommend the 36-month one because you end up saving quite a bit of money), opt for Domain Privacy (optional), and pay. Lastly, you’ll be asked to create an account password. That’s it!
Why use Youstable as your web hosting provider?
- Cost-effective — only $2.95/month (when using my referral link)
- You get a free domain name with any hosting plan
- User-friendly interface
- WordPress comes preinstalled
- Fast page loading speed
- Good security options
- 24/7 exceptional customer support
- Comes highly recommending and it’s widely used by bloggers
- Still thinking, look for social media comments for Youstable.
Step 2: Download your WordPress files
a) Log into your GoDaddy account.
b) Expand the Web Hosting tab and click Manage.
c) You’ll be taken to your cPanel. Under the Files section, locate the File Manager icon and click on it.
d) A new page will open. In the left-hand side panel, look for the public_html folder. When you click on it, its contents will open in the panel to the right. These are all your WordPress files.
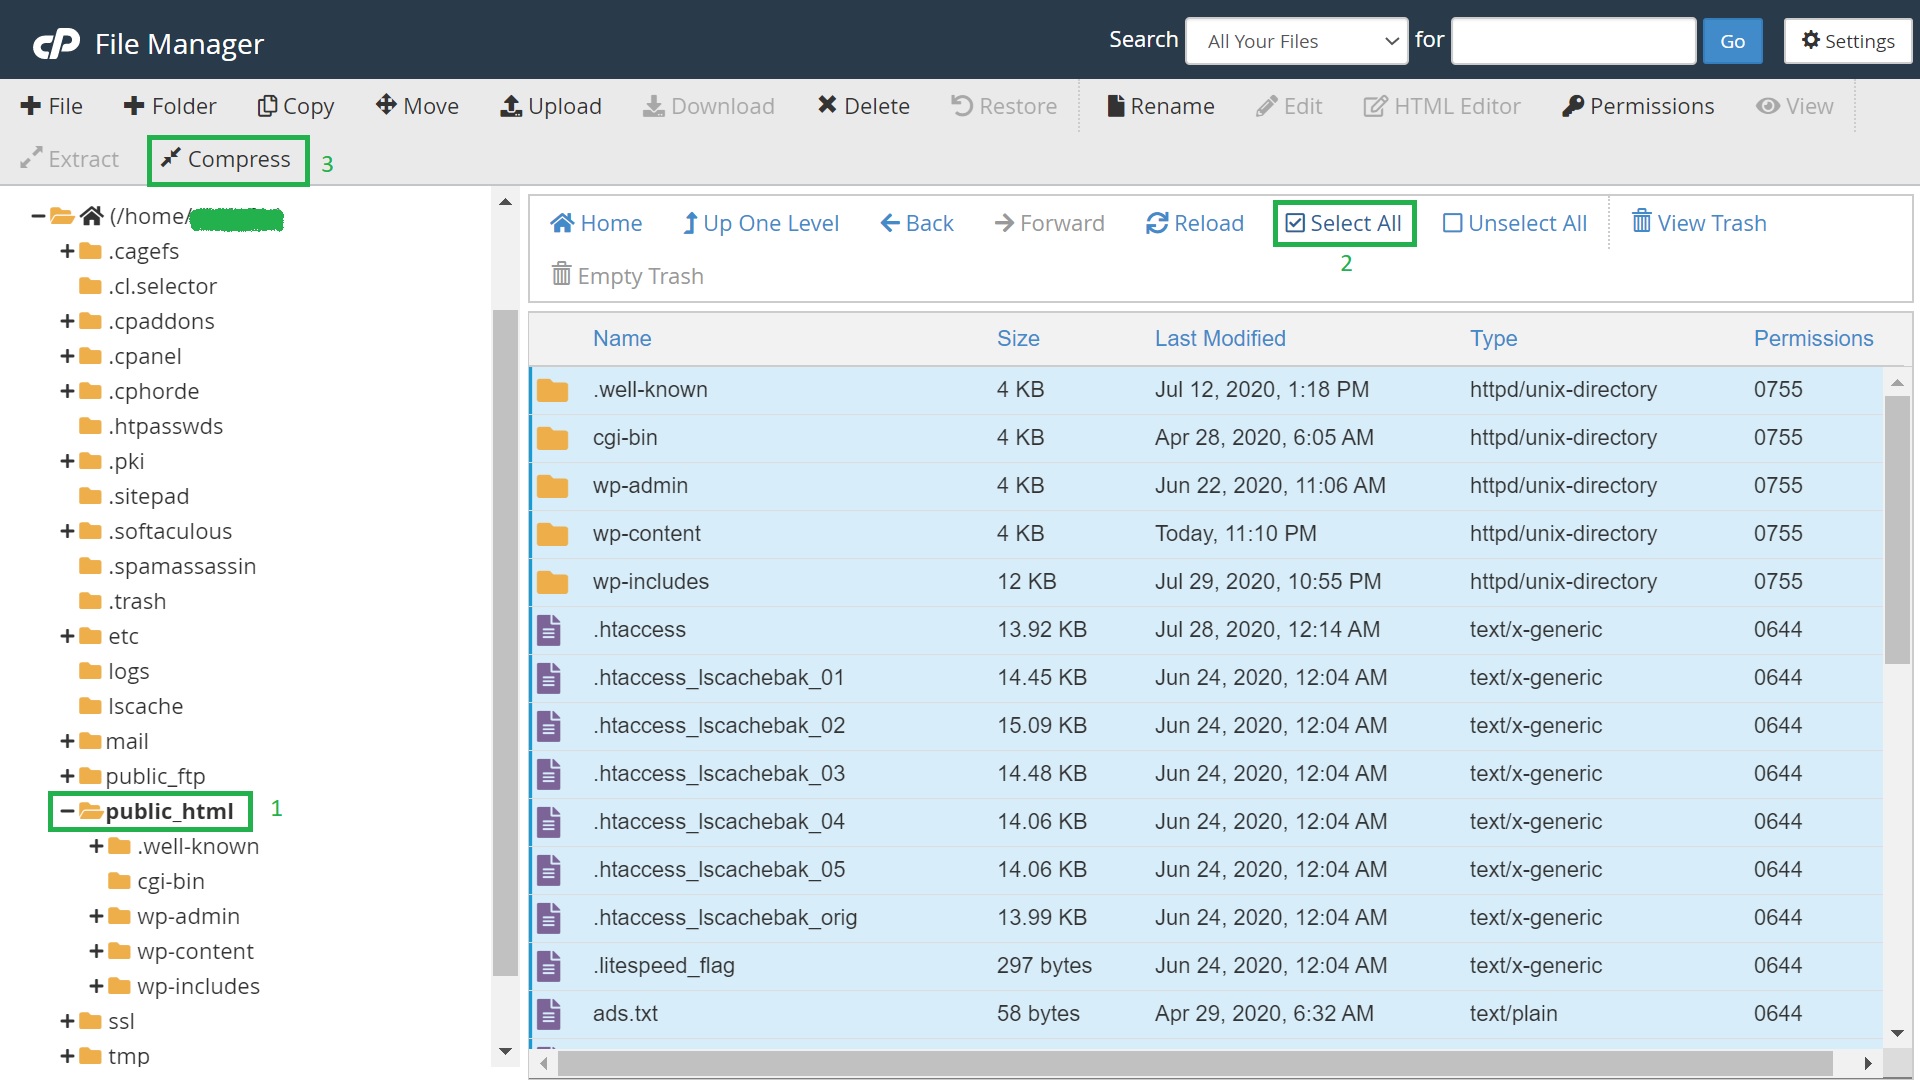
e) Select all the files and click Compress.
f) Choose Zip Archive and hit Compress files.
g) Take note of the Archive location. By default, the target location should be the very same public_html folder.
Once the compression is complete, look for the newly created zip file and click Download from the top menu to download your WordPress files to your computer.
With cPanel VPS hosting, YouStable makes it easy for you to transfer your hosting from GoDaddy.
Step 3: Export your GoDaddy database.
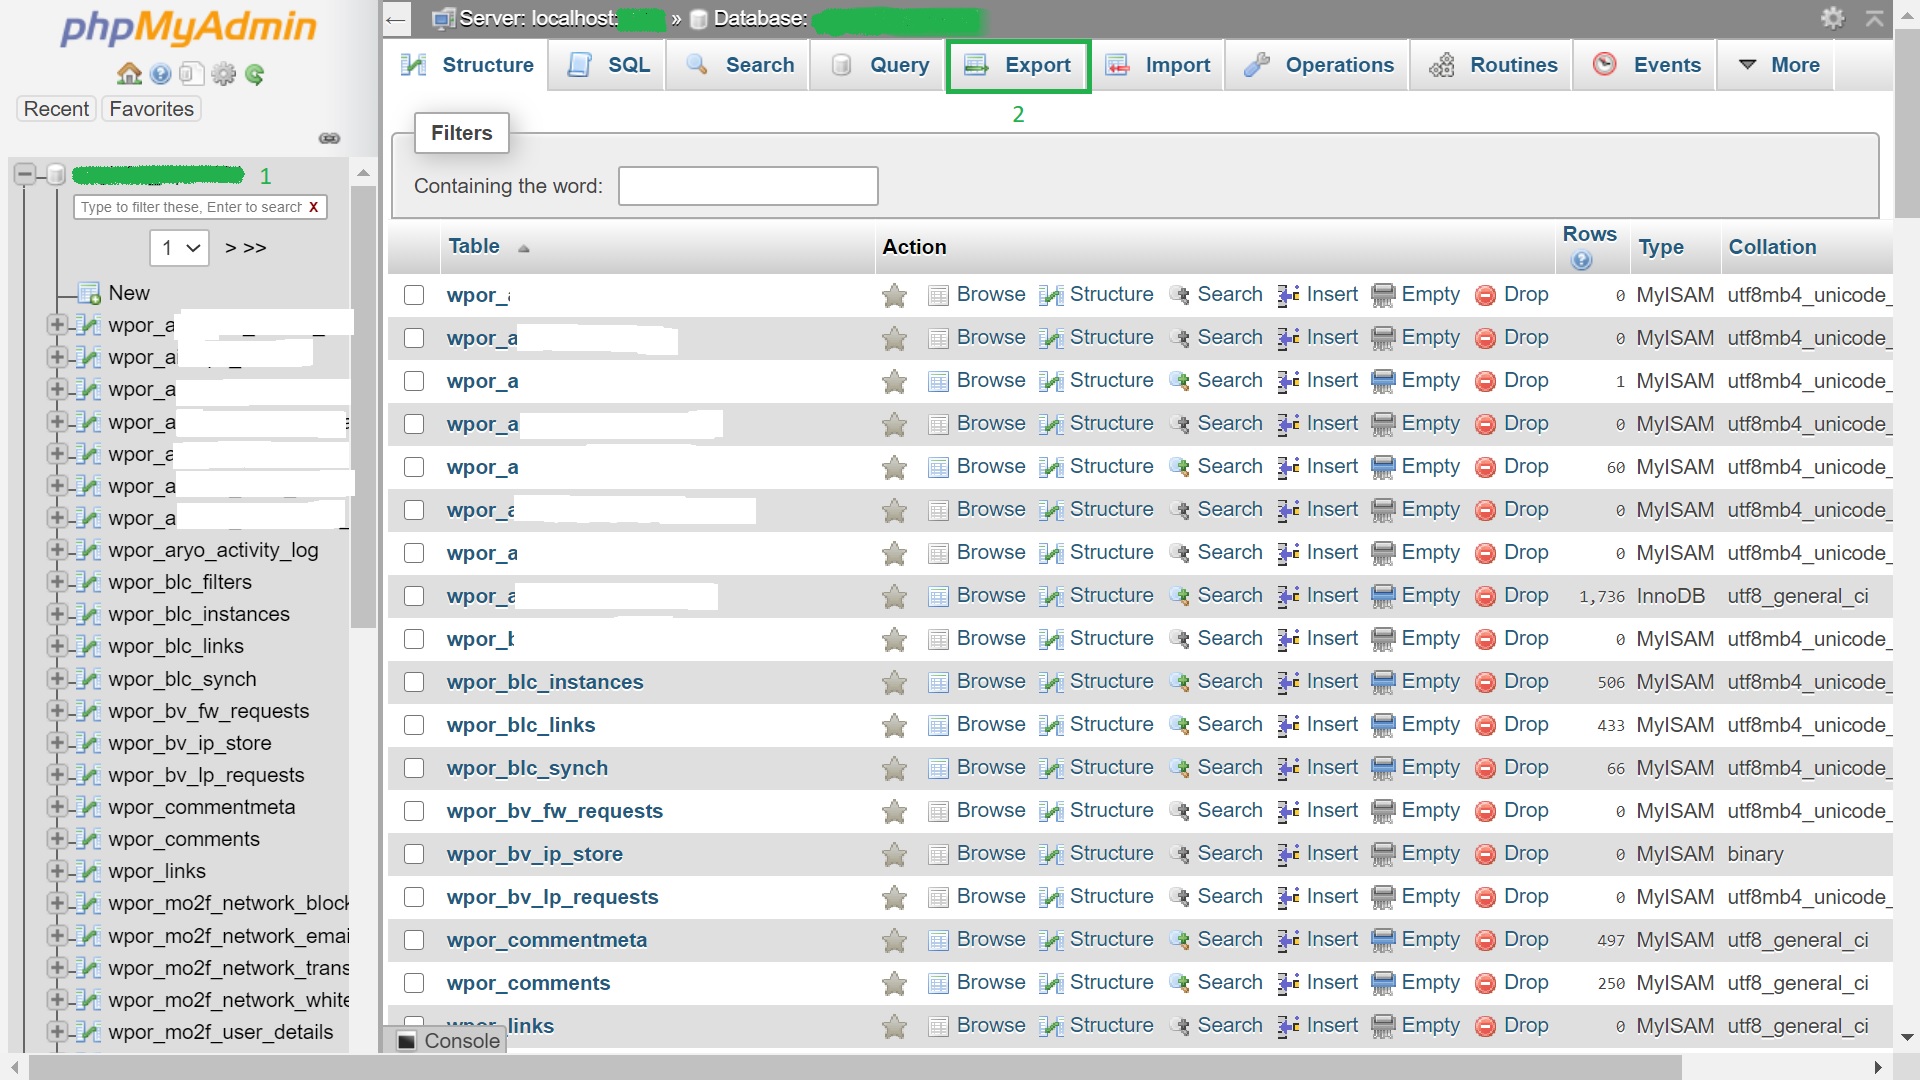
a) Go back to your cPanel and scroll down to the Databases section. Click phpMyAdmin.
b) On the left-hand side, you will see your databases. Click on your blog’s database. The database will expand to the right, and you will see various tables appearing, like comments, posts, etc.
c) Go to the top menu and click Export.
d) Choose Export method >> Quick and Format >> SQL. Hit Go. The database will be saved to your computer.
Step 4: Add your domain to Youstable Hosting.
a) Register with correct details on the website www.youstable.com – Register or Click Here.
b) Once you are logged in click this link to add your custom domain or open https://www.youstable.com/hosting/wordpress-hosting
Select the best plan according to your choice. Select I will use my existing domain and update my name-servers – Enter your custom domain as illustrated below:
c) I will recommend to go for 3 Years as it will save you lot of money. Finally click Buy Now.
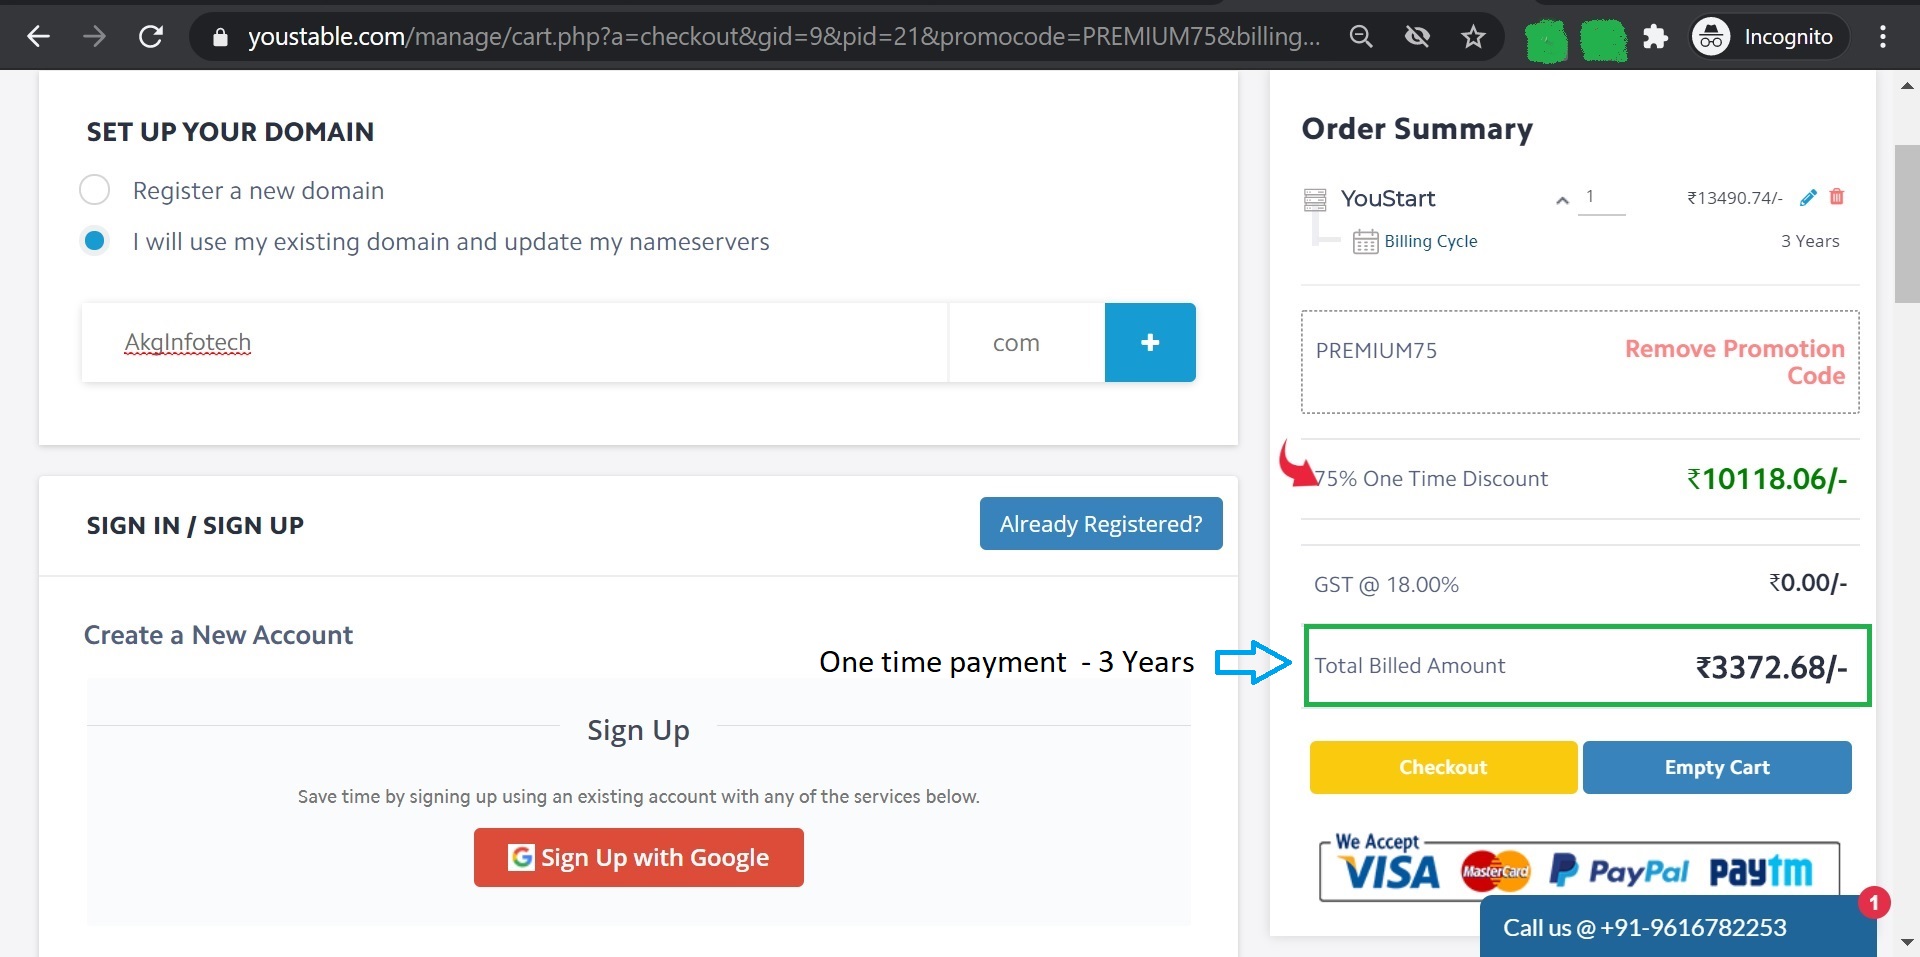
Click Checkout to proceed further with payment options. We do accept all payment modes e.g., Paytm, Debit Card, Paypal. Once your payment is processed, you receive an email confirmation along with SMS on your Mobile Number.
Step 5: Change Domain Nameservers.
a) Go back to your Go Daddy account (you can do so by clicking My Products at the top of the page) and this time expand the Domains tab.
b) Choose Manage DNS.
c) A new page will open. Scroll down until you see written Nameservers.
d) Click the Change button.
e) Replace the GoDaddy nameservers with the Youstable nameservers. The Youstable nameservers usually look like this cloud3.youstable.com cloud4.youstable.com
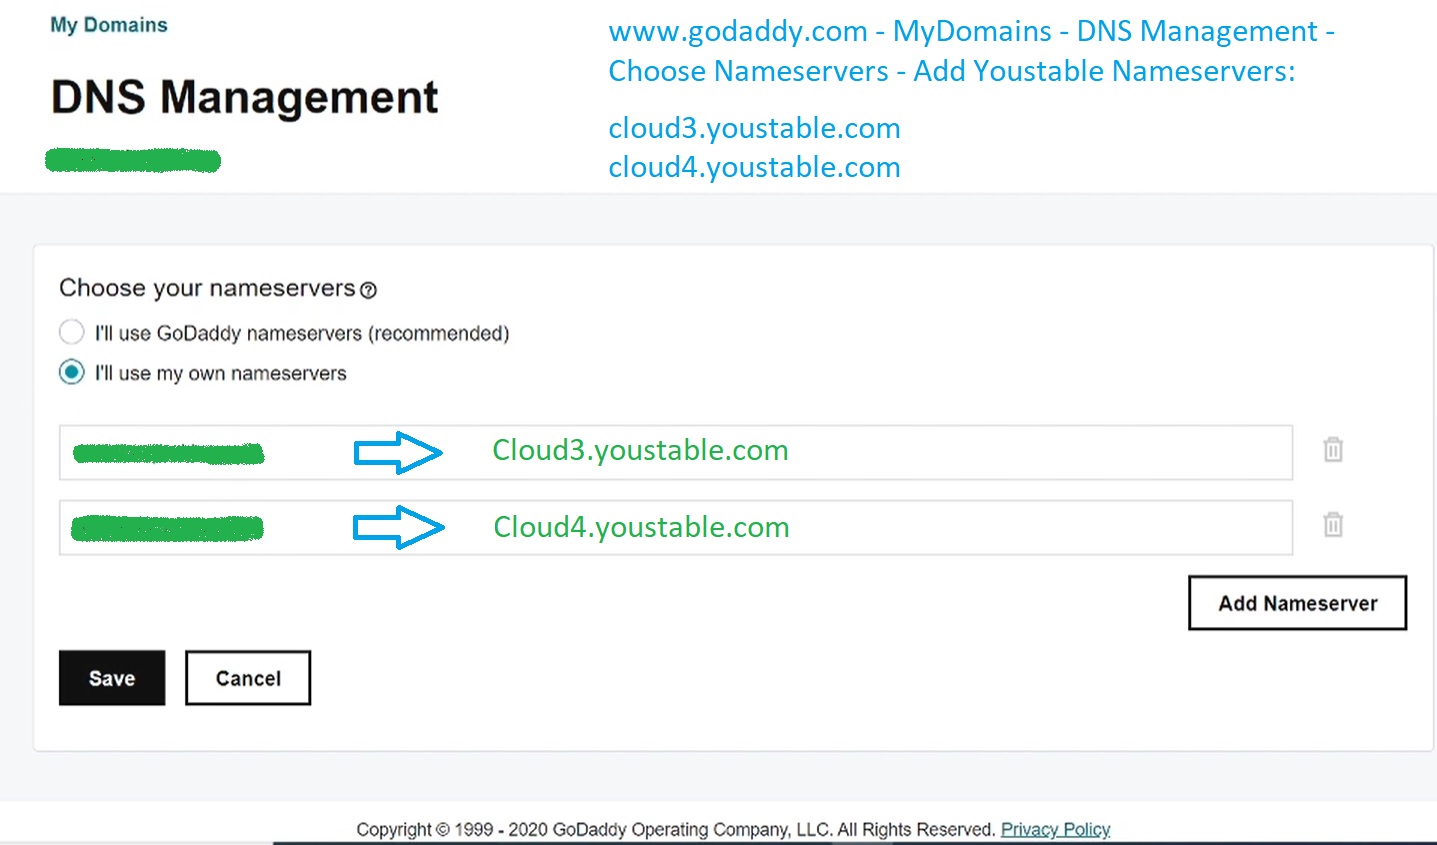
Save the changes. Now your domain will point to Youstable. You may also get the nameservers on the main page of your Youstable Account:

Step 6: Transfer WordPress files to Youstable
1) Login to your YouStable Account, under Quick-Shortcuts – click File Manager.
2) Click Public_Html – click Upload in the top menu to upload the zip file you downloaded from GoDaddy in Step 2.
3)Once the upload is complete, select the zip file and hit Extract.
Step 7: Create a new database in Youstable
1) Back to your Youstable dashboard the main page, click on MySQL Databases.
2) Create a new database. Click Create database and write down the name of the database (including the prefix) because you will need it in step 8. Your database name will look like this akgdom_DB1
Next, scroll down to add a new user, ie. user1. Add a password and write down your username, prefix included – prefix_user1 and password. Hit Create a user.
Add the newly created user to the database you’ve just created and hit Add.
Step 8: Move database to Youstable
a) Go back to the main Youstable page, and open phpMyAdmin.
b) In the left-hand side panel, look for the database you created in step 7 and click on it (if you can’t see it, click on the + sign to expand the folders). The right-hand side panel will be empty.
Import the database you downloaded from GoDaddy in step 3.
Step 9: Edit Wp-Config.php file inside Public_html
a) Go to Hosting in the top menu.
b) Just like before, scroll down to the Files section and click File Manager. A popup will open asking you to select the directory you wish to open. Tick Document Root for and select your domain name from the drop-down list. Hit Submit.
c) Select wp-config.php and open it with Code editor.
d) Now find the DB_NAME, DB_USER, DB_PASSWORD, and change the parts highlighted with the database name, username, and password created in step 7, as illustrated below:
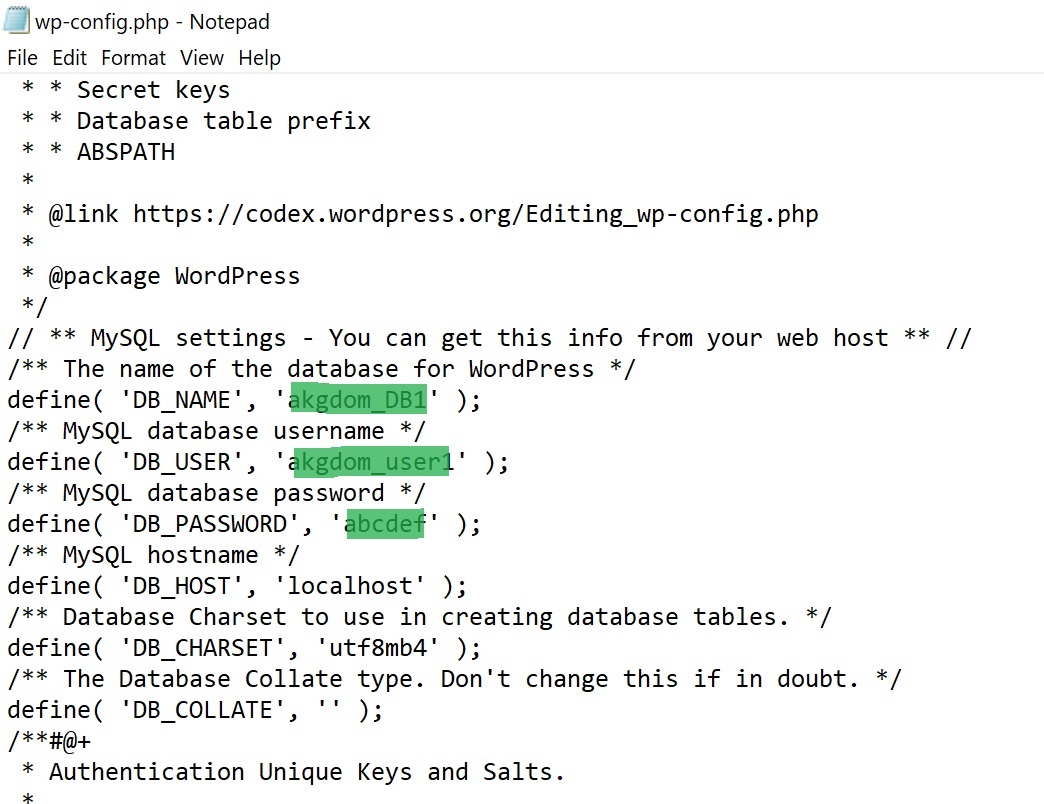
e) Save it.
Step 10: Save permalinks
a) Log into your WordPress dashboard as usual.
b) Go to Settings >> Permalinks – Simply click Save.
Method 2: Alternate method to migrate your website to YouStable.
You may use the pluggin “all-in-one-wp-migration-file-extension” and “all-in-one-wp-migration” to export all data including database, files, etc. in one file and upload it to Youstable.
Follow the easy steps below:
AT GoDaddy End:
Open www.yourdomain.com/wp-admin.
1) Login with hosting admin credentials. Click Plugins – Add New.
2) Install “all-in-one-wp-migration” plugin in Source Go-Daddy.
2) Export Site – File – Download.
3) Replace the GoDaddy nameservers with the Youstable nameservers that you received by email when you signed up for the YouStable hosting. The Youstable nameservers usually look like this cloud3.youstable.com cloud4.youstable.com. You will find the screenshot of the same above.
At YouStable End:
1) Login with hosting admin credentials. Click Plugins – Add New.
2) Install “all-in-one-wp-migration” plugin along with “all-in-one-wp-migration-file-extension”.
Note: Installing all-in-one-wp-migration-file-extension will enable file upload upto 512 Mb in target Youstable.
3) After installing both plugins, click All In One Wp Migration at left pane – Import – Select the file you downloaded above.
5) Ensure all Hyperlinks are pointing towards your domain name. This method is easy and helps brings all data from old hosting providers however hyperlinks sometimes changes to localhost. Hence, if you have hyperlinks in your website, ensure all are correctly updated.
6) Allow some time to leave the data on Go-Daddy as it may take some time for DNS to propagate.
And that’s it! Your blog should now be up and running on Youstable. At this stage, you should have successfully migrated your blog from GoDaddy to Youstable. Wasn’t that easy? It was. You will save a lot of money now and will have peace of mind.
One blog is not enough to highlight and share all the features of the service, I plead you to invest wisely and take time in analyzing which hosting provider is seriously willing to provide you with the best services. With Youstable, we assure that your website will never be down as we manage our all servers with 100% efficient backups.